🧢 Beautiful ✨ Detailed πŸ’ Adorable

Snowberry cushion cover Pattern

Snowberry cushion cover Pattern
4.8β˜… Rating
5-7 Hours Time Needed
1.2K Made This
βœ‚οΈ

Intermediate Level

Ideal for those with basic crochet experience, featuring slightly more advanced stitches and techniques to expand your skills.

⏱️

Weekend Treat

Takes 5-7 hours, making it an enjoyable project to finish over a couple of days.

🏑

Cozy Accent

A warm touch for your space that transforms ordinary corners into inviting nooks filled with handmade charm.

About This Snowberry cushion cover Pattern

This pattern creates a textured Snowberry cushion cover made from two matching rectangular squares that are sewn together to fit a 14" x 14" pillow form. It combines simple repeats and a special Sideways Puff Stitch to produce a lovely raised bobble-like texture in alternating colour bands. The pattern includes both UK and US terms and step-by-step photos to guide you.

Snowberry cushion cover Pattern crochet pattern - detailed view of completed project

You will make two identical panels, add a neat edged border and then sew the panels together around a pillow form. The pattern uses aran weight yarn in three colours and a 5 mm hook for a cosy finished cushion.

Why You'll Love This Snowberry cushion cover Pattern

I absolutely love this pattern because the Sideways Puff Stitch creates such a delicious, tactile texture that looks more complicated than it actually is. I adore how the alternating colour bands give a fresh, coastal palette and make the stitch pop. The design is practical β€” two easy-to-sew squares β€” so you can finish a polished cushion cover in a weekend. I also love that it works in both UK and US terms, so more crocheters can enjoy making it.

Snowberry cushion cover Pattern step 1 - construction progress Snowberry cushion cover Pattern step 2 - assembly progress Snowberry cushion cover Pattern step 3 - details and accessories Snowberry cushion cover Pattern step 4 - final assembly and finishing

Switch Things Up

I love how versatile this pattern is for customization! You can easily adjust the colours to create your own unique palette β€” try pastels for a soft nursery look or jewel tones for a richer, more dramatic cushion.

Want to make it bigger or smaller? Simply change your yarn weight and hook size. Using bulky yarn with a larger hook will give you a chunky, cuddly cushion, while a DK with a smaller hook creates a smaller, more delicate cover.

I often add my own creative touches like embroidered initials, tiny crocheted flowers, or a contrasting stripe for a focal band. These personal additions make each piece truly one-of-a-kind.

Try swapping the order of the colour bands or repeating a favourite colour more often to balance the design in a way that suits your decor.

For a different edge, replace the two-round border with a scalloped or crab stitch edging to add visual interest and a different finish.

I sometimes make the two panels different colours for a reversible cushion where each side has its own mood β€” one cool, one warm β€” so you can change the look easily.

If you prefer a zipper closure, sew in a concealed zipper along one edge instead of hand-sewing the final seam; this gives you an easy removable cover for laundering.

Try substituting the Sideways Puff Stitch with standard puff stitches or bobble stitches for a slightly different texture that still reads as a decorative raised motif.

For a portable mini version, use fingering weight yarn and a smaller hook to create a small cushion or pin cushion that highlights the stitch on a tiny scale.

I enjoy adding a bit of metallic or sparkly yarn as a slim accent band for holiday versions β€” it catches the light beautifully and makes a lovely gift.

Common Mistakes & How to Fix Them

βœ— Skipping the turning chain rules can alter your stitch counts and pattern alignment; always follow the note about whether the chain counts as a stitch for each row and check your stitch count after the first repeat. βœ— Not joining new colours with a standing stitch can create a loose start that looks untidy; join each new colour with the standing stitch recommended or CH 1 and work into the same stitch to secure it. βœ— Failing to weave in ends regularly causes a lot of finishing work and loose tails; weave in ends after every 8-10 rows to keep things tidy and manageable. βœ— Working with inconsistent tension makes the puff stitches and bands look uneven; maintain a steady, relaxed tension and keep your loops for the Sideways Puff Stitch at the same height each time.

Snowberry cushion cover Pattern

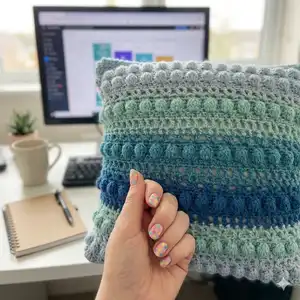
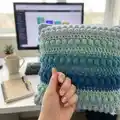
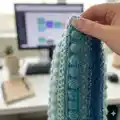
Make a textured Snowberry cushion cover using an attractive sideways puff stitch pattern and soft aran-weight yarn. This design uses three complementary shades to create a striped, cozy cushion cover that fits a 14" x 14" pillow form. The pattern includes step-by-step instructions for both UK and US terms, clear special stitch guidance for the Sideways Puff Stitch, and photos to help you through assembly.

Intermediate 5-7 Hours

Materials Needed for Snowberry cushion cover Pattern

β€” Main Fabric

  • 01
    Paintbox Yarns Simply Aran (aran weight): Dolphin Blue (Color 1) approx. 161 yards / 147 meters (80 grams)
  • 02
    Paintbox Yarns Simply Aran (aran weight): Washed Teal (Color 2) approx. 100.5 yards / 92 meters (50 grams)
  • 03
    Paintbox Yarns Simply Aran (aran weight): Duck Egg Blue (Color 3) approx. 161 yards / 147 meters (80 grams)
  • 04
    Extra yarn of any of the shades for sewing the squares together and weaving in ends

β€” Tools Required

  • 01
    5 mm (H) crochet hook
  • 02
    Yarn needle for sewing and weaving in ends
  • 03
    Scissors
  • 04
    14" x 14" pillow form
  • 05
    Extra yarn to sew the squares together
  • 06
    Stitch markers (optional)

Progress Tracker

0% Complete

β€” Special Stitches :

Info :

Sideways Puff Stitch (SWPuff ST) - Before you make a sideways puff stitch you always have 3 TR STS (Picture 1). Yarn over hook, insert hook in indicated stitch (this is going to be the ST you put the first TR into the base of the first TR, NOT the TR itself!), pull up a long loop through that stitch/space (3 loops on hook) (Picture 2). Yarn over hook again and insert hook into the same stitch, pull up a loop (same height as the previous one) 3 more times. You should have 9 loops on your hook. Yarn over and pull through 8 loops (2 loops on your hook) (Pictures 6-7), yarn over and pull through both loops (Pictures 8-9).

Infos :

Pictures 1-9 show the steps of the Sideways Puff Stitch: base of 1st TR, pulling long loops, gathering to 2 loops, finishing with a slip through both loops.

β€” Gauge :

Info :

3 HTR = 1" (3 HTR = 2.5 cm)

β€” Additional notes :

Info :

If a row/round starts with a Chain 1, it is not counted as a stitch, unless stated otherwise. Slip stitches do not count as stitches. Chain 2 always count as treble crochet. UK terms used throughout. At the end of the round, theres going to be a note with the stitch count, so you can keep track of your work easily and avoid any mistakes. Its written in a different color in bold. Weave in the ends after every 8-10 rows to reduce the amount of ends to weave in at the end. Notes are written in a different color in (brackets) to help you through the pattern. When working on the corners, always remember that there might be a hidden stitch hiding under the corner stitches which is the first stitch of the previous row. You can start each round as I did in the pattern or you can use a standing stitch or chains, its totally up to you!

β€” Instructions (UK TERMS) :

Info :

Make 2

Info :

To start: With Color 1 (Dolphin Blue) CH 52

Row 1 :

1 TR into the 4th CH from the hook, 1 TR in each CH to end (50 TR)

Row 2 :

CH 2 (counts as TR), {SK 1 ST, 1 TR in next ST, 1 TR in skipped ST} 24 times, 1 TR in top of 3 CH (2 TR, 24 TR "crosses")

Row 3-4 :

same as Row 2

Info :

Fasten off.

Row 5 (WS) :

Join Color 2 (Washed Teal) to the last ST of last row with a standing HTR or alternatively, you can CH 1 and HTR in same ST. 1 HTR in next 48 STS, 1 HTR in top of CH 2 (50 HTR)

Row 6 (RS) :

CH 2 (counts as TR), {1 TR in next 3 STS, 1 SWPuff ST, SK 1 ST} 12 times, 1 TR in last ST (38 TR, 12 SWPuff ST)

Row 7 (WS) :

CH 1, 1 HTR in same ST, 1 HTR in next 48 STS, 1 HTR in top of CH 2 (50 HTR)

Row 8-9 :

same as Row 6-7

Info :

Fasten off.

Row 10 (RS) :

Join Color 3 (Duck Egg Blue) to the last ST of last row with a standing TR or alternatively, you can CH 1 and TR in same ST. {SK 1 ST, 1 TR in next ST, 1 TR in skipped ST} 24 times, 1 TR in last ST (2 TR, 24 TR "crosses")

Row 11-12 :

same as Row 2

Info :

Fasten off.

Row 13 (WS) :

Join Color 1 (Dolphin Blue) to the last ST of last row with a standing HTR or alternatively, you can CH 1 and HTR in same ST. same as Row 5 (50 HTR)

Row 14-17 :

repeat Row 6-7 twice (50 HTR)

Info :

Fasten off.

Row 18-20 :

Join Color 2 (Washed Teal) to the last ST of last row with a standing TR or alternatively, you can CH 1 and TR in same ST. same as Row 10-12 (2 TR, 24 TR "crosses")

Info :

Fasten off.

Row 21-25 :

Join Color 3 (Duck Egg Blue) to the last ST of last row with a standing HTR or alternatively, you can CH 1 and HTR in same ST. same as Row 13-17 (50 HTR)

Info :

Fasten off.

Row 26-28 :

Join Color 1 (Dolphin Blue) the last ST of last row with a standing TR or alternatively, you can CH 1 and TR in same ST. same as Row 10-12 (2 TR, 24 TR "crosses")

Info :

Fasten off.

Info :

This is how your sections should look like after Row 20: two identical panels as pictured.

β€” Edge (UK TERMS) :

Round 1 :

Join Color 3 (Duck Egg Blue) to the first ST of last Row (thats the top right corner on the right side). CH 1, 2 DC in same ST, 1 DC in next 48 STS, 3 DC in next ST, DC 48 evenly on the side, 3 DC into the base of 3 CH, 1 DC in next 48 CH, 3 DC in last CH, DC 48 evenly on the side, 1 DC into the first ST with the 2 DC in it, join with a SLST to first DC (Corner: 3 DC. Sides: 48 DC)

Round 2 :

CH 1, 2 DC in same ST, 1 DC in next 50 STS, 3 DC in next ST, 1 DC in next 50 STS, 3 DC in next ST, 1 DC in next 50 STS, 3 DC in next ST, 1 DC in first ST with the 2 DC in it, join with a SLST to first DC (Corner: 3 DC. Sides: 50 DC)

Info :

Fasten off, weave in all ends.

β€” Finishing :

Info :

As you have 2 squares (one for each side), line them up, facing with the right side. (Picture 1)

Item Name (P1) :

Start in one of the corners and start sewing the sides together with the yarn left from the project. (I used the Duck Egg Blue shade) (Picture 2-3)

Item Name (P2) :

Keep sewing (Picture 4) and when you sew 3 sides together, insert the pillow form.

Info :

Continue to sew up the last side and then weave in the loose ends.

β€” Instructions (US TERMS) :

Info :

Make 2

Info :

To start: With Color 1 (Dolphin Blue) CH 52

Row 1 :

1 DC into the 4th CH from the hook, 1 DC in each CH to end (50 DC)

Row 2 :

CH 2 (counts as DC), {SK 1 ST, 1 DC in next ST, 1 DC in skipped ST} 24 times, 1 DC in top of 3 CH (2 DC, 24 DC "crosses")

Row 3-4 :

same as Row 2

Info :

Fasten off.

Row 5 (WS) :

Join Color 2 (Washed Teal) to the last ST of last row with a standing HDC or alternatively, you can CH 1 and HDC in same ST. 1 HDC in next 48 STS, 1 HDC in top of CH 2 (50 HDC)

Row 6 (RS) :

CH 2 (counts as DC), {1 DC in next 3 STS, 1 SWPuff ST, SK 1 ST} 12 times, 1 DC in last ST (38 DC, 12 SWPuff ST)

Row 7 (WS) :

CH 1, 1 HDC in same ST, 1 HDC in next 48 STS, 1 HDC in top of CH 2 (50 HDC)

Row 8-9 :

same as Row 6-7

Info :

Fasten off.

Row 10 (RS) :

Join Color 3 (Duck Egg Blue) to the last ST of last row with a standing DC or alternatively, you can CH 1 and DC in same ST. {SK 1 ST, 1 DC in next ST, 1 DC in skipped ST} 24 times, 1 DC in last ST (2 DC, 24 DC "crosses")

Row 11-12 :

same as Row 2

Info :

Fasten off.

Row 13 (WS) :

Join Color 1 (Dolphin Blue) to the last ST of last row with a standing HDC or alternatively, you can CH 1 and HDC in same ST. same as Row 5 (50 HDC)

Row 14-17 :

repeat Row 6-7 twice (50 HDC)

Info :

Fasten off.

Row 18-20 :

Join Color 2 (Washed Teal) to the last ST of last row with a standing DC or alternatively, you can CH 1 and DC in same ST. same as Row 10-12 (2 DC, 24 DC "crosses")

Info :

Fasten off.

Row 21-25 :

Join Color 3 (Duck Egg Blue) to the last ST of last row with a standing HDC or alternatively, you can CH 1 and HDC in same ST. same as Row 13-17 (50 HDC)

Info :

Fasten off.

Row 26-28 :

Join Color 1 (Dolphin Blue) the last ST of last row with a standing DC or alternatively, you can CH 1 and DC in same ST. same as Row 10-12 (2 DC, 24 DC "crosses")

Info :

Fasten off.

β€” Edge (US TERMS) :

Round 1 :

Join Color 3 (Duck Egg Blue) to the first ST of last Row (thats the top right corner on the right side). CH 1, 2 SC in same ST, 1 SC in next 48 STS, 3 SC in next ST, SC 48 evenly on the side, 3 SC into the base of 3 CH, 1 SC in next 48 CH, 3 SC in last CH, SC 48 evenly on the side, 1 SC into the first ST with the 2 SC in it, join with a SLST to first SC (Corner: 3 SC. Sides: 48 SC)

Round 2 :

CH 1, 2 SC in same ST, 1 SC in next 50 STS, 3 SC in next ST, 1 SC in next 50 STS, 3 SC in next ST, 1 SC in next 50 STS, 3 SC in next ST, 1 SC in first ST with the 2 SC in it, join with a SLST to first SC (Corner: 3 SC. Sides: 50 SC)

Info :

Fasten off, weave in all ends.

β€” Finishing (US TERMS) :

Info :

As you have 2 squares (one for each side), line them up, facing with the right side. Start in one of the corners and start sewing the sides together with the yarn left from the project. (I used the Duck Egg Blue shade) (Picture 2-3). Keep sewing and when you sew 3 sides together, insert the pillow form. Continue to sew up the last side and then weave in the loose ends.

Assembly Instructions

  • Line up the two completed squares with right sides facing each other and align edges carefully before sewing.
  • Start sewing at one corner using the yarn tail left from your last row, sewing through both edges with a yarn needle to create a tidy seam.
  • When you have sewn three sides, turn the cover right side out and insert the 14" x 14" pillow form before finishing the last side to make stuffing easier.
  • Sew the final side closed with an even mattress or whip stitch, then weave in all loose ends securely to prevent unraveling.
  • If desired, sew a hidden ladder stitch for an invisible join on the final side, or continue using the same visible yarn seam for a rustic finish.

Important Notes

  • πŸ’‘Use a stitch marker or a contrasting thread to mark the beginning of rows and rounds so you can keep track of stitch repeats and colour changes.
  • πŸ’‘Weave in yarn ends as you go β€” around every 8-10 rows β€” to avoid a large number of loose ends to manage at the end of the project.
  • πŸ’‘Maintain consistent tension throughout to ensure the finished cover is even and the Sideways Puff Stitches sit uniformly across the fabric.
  • πŸ’‘When joining colours, use a standing stitch or CH method described in the pattern to keep colour joins neat and secure.

Thank you for choosing the Snowberry cushion cover pattern β€” I hope it brings a fresh, textured touch to your home decor. This cozy cushion makes a thoughtful handmade gift and a weekend project you can be proud of. Happy crocheting and enjoy your new, handmade accent piece! 🧢✨

You ask,

we answer.

FAQs

What size will the finished piece be?

The finished cushion cover fits approximately a 14" x 14" / 37 cm x 37 cm pillow form when made with the recommended aran weight yarn and 5 mm hook.

Can I use different yarn weights for this pattern?

Yes, but changing yarn weight will affect the final size and texture. If you use a thicker yarn, your cover will be larger and the puff stitch will be chunkier; adjust your hook size accordingly and check gauge.

Do I need prior crochet experience for this pattern?

This pattern is rated intermediate, so basic knowledge of stitches (DC/TR, HDC/HTR, CH, SLST) and working in rows is recommended, plus willingness to try the Sideways Puff Stitch.

How long does this project typically take to complete?

Most crocheters complete this project in 5-7 hours, though time may vary based on experience level, familiarity with the puff stitch, and if you make both panels in one sitting.