🧢 Beautiful ✨ Detailed πŸ’ Adorable

Sleepy Bunny Amigurumi Pattern

Sleepy Bunny Amigurumi Pattern
4.8β˜… Rating
5-7 Hours Time Needed
4.0K Made This
βœ‚οΈ

Intermediate Level

Ideal for those with basic crochet experience, featuring slightly more advanced stitches and techniques to expand your skills.

⏱️

Weekend Treat

Takes 5-7 hours, making it an enjoyable project to finish over a couple of days.

🧸

Cute Companion

An adorable friend to cherish, handcrafted with love to bring comfort and joy for years to come.

About This Sleepy Bunny Amigurumi Pattern

This pattern creates a sleepy bunny amigurumi holding an Easter-style basket filled with crocheted eggs. It includes full round-by-round instructions for the head, body, ears, arms, legs, eggs and basket, plus joining steps for assembly. The design features simple shaping, color changes, and embroidered facial details for an expressive finish.

Sleepy Bunny Amigurumi Pattern crochet pattern - detailed view of completed project

You will learn to work continuous rounds, front/back loop details, and layered construction for the ears and basket. The finished toy is perfect for gifting or seasonal displays and can be customized with different yarn colors.

Why You'll Love This Sleepy Bunny Amigurumi Pattern

I absolutely love this pattern because it balances simple amigurumi shaping with sweet, expressive details that bring the character to life. I enjoy the way the layered ears and embroidered face give the bunny personality without complicated pieces. The little basket and eggs add a playful finishing touch that makes this project perfect for seasonal crafting. Sharing this design brings me joy because it is approachable yet satisfying to finish.

Sleepy Bunny Amigurumi Pattern step 1 - construction progress Sleepy Bunny Amigurumi Pattern step 2 - assembly progress Sleepy Bunny Amigurumi Pattern step 3 - details and accessories Sleepy Bunny Amigurumi Pattern step 4 - final assembly and finishing

Switch Things Up

I love trying different color palettes on this pattern to make unique characters.

I often use pastel shades for an Easter set or muted tones for a nursery decoration.

Want a larger bunny? Use a thicker yarn and a larger hook to scale up the whole design.

Make a mini version for keychains by using finer yarn and a smaller hook to reduce the final size.

I sometimes embroider different facial expressions to change the personality β€” try smiling eyes or sleepy brows.

Add tiny crocheted accessories like a scarf, hat, or little toy egg for more character and play value.

Try mixing textures by using a fluffy yarn for the body but smooth yarn for details to create contrast.

For a posable bunny, insert thin wire into the limbs before stuffing to allow gentle shaping and posing.

Customize the basket by changing the hanger color or adding stripes with alternating rounds for a woven look.

I recommend practicing color changes on a swatch to keep tension even across joins and avoid gaps at color transitions.

Consider adding felt pieces or safety features where appropriate for younger children, but always secure parts well.

Common Mistakes & How to Fix Them

βœ— Skipping stitch markers during rounds can cause you to lose the start of the round; place a marker at the first stitch and move it each round to stay on track. βœ— Forgetting to stuff as you go results in uneven shaping and lumps; stuff gradually and firmly during shaping rounds to maintain a smooth silhouette. βœ— Not leaving a long tail when finishing parts makes sewing difficult later; always leave a long thread end for secure sewing and weaving in. βœ— Pulling stitches too tight when decreasing can distort the shape of the piece; keep tension consistent and slightly looser when working decreases for smooth shaping.

Sleepy Bunny Amigurumi Pattern

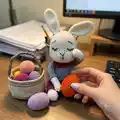
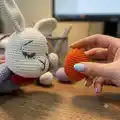
Make a cuddly sleepy bunny complete with a little basket of eggs. This pattern guides you through crocheting the head, body, ears, arms, legs, eggs and basket with clear rounds and helpful assembly notes. Perfect for handmade gifts or seasonal decor, you can customize colors to suit your style. Follow the step-by-step instructions and enjoy bringing this sweet companion to life.

Intermediate 5-7 Hours

Materials Needed for Sleepy Bunny Amigurumi Pattern

β€” Main Fabric

  • 01
    Yarn - use a yarn suitable for amigurumi in your preferred colors
  • 02
    Main Color: White (body and head)
  • 03
    A Color: Pink (accent / skirt or detail)
  • 04
    B Color: Lilac (accent / skirt or detail)
  • 05
    C Color: Green (collar or details)
  • 06
    Eggs: Yellow, Green, Pink, Orange, Lilac, Light Pink (make 6)

β€” Tools Required

  • 01
    Crochet hook size 2.5 mm (or a size that fits your yarn)
  • 02
    Scissors
  • 03
    Polyester stuffing
  • 04
    Tapestry needle for sewing and weaving ends
  • 05
    Stitch marker
  • 06
    Pins for assembly

Progress Tracker

0% Complete

β€” Head & Body :

Info :

MAIN COLOR

Round 1-6 :

sc in a mr

Round 2 :

6 sc inc(12)

Round 3 :

(6 times)1 sc into sc next inc(18)

Round 4 :

(6 times)2 sc into sc next inc(24)

Round 5 :

(6 times)3 sc into sc next inc(30)

Round 6 :

(6 times)4 sc into sc next inc(36)

Round 7 :

(6 times)5 sc into sc next inc(42)

Round 8 :

(6 times)6 sc into sc next inc(48)

Round 9 :

(6 times)7 sc into sc next inc(54)

Round 10-19 :

(10 ring)sc into sc(54) Stuff the head tightly. Keep filling as you go.

Round 20 :

20 sc into sc(14 sc inc)20 sc into sc(68)

Round 21-27 :

(7 ring)sc into sc(68)

Round 28 :

20 sc into sc(14 sc dec)20 sc into sc(54)

Round 29 :

(6 times)7 sc into sc next dec(48)

Round 30 :

(6 times)6 sc into sc next dec(42)

Round 31 :

(6 times)5 sc into sc next dec(36)

Round 32 :

(6 times)4 sc into sc next dec(30)

Round 33 :

(6 times)3 sc into sc next dec(24)

Round 34-36 :

(3 ring)sc into sc(24)

Info :

A color-

Round 37 :

(6 times)3 sc into sc next inc(30)

Round 38 :

(6 times)4 sc into sc next inc(36)

Round 39 :

(6 times)5 sc into sc next inc(42)

Round 40 :

sc into sc(42)

Round 41 :

(6 times)6 sc into sc next inc(48)

Round 42-49 :

(8 ring)sc into sc(48)

Info :

B color-

Round 50 :

In flo sc into sc(48)

Round 51-55 :

(5 ring)sc into sc(48)

Round 56 :

in flo sc into sc(48)

Round 57 :

(6 times)6 sc into sc next dec(42)

Round 58 :

(6 times)5 sc into sc next dec(36)

Round 59 :

(6 times)4 sc into sc next dec(30)

Round 60 :

(6 times)3 sc into sc next dec(24)

Round 61 :

(6 times)2 sc into sc next dec(18)

Round 62 :

(6 times)1 sc into sc next dec(12)

Info :

Stuff the body tightly.

Round 63 :

6 sc dec (6)fo.Clean the thread end.

Info :

sweater detail-Rnd-56-in blo sc into sc(48)

β€” Legs :

Info :

MAIN COLOR

Round 1-6 :

sc in a mr

Round 2 :

6 sc inc(12)

Round 3 :

(6 times)1 sc into sc next inc(18)

Round 4 :

(6 times)2 sc into sc next inc(24)

Round 5-7 :

(3 ring)sc into sc(24)

Round 8 :

6 sc into sc(6 sc dec)6 sc into sc(18)

Round 9 :

5 sc into sc(4 sc dec)5 sc into sc(14)

Round 10-13 :

(4 ring)sc into sc(14)

Info :

B color- Stuff the legs. Keep filling as you go.

Round 14 :

sc into sc(14)

Round 15 :

in flo sc into sc(14)

Round 16 :

2 sc inc(16)

Round 17-28 :

(12 ring)sc into sc(16)

Round 29 :

Straighten it. Insert the needle into both layers. 8 sc fo. Leave a long thread end to sew.

Info :

sleeve detail-Rnd 13-in blo sc into sc(14)

Info :

Legs detail-Rnd 14-in blo sc into sc(14)

Info :

Collar -C color-

Round 1 :

30 ch.

Round 2 :

30 ch into sc(30)turn

Round 3 :

30 sc inc cr(60 cr)fo.Leave a long thread to sew

β€” Arms :

Info :

MAIN COLOR

Round 1-6 :

sc in a mr

Round 2 :

6 sc inc(12)

Round 3 :

2 sc inc(14)

Round 4-12 :

(9 ring)sc into sc(14)

Info :

A color-

Round 13 :

in flo sc into sc(14)

Round 14-29 :

(15 ring)sc into sc(14)

Round 30 :

Straighten it. Insert the needle into both layers. 7 sc fo. Leave a long thread end to sew.

β€” Ears :

Info :

MAIN COLOR - MAKE 2

Round 1-6 :

sc in a mr

Round 2 :

6 sc inc(12)

Round 3 :

(2 times)5 sc into sc next inc(14)

Round 4 :

(2 times)6 sc into sc next inc(16)

Round 5 :

(2 times)7 sc into sc next inc(18)

Round 6 :

(2 times)8 sc into sc next inc(20)

Round 7 :

(2 times)9 sc into sc next inc(22)

Round 8 :

(2 times)10 sc into sc next inc(24)

Round 9-24 :

(16 ring)sc into sc(24)

Round 25 :

Straighten it. Insert the needle into both layers 12 sc fo.Leave a long thread end to sew.

β€” Eggs :

Info :

COLORS = YELLOW - GREEN -PINK - ORANGE - LILAC - LIGHT PINK - MAKE 6

Round 1-6 :

sc in a mr

Round 2 :

6 sc inc(12)

Round 3 :

sc into sc(12)

Round 4 :

(6 times)1 sc into sc next inc(18)

Round 5 :

sc into sc(18)

Round 6 :

(6 times)2sc into sc next inc(24)

Round 7 :

sc into sc(24)

Round 8 :

(6 times)3 sc into sc next inc(30)

Round 9 :

sc into sc(30)

Round 10-17 :

(8 ring)sc into sc(30)

Round 18 :

(6 times)3 sc into sc next dec(24)

Round 19 :

sc into sc(24)

Round 20 :

(6 times)2 sc into sc next dec(18)

Round 21 :

sc into sc(18)

Info :

Tightly fill the egg. keep filling as you go

Round 22 :

(6 times)1 sc into sc next dec(12)

Round 23 :

sc into sc(12)

Round 24 :

6 sc dec(6)fo.clean the thread end

β€” Basket :

Info :

MAIN COLOR, LIGHT BROWN AND A COLOR

Round 1-6 :

sc in a mr

Round 2 :

6 sc inc(12)

Round 3 :

(6 times)1 sc into sc next inc(18)

Round 4 :

(6 times)2 sc into sc next inc(24)

Round 5 :

(6 times)3 sc into sc next inc(30)

Round 6 :

(6 times)4 sc into sc next inc(36)

Round 7 :

(6 times)5 sc into sc next inc(42)

Round 8 :

(6 times)6 sc into sc next inc(48)

Round 9 :

(6 times)7 sc into sc next inc(54)

Round 10 :

(6 times)8 sc into sc next inc(60)

Round 11 :

(6 times)9 sc into sc next inc(66)

Round 12 :

(6 times)10 sc into sc next inc(72)

Round 13 :

(6 times)11 sc into sc next inc(78)

Round 14 :

(6 times)12 sc into sc next inc(84)

Round 15 :

in flo sc into sc(84)

Round 16-26 :

(11 ring)sc into sc(84)

Round 27 :

sc into sc(84)

Round 28 :

sc into sc(84)

Round 29 :

sc into sc(84)

Round 30-31 :

(2 ring)sc into sc(84)fo.

Info :

basket hanger-A color-Rnd 1-70 ch.70 ch into sc(70 sc)fo.

β€” Joining Parts :

Info :

Sew the ears to both sides, to Rnd 4.

Info :

Sew sleeves to both sides, to Rnd 37.

Info :

Sew the legs to both sides, between Rnd 51-56.

Assembly Instructions

  • Sew the ears to both sides of the head at round 4, matching positioning symmetrically and securing with whipstitch.
  • Sew the sleeves/arms to both sides of the body at round 37, pinning in place first to check alignment before sewing.
  • Sew the legs to both sides of the body between rounds 51-56, spacing evenly so the doll sits balanced.
  • Attach the collar and any sweater details by sewing the edges in place and weaving in ends for a neat finish.
  • Make the basket hanger and sew or attach it to the basket rim; fill the basket with the crocheted eggs and position it by the bunny.

Important Notes

  • πŸ’‘Use stitch markers to keep track of your rounds and the start of each round for consistent shaping.
  • πŸ’‘Stuff pieces firmly as you go; keep filling gradually to avoid lumps and maintain the intended shape.
  • πŸ’‘Leave a long thread tail when finishing parts to make sewing and secure attachment easier and neater.
  • πŸ’‘Insert the needle into both layers before closing layered pieces (ears, legs, basket) to secure a flat seam.

This sleepy bunny amigurumi is a charming little project that makes a lovely handmade gift or seasonal decoration. Dress it in different colors to match your decor or create a set of eggs for a playful display. Small, sweet, and full of personalityβ€”handmade joy in every stitch. 🧢🐰✨

You ask,

we answer.

FAQs

What size will the finished piece be?

The finished amigurumi measures about 20 cm in circumference and around 10 cm in length using the recommended yarn and 2.5 mm hook.

Can I use different yarn weights for this pattern?

Yes, you can use different yarn weights but this will affect the final size and tension; adjust the hook size accordingly to keep the fabric tight for stuffing.

Do I need prior crochet experience for this pattern?

This pattern is rated intermediate and assumes familiarity with working in rounds, increases, decreases, and basic sewing techniques for assembly.

How long does this project typically take to complete?

Most crafters finish this project in about 5-7 hours, though exact time depends on experience, speed, and how many accessories you make.

How should I embroider the facial details?

Embroider the eyes, lashes and nose using contrasting yarn or embroidery thread, referring to the photos for placement and using a tapestry needle to stitch securely.