🧢 Beautiful ✨ Detailed πŸ’ Adorable

Rustic Lamp Pattern

Rustic Lamp Pattern
4.0β˜… Rating
5-7 Hours Time Needed
2.3K Made This
βœ‚οΈ

Intermediate Level

Ideal for those with basic crochet experience, featuring slightly more advanced stitches and techniques to expand your skills.

⏱️

Weekend Treat

Takes 5-7 hours, making it an enjoyable project to finish over a couple of days.

🏑

Cozy Accent

A warm touch for your space that transforms ordinary corners into inviting nooks filled with handmade charm.

About This Rustic Lamp Pattern

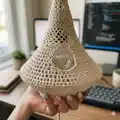
This pattern guides you through crocheting a rustic hanging lamp shade using the rope stitch and two metal rings for shape. It produces a soft-toned, textured lamp cover that looks lovely over living room or outdoor seating. The instructions include step-by-step rounds, finishing suggestions, and electrical assembly tips to make a safe, polished piece.

Rustic Lamp Pattern crochet pattern - detailed view of completed project

Perfect for intermediate crocheters comfortable with basic shaping and working in rounds. The pattern uses common stitches and clear repetition to build the lamp form.

Why You'll Love This Rustic Lamp Pattern

I absolutely love this pattern because it turns simple yarn and a couple of metal rings into a stunning, sculptural lamp. I enjoy the rhythm of the rope stitch β€” it creates beautiful texture with minimal effort. The design is forgiving, so you can adjust hook size or ring diameter to suit your space. Making this lamp gives me a real sense of accomplishment because the finished piece looks like a boutique decor item made by hand.

Rustic Lamp Pattern step 1 - construction progress Rustic Lamp Pattern step 2 - assembly progress Rustic Lamp Pattern step 3 - details and accessories Rustic Lamp Pattern step 4 - final assembly and finishing

Switch Things Up

I love experimenting with color on this lamp β€” you can swap the sand tone for soft pastels or bold neutrals to match your decor.

Try a thicker yarn and larger hook to make a chunkier, more dramatic shade that hangs with a heavier drape.

If you want a smaller pendant, use thinner yarn and a smaller metal ring to create a more delicate lamp for bedside or hallway lighting.

I often add subtle embroidery or a band of contrasting color near the top to give the lamp a custom finish and visual interest.

Consider adding a removable inner diffuser (a fabric disc) to soften the light and protect the crocheted surface from direct heat.

For a boho look, attach tassels or a fringe around the lower ring before securing it in place.

You can also create a matching set by varying ring sizes and hanging several lamps at different heights for a layered, curated look.

Make a waterproof version for covered outdoor spaces by choosing a weather-resistant yarn or applying a suitable textile sealant carefully after finishing.

I sometimes wire-wrap the cord decoratively around the neck of the lamp for an industrial twist that complements modern interiors.

If you want to experiment with light effects, try colored or filament bulbs to change the ambience created by the textured rope stitch.

Common Mistakes & How to Fix Them

βœ— Working with inconsistent tension can make the lamp uneven and distort the shape; maintain steady tension and practice the rope stitch on a swatch before starting the lamp. βœ— Skipping the step to try a sample hook size often results in a shade that is too loose or too tight; test the hook and adjust to get the right drape and density for the rings. βœ— Failing to weave in ends immediately makes them hard to reach after assembly; weave ends as you go with the wool needle to avoid fiddly finishing later. βœ— Not reinforcing the work before adding electrical parts can lead to sagging when hanging; consider fabric stiffener spray as recommended or tighten stitches near the rings for extra support.

Rustic Lamp Pattern

Create a warm, natural-looking hanging lamp with this crochet pattern that uses a simple rope stitch and metal rings for structure. You will crochet a textured lamp shade that fits over a standard E27 bulb and adds handmade charm to any room. The pattern includes full round-by-round instructions, finishing tips, and electrical assembly guidance so you can complete a safe, beautiful lamp for your home.

Intermediate 5-7 Hours

Materials Needed for Rustic Lamp Pattern

β€” Main Fabric

  • 01
    Katia Capri yarn: 3 balls of Sand 82134 (as stated in the materials list)

β€” Tools Required

  • 01
    3 mm crochet hook
  • 02
    Metal ring Ø 30 cm
  • 03
    Metal ring Ø 15 cm
  • 04
    Wool needle with large eye
  • 05
    Scissors
  • 06
    Safety screwdriver
  • 07
    Wire stripper (or a sharp knife)
  • 08
    Black electrical cord, length of your choice
  • 09
    Flat plug, black
  • 10
    Lamp fitting, black
  • 11
    Strain relief, black
  • 12
    E27 lamp, 600 lumens

Progress Tracker

0% Complete

β€” Lamp :

Info :

End each round with 1 sl st in the 1st stitch of the round.

Info :

Try out the size of the crochet hook first and use a different size if necessary. You crochet with the rope stitch, like this: make 1 dc, 1 ch, 1 dc around 1 ch = base stitch.

Rnd 1 :

crochet 40 ch, join with 1 sl st in 1st ch.

Rnd 2 :

1 ch, 40 sc, join with 1 sl st in 1st sc.

Rnd 3 :

3 ch, 1 dc in 1st sc, 1 ch, 1 dc in 2nd sc, rep (1 dc, 1 ch, 1 dc in 4th sc), join.

Rnd 4 :

rep Rnd 3, but work around the ch of the previous round and join.

Rnds 5-12 :

as Rnd 4.

Rnd 13 :

as Rnd 4, but crochet 2 ch instead of 1.

Rnd 14 :

as Rnd 13.

Rnd 15 :

3 ch, rep (1 dc, 3 ch, 1 dc around the 2 ch), join with 1 sl st.

Rnd 16 :

3 ch, rep (1 dc, 1 ch, 1 dc, 1 ch, 1 dc around the 3 ch), join with 1 sl st.

Rnd 17 :

3 ch, 1 dc, 1 ch, 1 dc around each ch, join.

Rnds 18-20 :

as Rnd 17.

Rnd 21 :

as Rnd 13.

Rnds 22-24 :

as Rnd 21.

Rnd 25 :

as Rnd 21, but crochet 3 ch instead of 2 ch between the dc now.

Rnd 26 :

as Rnd 16.

Rnds 27-33 :

as Rnd 17.

Rnd 34 :

3 ch, rep (1 dc, 1 ch, 1 dc around 1 ch, 1 ch, 1 dc, 1 ch), end with 1 sl st.

Rnds 35-37 :

as Rnd 17.

Rnds 38-41 :

as Rnds 34-36.

Rnd 42 :

Take the metal ring of 30 cm Ø and crochet in 1 ch: 1 sc on each stitch of the previous round (= 1 sc in 1 dc, 1 sc around the ch, 1 sc in 1 dc). Insert the hook into the stitch of the previous round, the yarn goes over the ring. Pull the yarn through the loop (like an sc) with the hook. Join with 1 sl st in the 1st ch.

Rnd 43 :

as Rnd 3.

Rnds 44-50 :

as Rnd 17. Dec from here.

Rnd 51 :

3 ch, rep (1 dc, 1 ch, 1 dc, crochet in the next ch: 1 dc, 1 ch, 1 dc, make 1 dc in the next ch). Join with 1 sl st.

Rnd 52 :

3 ch, rep (1 dc, 1 ch, 1 dc, 1 ch, crochet in the next ch: 1 dc, 1 ch, 1 dc, skip 1 dc). Join with 1 sl st.

Rnds 53-55 :

as Rnd 17.

Rnd 56 :

take the 15 cm Ø metal ring and work as Rnd 42.

Rnd 57 :

1 ch, 1 sc on 1 sc, join with 1 sl st. Fasten off the last thread and use the wool needle to carefully weave it through a few stitches on the inside. Break the yarn.

β€” Finishing :

Info :

Reinforce the work with fabric stiffener spray, this step is optional.

β€” Electrical Parts :

Info :

Attach the plug to one end of the cord and the strain relief with fitting to the other end. Insert the plug from the inside through the narrow part of the lamp cover. Pull the cord as far as you like and determine the height of the bulb in the lamp. Cut a long strand of the yarn and tightly pull the narrow part upward. Use the yarn to tightly tie and wrap the lamp you made to secure it at about 28 cm from the fitting. Keep in mind that the work will slightly sag when it hangs. Wind the cord around a stick or hang several lamps from the ceiling at different heights. Finally, screw in the light bulb.

β€” Tips :

Info :

TIP! Immediately weave in all the ends with the wool needle. You can barely reach them later.

Assembly Instructions

  • Attach the plug to one end of the cord and the strain relief with fitting to the other end before inserting the cord through the lamp cover.
  • Insert the plug from the inside through the narrow part of the lamp cover and pull the cord to determine the final bulb height.
  • Use a long strand of yarn to tightly tie and wrap the narrow part of the lamp and secure it about 28 cm from the fitting, trimming excess yarn.
  • Take the 30 cm metal ring and crochet 1 sc into each stitch of the previous round to secure the ring into the shade, then repeat the same method with the 15 cm ring for the lower section.
  • Wind the cord around a stick or hang multiple lamps at different heights for a layered display, and finally screw in the E27 lamp.
  • Fasten off the last thread, weave in all ends immediately with a wool needle through a few inside stitches, and break the yarn.

Important Notes

  • πŸ’‘Use stitch markers or count carefully when changing stitch patterns so repeats remain aligned and symmetrical.
  • πŸ’‘Weave in ends immediately with the wool needle as recommended, since access becomes difficult after assembly.
  • πŸ’‘Test the crochet hook size and tension before starting to ensure the shade will fit the metal rings and hang with the right drape.
  • πŸ’‘Follow safety guidelines for electrical assembly and, if unsure, consult an electrician when connecting plugs, strain reliefs, or fittings.

This rustic lamp pattern makes a beautiful, handmade accent for any living space with a natural, textured finish. It uses simple repeats and two metal rings to create professional structure and soft drape. Hang one or a cluster for instant cozy style in your home. 🧢✨

You ask,

we answer.

FAQs

What size will the finished piece be?

The finished lamp diameter is determined by the metal ring used; using the included 30 cm ring yields a shade approximately 30 cm across at its widest point.

Can I use different yarn weights for this pattern?

Yes, you can use different yarn weights, but this will affect the final size and drape; adjust your hook and consider the ring diameters accordingly.

Do I need prior crochet experience for this pattern?

This pattern is rated intermediate because it involves working in rounds, shaping, and finishing around metal rings; basic crochet stitches and reading round instructions are recommended.

How long does this project typically take to complete?

Most crafters complete this lamp in 5-7 hours, though time may vary based on experience level and any additional finishing or electrical assembly time.

Is the electrical assembly safe to do at home?

The pattern provides guidance for attaching plugs, strain reliefs, and fittings; if you are unsure about wiring or safety, consult a qualified electrician to complete the final electrical connections.