🧢 Beautiful ✨ Detailed πŸ’ Adorable

Rainbow Bunny Amigurumi Pattern

Rainbow Bunny Amigurumi Pattern
4.0β˜… Rating
5-7 Hours Time Needed
3.1K Made This
βœ‚οΈ

Intermediate Level

Ideal for those with basic crochet experience, featuring slightly more advanced stitches and techniques to expand your skills.

⏱️

Weekend Treat

Takes 5-7 hours, making it an enjoyable project to finish over a couple of days.

🧸

Cute Companion

An adorable friend to cherish, handcrafted with love to bring comfort and joy for years to come.

About This Rainbow Bunny Amigurumi Pattern

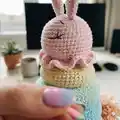
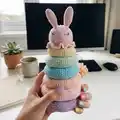
This pattern creates a pastel Rainbow Bunny stacking set with six soft rings and a cone topped by a sleepy bunny head. You will crochet each ring in different colors, assemble them in order, and attach a cone that stacks neatly on top. The pattern includes detailed round-by-round instructions and helpful assembly photos to guide you through the build.

Rainbow Bunny Amigurumi Pattern crochet pattern - detailed view of completed project

Suitable for intermediate crocheters who enjoy shaping and simple sewing. The finished toy measures approximately 27 cm tall with the recommended yarn and hook.

Why You'll Love This Rainbow Bunny Amigurumi Pattern

I absolutely love this pattern because it combines simple amigurumi shaping with a joyful rainbow palette that makes every piece look delightful. I enjoy the repetitive rounds for each ring β€” they are relaxing but still yield a satisfying result. Sewing the cone and stacking everything gives me so much creative satisfaction when the toy comes together. I love gifting this as a baby or birthday present because it is both decorative and tactile. The pattern also gives room to experiment with colors and sizes, which keeps the process fresh and fun.

Rainbow Bunny Amigurumi Pattern step 1 - construction progress Rainbow Bunny Amigurumi Pattern step 2 - assembly progress Rainbow Bunny Amigurumi Pattern step 3 - details and accessories Rainbow Bunny Amigurumi Pattern step 4 - final assembly and finishing

Switch Things Up

I love how easy it is to customize the colors of this pattern; try bright primaries for a bold toy or soft pastels for a nursery-friendly look.

I often change the yarn weight and hook size to create a mini keychain version or a chunky cuddle-size toy; adjust stuffing and sewing accordingly.

I like to embroider different facial expressions with black yarn to give each bunny its own personality; small changes to eye placement can change the mood dramatically.

I sometimes add tiny crocheted accessories like a bow or scarf to the cone top to make seasonal or themed versions.

I recommend experimenting with textured or variegated yarns for interesting surface effects on the rings and cone.

I sometimes replace the cone with a wooden bead or small plush hat for a mixed-material look that’s fun to explore.

I encourage using safety eyes or embroidered eyes depending on the recipient; for babies, embroidery keeps the toy completely safe.

I also like making a matching set of different-sized bunnies using the same palette for a coordinated nursery display.

I recommend trying different stuffing levels in the rings to see what stacks most stably for your chosen yarn and hook.

I find that adding a small amount of pipe cleaner or wire inside the cone gives it poseable strength, but keep this optional and avoid for baby-safe toys.

Common Mistakes & How to Fix Them

βœ— Skipping the stitch marker during rounds can make it hard to know where a round ends; always place and move a stitch marker at the end of each round to maintain correct counts. βœ— Forgetting to stuff gradually causes lumps and uneven shapes; stuff the rings and cone gradually while crocheting, adding small amounts at a time for a smooth finish. βœ— Cutting the yarn too short when finishing pieces prevents secure sewing; always leave a long tail (around 10-15 cm) for sewing parts together neatly. βœ— Not checking stitch counts after increases or decreases leads to misshapen rings; count your stitches after each increase/decrease round to ensure the correct circumference. βœ— Pulling stitches too tight when joining rings can distort the shape; use gentle, even tension when sewing rings and avoid cinching stitches too tightly.

Rainbow Bunny Amigurumi Pattern

Create a charming rainbow stacking bunny with soft pastel rings and a removable cone. This pattern guides you through crocheting six colorful rings, a cone, and finishing details for a sweet nursery toy you can treasure or gift. Clear round-by-round instructions and helpful photos make construction easy to follow. Perfect for making a handmade keepsake that brightens any shelf or play area.

Intermediate 5-7 Hours

Materials Needed for Rainbow Bunny Amigurumi Pattern

β€” Main Fabric

  • 01
    Yarn 'YARN-ART JEANS' Pink color N 74 - 55 g
  • 02
    Yarn 'YARN-ART JEANS' Purple color N 89 - 26 g
  • 03
    Yarn 'YARN-ART JEANS' Peach color N 73 - 15 g
  • 04
    Yarn 'YARN-ART JEANS' Blue color N 76 - 10 g
  • 05
    Yarn 'YARN-ART JEANS' Green color N 79 - 9 g
  • 06
    Yarn 'YARN-ART JEANS' Yellow color N 67 - 8 g
  • 07
    But you can take any yarn and color you like.

β€” Tools Required

  • 01
    Crochet hook size 2.5 mm
  • 02
    Toy filling (polyester fiberfill)
  • 03
    Stitch marker or a little piece of a different color yarn
  • 04
    Needles for sewing up
  • 05
    A small amount of black yarn to embroider the eyes
  • 06
    Scissors
  • 07
    Pins for assembly

Progress Tracker

0% Complete

β€” Cone :

Round 1 :

5 sc in MR

Round 2 :

5 inc (10)

Round 3 :

(sc, inc) x 5 (15)

Round 4-8 :

sc in each st (15)

Round 9 :

(2sc, inc) x 5 (20)

Round 10-18 :

sc in each st (20)

Round 19 :

(3sc, inc) x 5 (25)

Round 20-28 :

sc in each st (25) start to staff the detail gradually and evenly

Round 29 :

(4sc, inc) x 5 (30)

Round 30-36 :

sc in each st (30)

Round 37 :

(5sc, inc) x 5 (35)

Round 38-43 :

sc in each st (35)

Round 44 :

(6sc, inc) x 5 (40)

Round 45-47 :

sc in each st (40)

Round 48 :

(7sc, inc) x 5 (45)

Round 49 :

(8sc, inc) x 5 (50)

Info :

Finish with a slip st. Cut the yarn leaving a long tail for sewing. The length of cone should not exceed 17-18 cm.

β€” The bottom of the cone :

Round 1 :

7 sc in MR

Round 2 :

7 inc (14)

Round 3 :

(sc, inc) x 7 (21)

Round 4 :

(2 sc, inc) x7 (28)

Round 5 :

(3 sc, inc) x 7 (35)

Round 6 :

(4 sc, inc) x 7 (42)

Round 7 :

(5 sc, inc) x 6, 4 sc, 2 inc (50)

Round 8 :

sc in each st (50)

Info :

Sew the bottom and the cone together.

β€” Ring 1 : PURPLE COLOR

Info :

ch 60. sl st the end to the first ch to make a ring

Round 1 :

sc into the same ch that you just did a sl st into, sc around (60)

Round 2 :

(sc, inc) x 30 (90)

Round 3-16 :

sc in each st (90)

Round 17 :

(sc, dec) x 30 (60)

Round 18 :

sc in each st (60)

Info :

Leave a long enough end to sew it together (see pictures). Let's start to stuff the detail gradually and evenly. Preferably, the circumference of 1 and 2 rings should be 10 cm.

β€” Ring 2 : PINK COLOR

Info :

ch 54. sl st the end to the first ch to make a ring

Round 1 :

sc into the same ch that you just did a sl st into, sc around (54)

Round 2 :

(sc, inc) x 27 (81)

Round 3-16 :

sc in each st (81)

Round 17 :

(sc, dec) x 27 (54)

Round 18 :

sc in each st (54)

Info :

Leave a long enough end to sew it together. Let's start to stuff the detail gradually and evenly. Preferably, the circumference of 1 and 2 rings should be 10 cm.

β€” Ring 3 : PEACH COLOR

Info :

ch 50. sl st the end to the first ch to make a ring

Round 1 :

sc into the same ch that you just did a sl st into, sc around (50)

Round 2 :

(sc, inc) x 25 (75)

Round 3-15 :

sc in each st (75)

Round 16 :

(sc, dec) x 25 (50)

Round 17 :

sc in each st (50)

Info :

Leave a long enough end to sew it together. Let's start to stuff the detail gradually and evenly. Preferably, the circumference of ring should be 9 cm.

β€” Ring 4 : BLUE COLOR

Info :

ch 44. sl st the end to the first ch to make a ring

Round 1 :

sc into the same ch that you just did a sl st into, sc around (44)

Round 2 :

(sc, inc) x 22 (66)

Round 3-15 :

sc in each st (66)

Round 16 :

(sc, dec) x 22 (44)

Round 17 :

sc in each st (44)

Info :

Leave a long enough end to sew it together. Let's start to stuff the detail gradually and evenly. Preferably, the circumference of ring should be 9 cm.

β€” Ring 5 : GREEN COLOR

Info :

ch 38. sl st the end to the first ch to make a ring

Round 1 :

sc into the same ch that you just did a sl st into, sc around (38)

Round 2 :

(sc, inc) x 19 (57)

Round 3-14 :

sc in each st (57)

Round 15 :

(sc, dec) x 19 (38)

Round 16 :

sc in each st (38)

Info :

Leave a long enough end to sew it together. Let's start to stuff the detail gradually and evenly. Preferably, the circumference of ring should be 9 cm.

β€” Ring 6 : YELLOW COLOR

Info :

ch 34. sl st the end to the first ch to make a ring

Round 1 :

sc into the same ch that you just did a sl st into, sc around (34)

Round 2 :

(sc, inc) x 17 (51)

Round 3-13 :

sc in each st (51)

Round 14 :

(sc, dec) x 17 (34)

Round 15 :

sc in each st (34)

Info :

Leave a long enough end to sew it together. Let's start to stuff the detail gradually and evenly. Preferably, the circumference of ring should be 9 cm.

Info :

Sew the obtained cone to the first ring with a needle. Assemble the rings in order from largest (purple) to smallest (yellow/green) and stack the cone on top. Stuff pieces gradually while crocheting for even shape and finish sewing using the long tails left for joining.

Assembly Instructions

  • Sew the bottom circle to the cone by aligning the edges and whipstitching through both layers, then stuff the cone gradually before completely closing the seam.
  • Sew the obtained cone to the first (largest) ring with a needle, aligning the cone base with the ring opening and stitching securely around the circumference.
  • Stack the rings in order from largest (Ring 1 purple) to smallest (Ring 6 yellow) and check fit; adjust stuffing inside rings if necessary to maintain even shape.
  • Leave long yarn tails (approx 10-15 cm) when finishing each ring and the cone to sew pieces together neatly and securely without reattaching extra yarn.
  • Pin pieces in place before final sewing to ensure correct alignment and symmetry between cone and rings.

Important Notes

  • πŸ’‘Use a stitch marker to mark the ending of the round and move the stitch marker after finishing each round.
  • πŸ’‘When finishing any of the body parts except the head leave a long yarn tail (around 10-15cm) which you can use for sewing.
  • πŸ’‘Fill the stuffing into the body parts while crocheting them; be sure that you fill the rings with the same amount of fiberfill so rings will have the same shape.
  • πŸ’‘Work with consistent tension throughout your rounds for even, professional-looking results.

This Rainbow Bunny stacking set is a joyful project that makes a lovely handmade gift for little ones. The pastel rings and sleepy bunny top add a charming touch to any nursery or shelf. Have fun customizing colors and enjoy the slow, satisfying process of building something special by hand. 🧢🧸

You ask,

we answer.

FAQs

What size will the finished piece be?

The finished stacking bunny measures approximately 27 cm (10.62 inches) tall when using the recommended yarn and a 2.5 mm hook; exact size may vary with yarn and tension.

Can I use different yarn weights for this pattern?

Yes, you can use different yarn weights, but this will affect final size and ring circumferences; choose an appropriate hook for your yarn and expect the finished toy to be larger or smaller.

Do I need prior crochet experience for this pattern?

This pattern is rated intermediate, so basic experience with single crochet, increases, decreases, and working in rounds is recommended for best results.

How long does this project typically take to complete?

Most crocheters complete this project in 5-7 hours, though time may vary depending on experience level, number of rings completed, and finishing work.

How should I stuff the rings for best results?

Stuff rings gradually while crocheting so you can maintain an even, rounded shape; avoid overstuffing which can distort the rings and making each ring have a consistent amount of fiberfill helps them stack neatly.