🧢 Beautiful ✨ Detailed πŸ’ Adorable

Ragdoll Pocket Whale Amigurumi Pattern

Ragdoll Pocket Whale Amigurumi Pattern
4.5β˜… Rating
2-4 Hours Time Needed
1.1K Made This
βœ‚οΈ

Beginner Friendly Level

Perfect for those just starting their crochet journey, with clear instructions and simple techniques

⏱️

Bite-Sized Project

Finishes in 2-4 hoursβ€”perfect for an afternoon of creative relaxation.

🎁

Tiny Treasure

Small, sweet, and gift-worthy creations that fit perfectly in the palm of your hand with detailed charm.

About This Ragdoll Pocket Whale Amigurumi Pattern

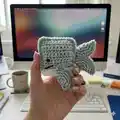
This pattern makes a tiny ragdoll pocket whale using US crochet terms and DK yarn. The whale is worked flat for the body and small round pieces for flippers and tail. Photos are included at the end to guide finishing and assembly for a neat result.

Ragdoll Pocket Whale Amigurumi Pattern crochet pattern - detailed view of completed project

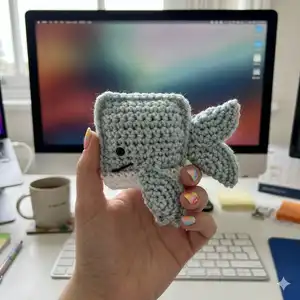
You will work simple single crochet rows and small circles, then join pieces and add safety eyes and embroidery for the face. The finished toy is perfect for a keyring or a pocket-sized gift.

Why You'll Love This Ragdoll Pocket Whale Amigurumi Pattern

I absolutely love this pattern because it turns simple stitches into an irresistibly cute pocket whale that you can finish in an afternoon. I enjoy how approachable the technique isβ€”mainly single crochet and basic shapingβ€”so it is great for beginners and a relaxing make for experienced crocheters. The pieces are small and portable, which means I can take the project anywhere and see progress quickly. I also love how customizable the whale is: a quick color change or different eyes completely changes the personality. Making these little whales always brings a smile when I gift them to friends and family.

Ragdoll Pocket Whale Amigurumi Pattern step 1 - construction progress Ragdoll Pocket Whale Amigurumi Pattern step 2 - assembly progress Ragdoll Pocket Whale Amigurumi Pattern step 3 - details and accessories Ragdoll Pocket Whale Amigurumi Pattern step 4 - final assembly and finishing

Switch Things Up

I love customizing this little whale by changing colors; swap the main colour for pastel pinks or bright corals to create a playful collection.

You can easily make a keyring by sewing a small loop or attaching a keyring to the top corner before finishing the seam for portability.

If you want a chunkier whale, I change to a worsted weight yarn and a larger hook for a cuddly, larger version that still follows the same stitch counts.

To make a tiny version for charms, use fingering weight yarn and a 2.5mm or 2.0mm hook and keep the same instructions for an adorable miniature.

I sometimes add little embroidered freckles or a heart on the belly with contrasting thread to give each whale extra personality and charm.

For eyes, try tiny safety beads, embroidered French knots, or use felt circles glued inside for a different look depending on the recipient.

I occasionally change the belly colour to a striped design by alternating rows of white and a second accent colour for a nautical feel.

Play with placement of the flippers and tail slightly higher or lower to create different poses and expressions for your whales.

If you want the whale to be posable, consider adding a small length of craft wire inside the flippers before closing them; secure wire ends so they don't poke through the yarn.

I also enjoy making little outfits or accessories like tiny crocheted bows or hats to dress up the whales for gifts or seasonal themes.

Common Mistakes & How to Fix Them

βœ— Not counting the foundation chain properly; recount your CH and make sure you have exactly 12 chains before turning to avoid a too-small or too-large body piece. βœ— Forgetting to insert safety eyes before closing the seam; place the eyes in position before you join the last side so you can secure them correctly. βœ— Overstuffing the body which causes distortion of the shape; add small amounts of stuffing gradually so the whale keeps a soft, squishy look. βœ— Skipping the white belly join step and finishing without sewing corners; follow the joining instructions carefully and add 2 SC at each corner for neat edges.

Ragdoll Pocket Whale Amigurumi Pattern

Make a sweet pocket-sized whale that fits in the palm of your hand. This pattern uses simple single crochet rows and easy assembly so you can create a charming tiny amigurumi quickly. You will love how customizable it is with color choices and tiny details. Perfect for gifts, keyrings, or a quick crochet treat.

Beginner Friendly 2-4 Hours

Materials Needed for Ragdoll Pocket Whale Amigurumi Pattern

β€” Main Fabric

  • 01
    DK acrylic yarn (author used DK acrylic yarn for main colour)
  • 02
    White DK acrylic yarn or similar for the belly accent (small amount)
  • 03
    Cotton yarn is an optional substitute if preferred

β€” Tools Required

  • 01
    Crochet hook 3.5mm
  • 02
    Black embroidery thread
  • 03
    2mm safety eyes (2 pieces)
  • 04
    Stitch markers
  • 05
    Scissors
  • 06
    Metal yarn needle
  • 07
    Polyester fibrefill or scraps of yarn for stuffing
  • 08
    Keyring (optional)

Progress Tracker

0% Complete

β€” Notes :

Info :

Written in US terms; Pictures are at the end of pattern to make it printer friendly.

β€” Abbreviations :

Infos :

CH - chain. ST - stitch. SC - single crochet. INC - increase = single crochet 2 times in the same stitch or chain.

β€” Materials :

Info :

DK acrylic yarn is what I used, but you are free to use cotton yarn as well. 3.5mm hook. Black embroidery thread. 2mm safety eyes. Stitch markers. Scissors. Metal yarn needle. Polyester fibrefill, or scraps of yarn. Keyring.

β€” Body (MAKE 2) :

Round 0 :

Slipknot, CH 12 and turn - this is the foundation row

Round 1 :

SC in the 2nd CH from hook and then SC until the end of row, CH 1, turn

Round 2 :

SC in each ST of the row, CH 1, turn

Round 3-9 :

SC in each ST of the row, CH 1, turn

Round 10 :

SC in each ST of the row, at the last ST pull up a loop and join the white yarn with a SC, then CH 1 and turn

Round 11 :

Now working with the white yarn, SC in each ST of the row, CH 1, turn

Round 12 :

SC in each ST of the row, fasten and cut yarn

Infos :

Bring the 2 sides together. Starting from the right side of your main colour, join new yarn in the same colour and start to SC along all 3 sides. At every corner ST you will need to do 2 SC. Before reaching the white part, you need to insert the safety eyes. Join the white yarn and continue to SC the last side - here you can tuck all the yarn ends inside and use some extra stuffing as well, but not much is needed. Fasten yarn and weave in ends.

β€” Flippers and Tail (MAKE 4) :

Round 1 :

Slipknot, CH 2. SC 6 times in the 2nd CH from hook

Round 2 :

SC 2 times in each ST around (12 sts total)

Round 3 :

SC 1, INC - all around (18 sts total)

Round 4 :

SC 2, INC - all around (24 sts total), don't fasten

Infos :

Fold circle, turn it with the rounded part to face your left hand and start to SC the sides together. Tuck inside the starting yarn tail. Fasten and leave length of yarn for attaching to the body. For the tail you need to sew the bottom edges, overlapping, with rounded sides facing each other.

β€” Finishing and Assembly :

Info :

Attach tail to the middle of the back side. Attach flippers to either side right above the white stitches. You can either sew on a mouth or not. If you do add a mouth make sure to knot the ends, tuck in and cut remaining yarn.

Assembly Instructions

  • Bring the two body squares together and SC along three sides to join, adding 2 SC at each corner and leaving a small opening to add stuffing and attach features.
  • Insert the 2mm safety eyes before finishing the last side of the body, positioning them just above the white belly strip and spacing symmetrically.
  • Sew the tail to the middle of the back side so the rounded overlapping edges are secure and the tail is centered.
  • Attach flippers to either side of the body just above the white stitches, ensuring symmetry and sewing the starting yarn tails inside for neatness.
  • Embroider or sew a mouth with black embroidery thread if desired, knotting the yarn ends securely and tucking them inside before trimming.

Important Notes

  • πŸ’‘Use a stitch marker at the beginning of each row to keep track of your rows when working flat pieces to avoid counting errors.
  • πŸ’‘Insert safety eyes before closing seams and joining the last side so they sit in the correct position and secure safely.
  • πŸ’‘Stuff the body lightly and evenly; overstuffing can distort the cute square shape while under-stuffing will make assembly tricky.

This tiny ragdoll pocket whale is a joyful, quick crochet project that makes a lovely handmade gift. It's worked in simple stitches and finished with tiny details like safety eyes and a little embroidered smile. Make a whole school of whales in different colours and share the handmade love! πŸ‹πŸ§Ά

You ask,

we answer.

FAQs

What size will the finished piece be?

The finished pocket whale measures approximately palm-sized (around 6-8 cm wide) when using DK yarn and a 3.5mm hook, though exact size will vary by tension.

Can I use different yarn weights for this pattern?

Yes, you can use different yarn weights but you will need to adjust your hook size; a bulkier yarn and larger hook will make a larger whale, while thinner yarn and a smaller hook will make a smaller, more delicate version.

Do I need prior crochet experience for this pattern?

This pattern is rated beginner friendly and mainly uses single crochet worked in rows and small rounds, so basic crochet skills are all you need to follow it.

How long does this project typically take to complete?

Most crocheters finish this pocket whale in 2-4 hours, depending on experience and whether you make multiple pieces or add detailed embroidery.