🧶 Beautiful ✨ Detailed 💝 Adorable

Ragdoll Pocket Jellyfish Amigurumi Pattern

Ragdoll Pocket Jellyfish Amigurumi Pattern
4.5★ Rating
2-3 Hours Time Needed
3.8K Made This
✂️

Intermediate Level

Ideal for those with basic crochet experience, featuring slightly more advanced stitches and techniques to expand your skills.

⏱️

Bite-Sized Project

Finishes in 2-4 hours—perfect for an afternoon of creative relaxation.

🧸

Cute Companion

An adorable friend to cherish, handcrafted with love to bring comfort and joy for years to come.

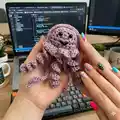
About This Ragdoll Pocket Jellyfish Amigurumi Pattern

This pattern creates a small 'pocket' style jellyfish amigurumi with a folded dome body and curly tentacles. It uses DK weight yarn and a 3.5mm hook for a soft, cuddly texture and tiny scale. The construction is worked in two identical halves that are joined and worked around to add the ruffled skirt and tentacles.

Ragdoll Pocket Jellyfish Amigurumi Pattern crochet pattern - detailed view of completed project

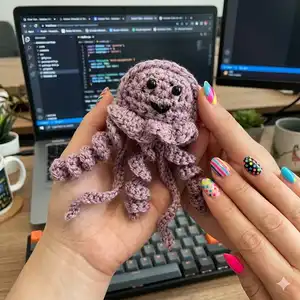
The pattern includes full abbreviations, materials list and clear step-by-step instructions for the body, ruffle, and curly tentacles. Pictures are included at the end of the pattern to guide assembly and finishing touches.

Why You'll Love This Ragdoll Pocket Jellyfish Amigurumi Pattern

I absolutely love this pattern because it turns simple stitches into a characterful little creature that fits in the palm of your hand. I enjoy the folded-body technique since it creates a satisfying 3D shape with minimal sewing. The curly tentacles are so fun and fast to make; they add personality without extra complexity. I also appreciate that it uses common materials—DK yarn and a 3.5mm hook—so you can start right away with yarn you probably already have. Making these little jellyfish is a relaxing and rewarding project that makes lovely gifts.

Ragdoll Pocket Jellyfish Amigurumi Pattern step 1 - construction progress Ragdoll Pocket Jellyfish Amigurumi Pattern step 2 - assembly progress Ragdoll Pocket Jellyfish Amigurumi Pattern step 3 - details and accessories Ragdoll Pocket Jellyfish Amigurumi Pattern step 4 - final assembly and finishing

Switch Things Up

I love customizing this pattern by changing colors; try bright neons for a playful look or soft pastels for a nursery-friendly version.

I sometimes use cotton yarn to give the jellyfish a firmer, less fuzzy finish—this works great if you want it to hold its shape more firmly.

If you want a larger jellyfish, switch to a thicker yarn and a larger hook; conversely, use fingering yarn and a smaller hook for a tiny keychain version.

I often add a small keyring before finishing the final tail so it becomes an instant bag charm—just thread the ring onto the yarn before closing the edge.

Try adding safety eyes of different sizes or embroidering sleepy eyes for a different personality; eye placement changes the expression dramatically.

For an extra tactile finish, use a boucle or textured DK yarn to give the dome a plush, cuddly feel.

I like to experiment with the number and length of tentacles—add more CH sections or shorten them for a bushier or neater look.

Embroider tiny freckles or use contrasting thread to give your jellyfish a whimsical face that stands out from the yarn color.

Make a whole family of jellyfish in gradient colors for a display or a garland; they look great grouped together in varying sizes.

Don't be afraid to mix techniques—try surface crochet or tiny felt accessories like a bow or hat to personalize each jellyfish.

Common Mistakes & How to Fix Them

✗ Skipping the instruction to leave the yarn attached on the second body half can make joining awkward; on the second body part do not fasten off so you can add safety eyes and continue joining edges without an extra join. ✗ Forgetting to stuff as you go will make it hard to close the straight seam neatly; add small amounts of polyester fill while shaping to keep an even, soft form. ✗ Crocheting into both loops at the straight edge instead of only the inside loops will prevent the exterior loop row from forming properly; when reaching the straight part, SC only in the inside loops until closed then CH 1 and work the exterior loops. ✗ Not counting DC clusters around the exterior can leave you with mismatched stitches; work DC 3 times in each loop around and verify you have 39 sts in total before slip stitching into the starting chain. ✗ Placing safety eyes too low or unevenly will affect the finished expression; add the safety eyes on each side of the starting centre point (the row above the straight row) and check spacing before fastening.

Ragdoll Pocket Jellyfish Amigurumi Pattern

Make a tiny, squishy pocket jellyfish you can carry anywhere. This sweet amigurumi uses simple stitches and a clever folded-body construction to create a cute, textured dome and curly tentacles. Perfect as a small gift, keyring, or decorative piece, the pattern is written in US terms and includes clear step-by-step instructions. Grab your DK yarn and a 3.5mm hook and enjoy a quick, satisfying crochet project.

Intermediate 2-3 Hours

Materials Needed for Ragdoll Pocket Jellyfish Amigurumi Pattern

— Main Fabric

  • 01
    DK acrylic yarn (light worsted, DK/#3) - main color, approx 20-40g for one jellyfish
  • 02
    Alternative: cotton yarn of similar weight if you prefer a firmer texture
  • 03
    Black embroidery thread - small amount for mouth details
  • 04
    Polyester fibrefill or scraps of yarn for stuffing
  • 05
    Optional: small keyring if turning into a keychain

— Tools Required

  • 01
    Crochet hook size 3.5mm
  • 02
    Black embroidery thread
  • 03
    1mm safety eyes (2 pieces)
  • 04
    Scissors
  • 05
    Metal yarn needle (tapestry needle) for sewing and weaving ends
  • 06
    Polyester fibrefill or scrap yarn for stuffing
  • 07
    Optional keyring

Progress Tracker

0% Complete

— Body :

Info :

slipknot, CH 2, SC 3 times in the 2nd CH from hook

Round 1 :

R1 – SC 2 times in each ST (6 sts total) CH 1, turn

Round 2 :

R2 – INC, SC 1, repeat until end of row (9 sts total), CH 1, turn

Round 3 :

R3 - INC, SC 2, repeat until end of row (13 sts total) CH 1

Round 4 :

R4 – starting from where the row ended and working on the bottom (the straight side) SC in 8 ST spaces to form a straight row (picture is marked to show which ST spaces)

Round 5 :

R5 - SC in each ST – CH 1, turn

Round 6 :

R6 – SC in each ST, fasten and cut yarn

Infos :

*on the second body part don’t fasten yarn, add the safety eyes on each side of the starting centre point (the row above the straight row). *bring both sides together and start to SC along the edges. *stuff as you go. *when reaching the straight part, SC only in the inside loops until closed. *when that row is finished CH 1 and start working in the loops on the exterior. *DC 3 times in each loop around (39 sts in total), SLST in the CH from the beginning of this row.

Infos :

*working in the middle row (the one in between the DC sts) make: SLST in first ST. SLST in next ST, CH 21, starting form 2nd CH SC 2 times in each CH, SLST back in the same ST. SLST in next ST, CH 28, starting form 2nd CH SLST in each CH, SLST back in the same ST. SLST in next ST. SLST in next ST, CH 21, starting form 2nd CH SC 2 times in each CH, SLST back in the same ST. SLST in next ST, CH 28, starting form 2nd CH SLST in each CH, SLST back in the same ST. SLST in next ST. SLST in next ST, CH 21, starting form 2nd CH SC 2 times in each CH, SLST back in the same ST, fasten, cut and weave in yarn tail.

Info :

*with black thread add a mouth in V shape working through the back, make a knot and tuck in ends.

Assembly Instructions

  • On the second body half do not fasten off the yarn; add 1mm safety eyes on each side of the starting centre point (the row above the straight row) before joining the halves.
  • Bring both body halves together and SC along the edges, stuffing with polyester fill as you go to shape the dome evenly.
  • When you reach the straight row, SC only into the inside loops until the piece is closed, then CH 1 and work the exterior loops to make the ruffled skirt with DC clusters.
  • Work DC 3 times in each exterior loop around (39 DC clusters total), then SLST into the starting CH to finish the ruffle row.
  • Work in the middle row between the DC clusters to add tentacles: use the sequence of SLST and chains (CH 21 and CH 28 sections) and finish each chain section back into the same middle stitch with SLST, fastening and weaving ends after the final set.
  • Use black embroidery thread to embroider a small V-shaped mouth through the back, knot securely and tuck in the ends before trimming any remaining yarn.

Important Notes

  • 💡Starting from the second body side, work with the same yarn without cutting it until the project is finished to simplify joining and finishing.
  • 💡Place safety eyes on the second half before joining: eyes should be on each side of the starting centre point (the row above the straight row).
  • 💡Stuff the body as you go for an even shape and to make closing the straight edge easier.
  • 💡When working the straight row, crochet only into the inside loops until closed, then CH 1 and work the exterior loops for the ruffle.

This tiny Ragdoll Pocket Jellyfish is a delightful, quick make that brings ocean charm to your hands. Perfect as a sweet gift, keyring, or pocket pal — it is small, squishy, and full of personality. Make a few in different colors and share the smiles! 🧶🐚✨

You ask,

we answer.

FAQs

What size will the finished piece be?

The finished amigurumi measures approximately palm-sized (about 6-8 cm tall) when using DK yarn and a 3.5mm hook; exact size will vary with yarn and tension.

Can I use different yarn weights for this pattern?

Yes, you can use other yarn weights but the finished size and texture will change; adjust hook size accordingly and expect a chunkier or smaller jellyfish depending on yarn.

Do I need prior crochet experience for this pattern?

This pattern is rated intermediate because it uses joining, working in loops, and creating multiple chain tentacles; basic crochet skills like SC, DC, SLST and working into chains are recommended.

How long does this project typically take to complete?

Most crocheters complete this project in 2-3 hours, though time may vary based on experience level and how many tentacles you add.