🧢 Beautiful ✨ Detailed πŸ’ Adorable

Rabbit Amigurumi Pattern

Rabbit Amigurumi Pattern
4.3β˜… Rating
5-7 Hours Time Needed
3.2K Made This
βœ‚οΈ

Intermediate Level

Ideal for those with basic crochet experience, featuring slightly more advanced stitches and techniques to expand your skills.

⏱️

Weekend Treat

Takes 5-7 hours, making it an enjoyable project to finish over a couple of days.

🧸

Cute Companion

An adorable friend to cherish, handcrafted with love to bring comfort and joy for years to come.

About This Rabbit Amigurumi Pattern

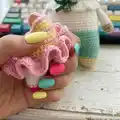
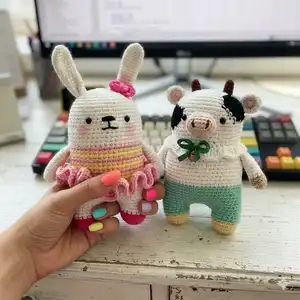
This pattern teaches you how to crochet a 15 cm mini rabbit amigurumi with a frilly skirt and ribbon detail. It includes full round-by-round instructions for the head, body, legs, arms, ears, skirt and ribbon. Color-change guidance and symbol charts are provided to create the layered stripes and skirt ruffles.

Rabbit Amigurumi Pattern crochet pattern - detailed view of completed project

Detailed photos and symbol patterns help you place facial features and assemble each part accurately. Sized for worsted or fingering-weight yarn on a 3mm hook to make a compact, collectible toy.

Why You'll Love This Rabbit Amigurumi Pattern

I absolutely love this pattern because it combines simple amigurumi shaping with playful colorwork that makes the little rabbit irresistibly charming. I enjoy the rhythm of working continuous rounds for the head and body while watching the striped skirt appear. The frilly skirt and tiny ribbon are my favorite details β€” they add personality with a few extra stitches. This pattern is satisfying to finish in a weekend and makes a sweet gift or shelf buddy.

Rabbit Amigurumi Pattern step 1 - construction progress Rabbit Amigurumi Pattern step 2 - assembly progress Rabbit Amigurumi Pattern step 3 - details and accessories Rabbit Amigurumi Pattern step 4 - final assembly and finishing

Switch Things Up

I love how easy it is to personalize this rabbit by changing yarn colors; for example, swap the light yellow stripes for mint green to create a fresh, modern look.

I sometimes use a slightly thinner yarn and a 2.5mm hook to make a smaller keychain-sized version that is perfect for gifts and decorations.

If you want a cuddlier result, try using a bulkier yarn and a larger hook β€” the skirt will become chunkier and more pronounced.

I also like adding embroidered eyelashes or freckles to give the rabbit a different expression and more character before attaching safety eyes.

For a washable toy, I replace glued eyes with securely sewn-on embroidered eyes for a child-safe finish.

Try knitting or crocheting a tiny matching scarf or tiny booties to make a coordinated outfit set and add personality to your creation.

I often experiment with different ribbon styles: use a crocheted bow, a small satin ribbon, or a tiny felt heart for the ear to vary the look.

To make the rabbit posable, consider inserting thin armature wire into the limbs before stuffing β€” this lets you pose the ears or arms slightly.

I recommend testing different stuffing amounts: firmer stuffing gives a sturdy toy, while softer stuffing yields a squeezable, plush feel.

For gift presentation, place the finished rabbit in a small linen bag or box and add a handwritten tag detailing yarn and hook size as a charming personal touch.

Don't be afraid to mix textures like boucle yarn for the skirt or a sparkly thread for decorative stripes to create a unique, eye-catching toy.

Common Mistakes & How to Fix Them

βœ— Skipping the stitch marker when dividing the legs causes incorrect leg placement; place a marker at the 31st stitch of Round 36 to mark the first leg stitch and count carefully. βœ— Forgetting to change yarn colors according to the symbol chart results in uneven stripes; follow the symbol patterns on page 1 and change colors exactly where illustrated. βœ— Stuffing too early or too much makes shaping difficult; stuff the leg before closing and stuff the body gradually to maintain the correct form. βœ— Not using back loop only (BLO) where instructed will flatten textured rounds; work Round 29 as sc through back loop only (sctbl) to create the correct ridge before the skirt. βœ— Sewing parts without pinning can produce misaligned placements; pin the arms, ears and ribbon into position and check symmetry before stitching securely.

Rabbit Amigurumi Pattern

Create an adorable mini rabbit amigurumi with this clear, illustrated crochet pattern. You will work the head, body, legs, arms, ears, skirt and ribbon with step-by-step rounds and helpful photos. The pattern features fun color changes, a frilly skirt and a tiny ribbon for sweet finishing touches. Perfect for gifting or adding to your handmade toy collection.

Intermediate 5-7 Hours

Materials Needed for Rabbit Amigurumi Pattern

β€” Main Fabric

  • 01
    Worsted weight yarn (recommended) - Light pink yarn
  • 02
    Worsted weight yarn (recommended) - Hot pink yarn
  • 03
    Worsted weight yarn (recommended) - White yarn
  • 04
    Worsted weight yarn (recommended) - Light yellow yarn
  • 05
    Worsted weight yarn (recommended) - Black yarn
  • 06
    Note: Finished size is approximately 15 cm (5.9 inches) when using fingering weight yarn on a 3mm crochet hook

β€” Tools Required

  • 01
    Crochet hook size 5/0 (3mm)
  • 02
    Yarn needle (weave in ends and sewing)
  • 03
    Fiberfill stuffing
  • 04
    Glue (to glue the eyes on the face if desired)
  • 05
    5mm black plastic eyes x2
  • 06
    Scissors
  • 07
    Stitch markers
  • 08
    Pins for assembly (optional)
  • 09
    Wooden pins for feet to straighten doll (optional)

Progress Tracker

0% Complete

β€” Head / Body / Legs :

Info :

*Change the color of the yarn according to the SYMBOL PATTERNS on page 1. Changing the yarn color is not mentioned in the descriptive design below.

Info :

Use the White yarn to make MAGIC RING.

Round 1 :

scx6 in the yarn loop, tighten the loop [6 sts]

Round 2 :

(2-sc inc) x 6 [12]

Round 3 :

(scx1, 2-sc inc) x 6 [18]

Round 4 :

(scx2, 2-sc inc) x 6 [24]

Round 5 :

(scx3, 2-sc inc) x 6 [30]

Round 6 :

(scx4, 2-sc inc) x 6 [36]

Round 7 :

(scx5, 2-sc inc) x 6 [42]

Round 8 :

(scx6, 2-sc inc) x 6 [48]

Round 9-28 :

sc in all 48 st [48]

Round 29 :

sctbl in all 48 st [48]

Round 30-36 :

sc in all 48 st [48]

Infos :

Do not forget to change the color as shown in the illustration to the right. (Check page 1 for more details.)

Info :

DIVIDE THE LEGS: To make a leg, identify the center space between the legs by the 6 stitches, and each leg identifies the other by 18. (Use stitch markers to help.) Sc at the 31th st of the Rnd 36. This sc is the first st of the first leg (left leg). Continue working on the first leg (left leg).

Round 37-40 :

sc in all 18 st [18]

Round 41 :

(scx1, sc2tog) x 6 [12]

Round 42 :

(sc2tog) x 6 [6]

Info :

Fasten off, leaving a long tail. Stuff the leg. Using a yarn needle, weave the yarn tail through the front loop of each remaining st and pull tight to close.

Info :

SECOND LEG (Right leg): Rejoin the White yarn to 7th back unworked st of Rnd 36. This sc is the first st for the second leg (right leg). Continue working the second leg (right leg) the same way as the first leg (left leg), from Rnd 37~42. Using a yarn needle, sew the 6 sts between the legs.

β€” Arms x2 :

Info :

Use the White yarn to make MAGIC RING for each arm.

Round 1 :

scx5 in the yarn loop, tighten the loop [5 sts]

Round 2 :

(2-sc inc) x 5 [10]

Round 3-11 :

sc in all 10 st [10]

Info :

Fasten off, Leaving a long tail for sewing. Flatten the ARM, do not stuff.

β€” Skirt :

Info :

*Use Light pink yarn to combine skirt and body at the first stitch of Rnd 29. Place the rabbit head towards your body and start making skirt leftward.

Round 1 :

(ch3, dcx1) in first st, (2-dc inc) x 47, slst [96 sts] *ch 3 = dcx1

Round 2 :

(ch3, dcx1) in first st, (2-dc inc) x 95, slst [192]

Info :

Fasten off and weave in the yarn end.

Info :

Repeat (2-dc inc) until the last stitch as needed to complete the skirt ruffle pattern.

β€” Ribbon :

Info :

Use the Hot pink yarn to make 14 chains for the ribbon.

Round 1 :

slst in the first ch [14 sts]

Round 2 :

ch1, (sc, hdc, dcx3, hdc, sc) x 2, slst [14]

Round 3 :

make 6 chains, wind around and slst in the first ch

Info :

Fasten off, Leaving a long tail for sewing the ribbon to the ear.

β€” Ear x2 :

Info :

Use the White yarn to make MAGIC RING for each ear.

Round 1 :

scx6 in the yarn loop, tighten the loop [6 sts]

Round 2 :

(scx2, 2-sc inc) x 2 [8]

Round 3 :

(scx3, 2-sc inc) x 2 [10]

Round 4-14 :

sc in all 10 st [10]

Info :

Fasten off, Leaving a long tail for sewing. Flatten the EAR, do not stuff. (Fold the ears.)

Info :

Attach facial details: Eyes location is between Round 13 and 14. Ribbon location is on the bottom of the left ear. Arms location is between Round 20 and 21. Sew placements referring to illustrations for accurate positioning.

Assembly Instructions

  • Attach eyes between rounds 13 and 14 on the head; position them approximately 19 stitches apart and glue or safely secure 5mm eyes before stitching features.
  • Sew the arms to the body between rounds 20 and 21, spacing left and right with a slight forward angle and secure with sturdy stitches.
  • Sew ears to the top of the head as shown, folding and flattening the ear pieces and positioning the ribbon on the bottom of the left ear before final stitching.
  • Sew the two legs into place and use a yarn needle to sew the 6 stitches between the legs shut after completing round 42 on both legs.
  • Attach the skirt to the body at the first stitch of Round 29 using light pink yarn, working leftward around the body so the ruffle aligns evenly.

Important Notes

  • πŸ’‘Change yarn colors exactly according to the symbol patterns on page 1 to create the correct stripe sequence for the body and skirt.
  • πŸ’‘Use stitch markers to mark round starts and the 31st stitch on Round 36 when dividing the legs to keep track of shaping and placement.
  • πŸ’‘Flatten the arms and ears and do not stuff them; leave long tails for sewing and position them with pins before final attachment.
  • πŸ’‘Work Round 29 as sc through back loop only (sctbl) to create the textured ridge that the skirt attaches to for a neat finish.

This sweet mini rabbit was designed to be a tiny, lovable companion you can finish in a weekend. It combines classic amigurumi shaping with delicate color stripes, a playful ruffle skirt and a tiny ribbon for personality. Make one for yourself or crochet a whole collection to gift to friends and family. πŸ§ΆπŸ’•

You ask,

we answer.

FAQs

What size will the finished piece be?

The finished amigurumi measures approximately 15 cm (5.9 inches) when using fingering weight yarn on a 3mm crochet hook as noted in the materials section.

Can I use different yarn weights for this pattern?

Yes, you can use different yarn weights, but the final size will change; for example, using worsted weight yarn with a 3mm hook will make a slightly larger, firmer toy and you may need to adjust hook size for consistent tension.

Do I need prior crochet experience for this pattern?

This pattern is rated intermediate, so basic knowledge of crochet stitches like single crochet, increases, decreases, and working in the round is recommended for best results.

How long does this project typically take to complete?

Most crocheters complete this project in 5-7 hours, though time may vary depending on your experience level and how quickly you work through color changes and assembly.