🧢 Beautiful ✨ Detailed πŸ’ Adorable

Pride Rainbow Gnome Amigurumi Pattern

Pride Rainbow Gnome Amigurumi Pattern
4.6β˜… Rating
8-10 Hours Time Needed
3.7K Made This
βœ‚οΈ

Intermediate Level

Ideal for those with basic crochet experience, featuring slightly more advanced stitches and techniques to expand your skills.

⏱️

All-Day Adventure

Requires 8-10 hours, ideal for a full day of immersive crocheting.

🧸

Cute Companion

An adorable friend to cherish, handcrafted with love to bring comfort and joy for years to come.

About This Pride Rainbow Gnome Amigurumi Pattern

This pattern creates a tall, striped Pride Rainbow Gnome featuring a tall curled hat, striped arms and legs, a fluffy yarn beard, and removable hat details. You will work color changes frequently to get the rainbow stripes and assemble small parts for a charming finished toy. The pattern uses standard amigurumi techniques like magic ring, single crochet increases and decreases, and simple finishing steps.

Pride Rainbow Gnome Amigurumi Pattern crochet pattern - detailed view of completed project

Ideal for makers who enjoy colorwork and small parts, this gnome is a cheerful decorative piece. The instructions include hat, body, nose, arms, legs and assembly with photos for reference.

Why You'll Love This Pride Rainbow Gnome Amigurumi Pattern

I absolutely love this pattern because it celebrates color in such a joyful, tactile way and turns simple strips of yarn into a playful character. I enjoy the rhythmic repetition of short stripe rounds β€” it is meditative yet fast-moving. The shaping is straightforward but rewarding, and assembling the beard and accessories lets me personalize each gnome. I get excited to make several at once in different color orders because each finished gnome feels unique and full of personality.

Pride Rainbow Gnome Amigurumi Pattern step 1 - construction progress Pride Rainbow Gnome Amigurumi Pattern step 2 - assembly progress Pride Rainbow Gnome Amigurumi Pattern step 3 - details and accessories Pride Rainbow Gnome Amigurumi Pattern step 4 - final assembly and finishing

Switch Things Up

I love how easy it is to customize this gnome by switching color orders; try a pastel rainbow for a softer look or neon shades for a bold statement.

You can change yarn weight and hook size to make mini keychain versions or large decorative gnomes; adjusting weight gives a huge size range.

I sometimes embroider small hearts or initials on the hat to personalize gifts, which adds a sweet handmade touch that recipients adore.

Swap the straight beard for a curly one by using loop stitch or by braiding yarn pieces together for a different texture and personality.

For a wintery version, use muted blues, greys and white and add a pompom to the hat tip instead of a curled point.

Try adding wire in the hat or limbs if you want posable features; be sure to cover wire ends securely to keep the toy safe.

I often make matching mini gnomes by using left-over yarn scraps and a smaller hook for a coordinated set perfect for gift baskets.

Use wool or cotton instead of acrylic for a different drape and finish, but adjust your hook size and tension for consistent stitch size.

Change the beard color to match the hat for a monochrome look or make the beard multicolored for extra whimsy and visual interest.

If you prefer a minimal finish, skip the shoe laces and keep the boots plain or add tiny felt badges or buttons as decorations.

Common Mistakes & How to Fix Them

βœ— Changing colors without securing tails neatly can leave long loose ends; carry the yarn or weave in ends as you go to keep stripes clean. βœ— Forgetting to insert the cardboard at the base will make the gnome unstable; cut and insert the cardboard at the indicated round before continuing. βœ— Not stuffing evenly makes the body lumpy and misshapen; stuff gradually, especially before rounds where you decrease, to keep a smooth profile. βœ— Skipping BLO instructions when requested will prevent you from sewing the hat correctly; work BLO where noted so you have front loops available for attachment. βœ— Pulling the yarn too tight during color changes can distort the rounds; maintain even tension and gently ease colors into place for consistent stitch size.

Pride Rainbow Gnome Amigurumi Pattern

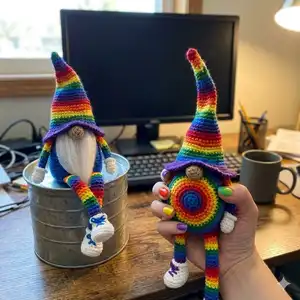
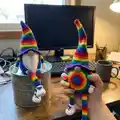
Make a colorful Pride Rainbow Gnome to celebrate love and color with this step-by-step crochet pattern. You will enjoy changing stripes, simple shaping, and easy assembly to create a fun decorative gnome. Perfect for gifting or seasonal decor, this pattern walks you through hat, body, arms, legs, beard and finishing touches. Clear instructions and photos help you every stitch of the way.

Intermediate 8-10 Hours

Materials Needed for Pride Rainbow Gnome Amigurumi Pattern

β€” Main Fabric

  • 01
    Red Heart Super Saver acrylic yarn - purple (small amounts for stripes)
  • 02
    Red Heart Super Saver acrylic yarn - blue (small amounts for stripes)
  • 03
    Red Heart Super Saver acrylic yarn - green (small amounts for stripes)
  • 04
    Red Heart Super Saver acrylic yarn - yellow (small amounts for stripes)
  • 05
    Red Heart Super Saver acrylic yarn - orange (small amounts for stripes)
  • 06
    Red Heart Super Saver acrylic yarn - red (small amounts for stripes)
  • 07
    Red Heart Super Saver yarn - white or beige for hands, boots and nose
  • 08
    Premium Polyester Fiber Fill stuffing (for body, limbs, hat)
  • 09
    Piece of cardboard (for the bottom of the body to make it flat)

β€” Tools Required

  • 01
    Crochet hook size C/2 - 2.75 mm
  • 02
    Tapestry needle for sewing pieces and weaving in ends
  • 03
    Scissors
  • 04
    Piece of cardboard to cut for base
  • 05
    Polyester stuffing (Premium Polyester Fiber Fill)
  • 06
    Small brush for combing the beard
  • 07
    Pins for assembly (optional)

Progress Tracker

0% Complete

Info :

Materials and tools: Yarn (I used Red Heart Super Saver) - purple, blue, green, yellow, orange, red, white or beige. Crochet hook - I used C/2 - 2.75 mm. Tapestry needle. Stuffing (I used Premium Polyester Fiber Fill). Scissors. Piece of cardboard (for the bottom of the body to make it flat). The Pride Rainbow Gnome is approx. 17 inches (43 cm) tall made with the materials and tools stated above. You can make the Gnome smaller or bigger by using smaller or bigger hook and/or yarn. I usually use acrylic yarn for my amigurumis but cotton yarn could be also used probably with a different size of hook and it might change the size of the finished gnome.

Infos :

Abbreviations: st - stitch. sc - single crochet. hdc - half double crochet. inc - increase (2 single crochet in same stitch). dec - decrease (single crochet 2 stitches together front loop only). BLO - back loop only. FLO - front loop only. (24) - number of stitches in a round. (sc, inc) x n - repeat n times. Crab stitch (reverse single crochet) - optional.

β€” Hat :

Info :

Start crocheting hat with red yarn.

Round 1 :

6 sc in magic circle (6)

Round 2 :

sc in each st (6)

Info :

Change to orange.

Round 3 :

sc in each st (6)

Round 4 :

(sc, 1 inc) x 3 (9)

Info :

Change to yellow.

Round 5-6 :

sc in each st (9)

Info :

Change to green.

Round 7 :

(2 sc, 1 inc) x 3 (12)

Round 8 :

sc in each st (12)

Info :

Change to blue.

Round 9 :

sc in each st (12)

Round 10 :

(3 sc, 1 inc) x 3 (15)

Info :

Change to purple.

Round 11-12 :

sc in each st (15)

Info :

Change to red.

Round 13 :

(4 sc, 1 inc) x 3 (18)

Round 14 :

sc in each st (18)

Info :

Change to orange.

Round 15 :

sc in each st (18)

Round 16 :

(5 sc, 1 inc) x 3 (21)

Info :

Change to yellow.

Round 17-18 :

sc in each st (21)

Info :

Change to green.

Round 19 :

(6 sc, 1 inc) x 3 (24)

Round 20 :

sc in each st (24)

Info :

Change to blue.

Round 21 :

sc in each st (24)

Round 22 :

(7 sc, 1 inc) x 3 (27)

Info :

Change to purple.

Round 23-24 :

sc in each st (27)

Info :

Change to red.

Round 25 :

(8 sc, 1 inc) x 3 (30)

Round 26 :

sc in each st (30)

Info :

Change to orange.

Round 27 :

sc in each st (30)

Round 28 :

(9 sc, 1 inc) x 3 (33)

Info :

Change to yellow.

Round 29 :

sc in each st (33)

Round 30 :

(10 sc, 1 inc) x 3 (36)

Info :

Change to green.

Round 31 :

(11 sc, 1 inc) x 3 (39)

Round 32 :

(12 sc, 1 inc) x 3 (42)

Info :

Change to blue.

Round 33 :

(13 sc, 1 inc) x 3 (45)

Round 34 :

(14 sc, 1 inc) x 3 (48)

Info :

Change to purple.

Round 35 :

FLO (7 sc, 1 inc) x 6 (54)

Round 36 :

(8 sc, 1 inc) x 6 (60)

Round 37-38 :

sc in each st around (60)

Round 39 :

crab stitch (reverse single crochet) in each st around (60) (see pictures 1-8) - Optional (you can do single crochet in each stitch around (60)).

Info :

Slip stitch in next stitch, fasten off, cut yarn.

β€” Body :

Info :

Start crocheting the body from the bottom with blue yarn.

Round 1 :

6 sc in magic circle (6)

Round 2 :

inc x 6 (12)

Round 3 :

(1 sc, 1 inc) x 6 (18)

Round 4 :

(2 sc, 1 inc) x 6 (24)

Round 5 :

(3 sc, 1 inc) x 6 (30)

Round 6 :

(4 sc, 1 inc) x 6 (36)

Round 7 :

(5 sc, 1 inc) x 6 (42)

Round 8 :

(6 sc, 1 inc) x 6 (48) (Cut out circle of cardboard to the size of your work). (see picture 9).

Round 9 :

BLO sc in each st (48)

Round 10-24 :

sc in each st (48)

Info :

Change to beige color. Insert cardboard. (see picture 10)

Round 25 :

BLO (6 sc, 1 dec) x 6 (42) (We're going to use front loops to sew hat to the body).

Round 26 :

(5 sc, 1 dec) x 6 (36)

Round 27 :

(4 sc, 1 dec) x 6 (30)

Round 28 :

(3 sc, 1 dec) x 6 (24)

Round 29 :

(2 sc, 1 dec) x 6 (18) - stuff body (see picture 11)

Round 30 :

(1 sc, 1 dec) x 6 (12)

Round 31 :

(1 dec) x 6 (6)

Info :

Fasten off, cut yarn, weave in yarn. (see picture 12)

β€” Nose :

Info :

Start crocheting with beige yarn.

Round 1 :

6 sc in magic circle (6)

Round 2 :

(sc, 1 inc) x 3 (9)

Round 3 :

(2 sc, 1 inc) x 3 (12)

Round 4 :

sc in each st around (12)

Round 5 :

(2 sc, 1 dec) x 3 (9)

Info :

Fasten off, cut yarn (leave long enough yarn to sew nose to body).

β€” Arm (make 2) :

Info :

Start crocheting the hand with white yarn.

Round 1 :

6 sc in magic circle (6)

Round 2 :

(1 sc, 1 inc) x 3 (9)

Round 3 :

(2 sc, 1 inc) x 3 (12)

Round 4 :

sc in each st (12)

Round 5 :

(2 sc, 1 dec) x 3 (9)

Info :

Change to purple. (Don't cut white yarn, leave it in front of work - see pictures 13-17).

Round 6 :

BLO (1 sc, 1 dec) x 3 (6)

Round 7 :

sc in each st (6)

Info :

Change to blue.

Round 8-9 :

sc in each st (6)

Info :

Change to green.

Round 10-11 :

sc in each st (6)

Info :

Change to yellow.

Round 12-13 :

sc in each st (6)

Info :

Change to orange.

Round 14-15 :

sc in each st (6)

Info :

Change to red.

Round 16 :

sc in each st (6)

Info :

Fold in half and crochet the edges together (3 sc). (see pictures 18-21).

Info :

Fasten off, cut yarn (leave long enough yarn for sewing arm to body).

Info :

Go back to round 5.

Item Name (Cuff) :

Chain 1 with white yarn that was left in front of work through the first front loop holding leg upside down. Rnd 1: sc in first loop (same loop you did the chain), (1 inc, 1 sc) x 4, 1 inc, 1 sc (16) (see pictures 22-24). Slip stitch in next stitch, fasten off, cut yarn, weave in yarn.

β€” Leg (make 2) :

Info :

Start crocheting the boot with white yarn. Chain 5.

Round 1 :

sc in 2. stitch from hook, 2 sc, 3 sc in last stitch, 2 sc, 2 sc in last st (10) (see pictures below on next page for Rnd 1-3)

Round 2 :

3 sc, 1 inc, 3 hdc in next st, 1 inc, 3 sc, 3 sc in last st (16) (see picture below)

Round 3 :

5 sc, 1 inc, 1 hdc inc (2 hdc in same st), 1 hdc inc, 1 inc, 5 sc, 2 inc (22) (see picture below)

Round 4 :

BLO sc in each st (22)

Round 5 :

sc in each st (22)

Round 6 :

5 sc, 4 dec, 9 sc (18)

Round 7 :

4 sc, 3 dec, 8 sc (15)

Round 8 :

4 sc, 2 dec, 5 sc, 1 dec (12)

Round 9 :

sc in each st (12)

Round 10 :

(sc, 1 dec) x 4 (8)

Info :

Stuff boot.

Info :

Change to purple. (Don't cut white yarn, leave it in front of work). (see pictures 13-17 for arm)

Round 11 :

BLO sc in each st (8)

Round 12 :

sc in each st (8)

Info :

Change to blue.

Round 13-14 :

sc in each st (8)

Info :

Change to green.

Round 15-16 :

sc in each st (8)

Info :

Change to yellow.

Round 17-18 :

sc in each st (8)

Info :

Change to orange.

Round 19-20 :

sc in each st (8)

Info :

Change to red.

Round 21-22 :

sc in each st (8)

Info :

Change to purple.

Round 23-24 :

sc in each st (8)

Info :

Change to blue.

Round 25-26 :

sc in each st (8)

Info :

Change to green.

Round 27-28 :

sc in each st (8)

Info :

Change to yellow.

Round 29-30 :

sc in each st (8)

Info :

Change to orange.

Round 31-32 :

sc in each st (8)

Info :

Change to red.

Round 33 :

sc in each st (8)

Info :

Fold in half and crochet the edges together (4 sc). (see pictures 18-21 for arm)

Info :

Fasten off, cut yarn (leave long enough yarn for sewing leg to body). Go back to round 11.

Item Name (Cuff) :

Chain 1 with white yarn that was left in front of work through the first front loop holding leg upside down. Rnd 1: 2 sc in first loop (same loop you did the chain), 7 inc (2 sc in each st around (16) (see pictures 22-23 for arm). Slip stitch in next stitch, fasten off, cut yarn, weave in yarn.

β€” Assembly :

Info :

Sew nose on body.

Info :

Sew hands on both sides of body (approx. 5 stitches from nose on each side).

Info :

Sew hat on body.

Info :

Sew legs to the bottom of the body. Add shoe laces.

Info :

Beard: cut about 15 pieces of yarn about 10 inches long. Tie yarn pieces on both sides of the nose (about 4 on each side) and under the nose (about 6-7 pieces). Separate yarn threads and comb with a brush.

Info :

Sew on any decorations you'd like to (buttons, embellishments, etc.).

Assembly Instructions

  • Sew nose on body centered on the face area using the long tail left from the nose so the nose is secure and seated slightly over the beard placement.
  • Sew hands on both sides of body approximately 5 stitches from the nose on each side, using the long tail left on arms to stitch through the body securely.
  • Sew hat to the body using the front loops left on round 25 of the body and the FLO round of the hat for a neat attachment.
  • Sew legs to the bottom of the body evenly spaced for balance and add shoe laces threaded through the boots for detail.
  • Attach beard by tying about 15 yarn pieces approximately 10 inches long around the nose area: about 4 on each side and 6-7 under the nose, then comb the yarn to separate strands.
  • Pin parts in place before final sewing to check symmetry and placement, adjust as needed, then sew securely with tapestry needle.

Important Notes

  • πŸ’‘Use front loops only on the body round indicated to attach the hat cleanly and securely.
  • πŸ’‘Insert a cut-to-size piece of cardboard into the body base at the indicated round to keep the gnome stable and flat.
  • πŸ’‘Leave long tails when fastening off small parts so you have enough yarn for sewing pieces neatly in place.
  • πŸ’‘Stuff firmly but evenly especially before rounds where you decrease to maintain shape and avoid lumps.

This Pride Rainbow Gnome is a joyful handmade piece you can display year-round or give as a colorful gift. It uses bright stripes and classic amigurumi shaping to create a charming, huggable character. Make one for yourself or craft a collection in different color orders for friends and family. 🧢🌈✨

You ask,

we answer.

FAQs

What size will the finished piece be?

The finished amigurumi measures approximately 17 inches (43 cm) tall when using the recommended yarn and C/2 (2.75 mm) hook.

Can I use different yarn weights for this pattern?

Yes, you can use different yarn weights but this will change the final size; adjust your hook accordingly and expect differences in height and fullness.

Do I need prior crochet experience for this pattern?

This pattern is rated intermediate and uses frequent color changes, increases, decreases, and basic assemblyβ€”so familiarity with amigurumi techniques is recommended.

How long does this project typically take to complete?

Most crocheters complete this project in 8-10 hours, though time may vary depending on experience and how many gnomes you make.