๐Ÿงถ Beautiful โœจ Detailed ๐Ÿ’ Adorable

Potion Amigurumi Pattern

Potion Amigurumi Pattern
4.0โ˜… Rating
5-7 Hours Time Needed
1.7K Made This
โœ‚๏ธ

Intermediate Level

Ideal for those with basic crochet experience, featuring slightly more advanced stitches and techniques to expand your skills.

โฑ๏ธ

Weekend Treat

Takes 5-7 hours, making it an enjoyable project to finish over a couple of days.

๐Ÿงธ

Cute Companion

An adorable friend to cherish, handcrafted with love to bring comfort and joy for years to come.

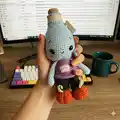
About This Potion Amigurumi Pattern

This pattern teaches you how to crochet a small potion bottle amigurumi with a rounded head, bottle neck, body, arms and whimsical boots. It includes step-by-step round instructions and helpful notes about where to place eyes and how to shape the face. You'll use yarn art jeans and switch colors to create the bottle body and clothing details.

Potion Amigurumi Pattern crochet pattern - detailed view of completed project

Suitable for intermediate crocheters who know basic amigurumi techniques. The pattern includes material lists, abbreviations, and finishing tips to complete your toy.

Why You'll Love This Potion Amigurumi Pattern

I absolutely love this pattern because it combines simple shaping with adorable character โ€” the bottle neck and rounded head give it a unique silhouette. I enjoy the color changes and small accessories that let you add personality quickly. The construction is efficient and fun, with legs and body worked together for easy assembly. It is a satisfying weekend project that produces a handmade toy you will proudly display or gift.

Potion Amigurumi Pattern step 1 - construction progress Potion Amigurumi Pattern step 2 - assembly progress Potion Amigurumi Pattern step 3 - details and accessories Potion Amigurumi Pattern step 4 - final assembly and finishing

Switch Things Up

I love how easy it is to customize this pattern by switching yarn colors to create different potion types; try neon or pastel combos for different moods.

Change the yarn weight and hook size to make a larger or smaller potion amigurumi; bulky yarn with a larger hook gives a chunky friend, while thinner yarn creates a tiny keychain version.

I often add embroidered labels or tiny crocheted charms to the bottle for extra personality and storytelling possibilities.

Feel free to replace safety eyes with embroidered eyes for a child-safe toy โ€” adjust placement slightly and test the expression before fastening permanently.

Make seasonal variations: use autumn colors and add a tiny crocheted leaf, or make a winter potion with sparkly yarn for holiday gifts.

Try adding wire to the arms if you want posable limbs; insert it carefully and cover with stuffing so it doesn't poke through.

Experiment with different boot shapes and sole colors to give each potion its own style โ€” bobble stitches or surface slip stitches can add texture.

I sometimes embroider tiny numbers or symbols on the pocket to turn the bottle into a character with a backstory.

If you prefer a softer look, use a fuzzy or boucle yarn for the body but keep details in smooth yarn for contrast.

Make a full set by designing complementary mini amigurumi ingredients (like tiny cupcake or bat) using the same yarn palette to create a themed gift bundle.

Common Mistakes & How to Fix Them

โœ— Skipping the instruction to work into back loops only when indicated will change the surface texture; follow the BLO instructions exactly to get the intended shaping and look. โœ— Installing safety eyes in the wrong rounds can make the face look squashed or misaligned; place eyes between rounds 30-31 spaced 13 SC apart as instructed. โœ— Forgetting to stuff gradually can create lumps or a flat shape; stuff tightly in small amounts and use a chopstick to push stuffing into narrow areas. โœ— Cutting yarn prematurely when joining legs will leave you unable to continue seamless work; do not cut the yarn on the second leg until instructed to maintain continuity. โœ— Not counting stitches after increases and decreases causes uneven shaping; count after each round especially during shaping rounds and after repeated sequences.

Potion Amigurumi Pattern

Create a charming potion bottle amigurumi with this detailed crochet pattern. You'll enjoy shaping the rounded head, sculpting facial features, and assembling cute legs, arms, and accessories. The pattern includes clear rounds, materials, and tips so you can follow along with confidence. Perfect as a handmade gift or a whimsical addition to your amigurumi collection.

Intermediate 5-7 Hours

Materials Needed for Potion Amigurumi Pattern

โ€” Main Fabric

  • 01
    Yarn Art Jeans color 75 (use for main body parts) - small amounts
  • 02
    Yarn Art Jeans color 72 (use for secondary parts) - small amounts
  • 03
    Yarn Art Jeans color 85 (accent color) - small amounts
  • 04
    Yarn Art Jeans color 19 (accent color) - small amounts
  • 05
    Yarn Art Jeans color 05 (accent color) - small amounts
  • 06
    Black fine yarn for eyelashes embroidery - small amount
  • 07
    Polyester toy stuffing for filling

โ€” Tools Required

  • 01
    Crochet hook size 1.75 mm
  • 02
    10-12 mm black plastic safety eyes (2 pcs)
  • 03
    Chopstick for stuffing
  • 04
    Needle for joining pieces and embroidering
  • 05
    Scissors
  • 06
    Pins
  • 07
    Stitch marker

Progress Tracker

0% Complete

โ€” Head :

Info :

BEGIN CROCHETING IN GREY

Round 1 :

6SC INTO MR (6)

Round 2 :

6INC (12)

Round 3 :

(1SC, INC)*6 (18)

Info :

WORK INTO BACK LOOPS ONLY

Round 4 :

18SC (18)

Round 5-7 :

18SC (18)

Info :

SWITCH TO BLUE YARN AND WORK INTO BACK LOOPS ONLY

Round 8 :

(2SC, INC)*6 (24)

Round 9-12 :

24SC (24)

Round 13 :

(3SC, INC)*6 (30)

Round 14-15 :

30SC (30)

Round 16 :

(4SC, INC)*6 (36)

Round 17 :

(5SC, INC)*6 (42)

Round 18 :

42SC (42)

Round 19 :

(6SC, INC)*6 (48)

Round 20-21 :

48SC (48)

Round 22 :

(7SC, INC)*6 (54)

Round 23-34 :

54SC (54)

Round 35 :

(7SC, DEC)*6 (48)

Round 36 :

BLO (6SC, DEC)*6 (42)

Round 37 :

(5SC, DEC)*6 (36)

Round 38 :

(4SC, DEC)*6 (30)

Round 39 :

(3SC, DEC)*6 (24)

Info :

RETURN TO ROUND 8, WORK ACROSS THE FRONT LOOPS

Info :

INSTALL EYES BETWEEN ROUNDS 30-31, 13SC APART

โ€” Legs and Body :

Round 1 :

CHAIN 7, STARTING TO THE 2ND ST FROM HOOK WORK 5SC, 4SC TO 1 ST, 4SC, INC (13)

Round 2 :

INC, 4SC, 4INC, 4SC, 2INC (22)

Round 3 :

1SC, INC, 4SC, (1SC, INC)*4, 4SC, (1SC, INC)*2 (29)

Round 4 :

2SC, INC, 4SC, (2SC, INC)*4, 4SC, (2SC, INC)*2 (36)

Round 5-7 :

36SC (36)

Round 8 :

12SC, 6DEC HDC, 12SC (30)

Round 9 :

(3SC, DEC)*6 (24)

Round 10 :

3SC, DEC, (1SC, DEC)*5, 4SC (18)

Round 11 :

2SC, DEC, (4SC, DEC)*2, 2SC (15)

Info :

CHANGE YARN COLOR

Round 12 :

15SC (15)

Info :

WORK INTO BACK LOOPS ONLY

Round 13 :

15SC (15)

Round 14-17 :

15SC (15)

Info :

RETURN TO ROUND 13 AND WORK 15DC

Info :

WORK 5SC ADDITIONALLY ACROSS THE SECOND LEG

Info :

CUT YARN ON THE SECOND LEG, BUT DO NOT BREAK YARN ON THE SECOND ONE, GO ON WORKING ACROSS LEG #1: 15SC AND THEN ACROSS LEG #2: 15SC

Round 19 :

(4SC, INC)*6 (36)

Round 20 :

36SC (36)

Info :

CHANGE YARN COLOR

Round 21 :

36SC (36)

Info :

WORK INTO BACK LOOPS ONLY

Round 22 :

36SC (36)

Round 23-25 :

36SC (36)

Round 26 :

(4SC, DEC)*6 (30)

Round 27 :

30SC (30)

Round 28 :

(3SC, DEC)*6 (24)

Round 29-31 :

24SC (24)

Info :

RETURN TO ROUND 22, WORK 36DC

โ€” Arms :

Round 1 :

6SC INTO MR (6)

Round 2 :

6INC (12)

Round 3 :

12SC (12)

Round 4 :

10SC, DEC (11)

Round 5 :

9SC, DEC (10)

Round 6-14 :

10SC (10)

Info :

A ROW THROUGH BOTH EDGES WORK

โ€” Veins on the boots :

Veins on the boots (P1) :

10CH, TURN AND STARTING TO THE 2ND ST FROM HOOK WORK 9 SL ST

โ€” Pocket :

Pocket (P1) :

1ROW: 5CH, TURN YOUR WORK. 2ROW: INC, 2SC, INC (6SC) TURN YOUR WORK. 3ROW: 6SC. SEW IT ON THE BELLY

โ€” Face sculpting and finishing :

Info :

MAKE FACE NEEDLE SCULPTING, SEND YOUR NEEDLE FROM BELOW THE NECK TO THE PLACE UNDER ONE OF THE EYES, AND GO BACK DOWN 1 ST AWAY, PULL. REPEAT THE STEPS ABOVE FOR THE SECOND EYE. PULL AND TIE KNOTS

Info :

EMBROIDER BROWS AND A SMILE.

Assembly Instructions

  • Install safety eyes between rounds 30-31 of the head, spaced 13 single crochets apart before sculpting the face.
  • Sew the pocket to the belly of the body after completing the pocket piece (3 rows) securing edges neatly.
  • Use needle sculpting to shape the face: pass the needle from below the neck to the spot under an eye, go back down one stitch away, pull and repeat for the other eye, then tie knots.
  • Sew arms and legs into place using a yarn needle and the long tails, pinning pieces first to check placement before final stitching.
  • Add slip-stitch veins to the boots using 10 chains and 9 slip stitches starting from the 2nd chain from hook, then sew boots to the leg area.

Important Notes

  • ๐Ÿ’กThis pattern does not contain crocheting lessons and is designed for crocheters who mastered basic crocheting skills and respective terms.
  • ๐Ÿ’กThe finished toy size with the materials recommended above is about 19 cm; size depends on tension and yarn weight.
  • ๐Ÿ’กCredit the designer on Instagram @mi.moo.mi and tag #bymimomi when posting finished works.
  • ๐Ÿ’กStuff firmly but evenly and use a chopstick to push stuffing into tight areas for smooth shaping.
  • ๐Ÿ’กUse stitch markers to track round starts and changes, especially when working BLO or FLO sections.

Thanks for making this little potion amigurumi โ€” your handmade creation brings magic and smiles! ๐Ÿงถ I hope you enjoyed stitching every round and adding the tiny details that make it unique. โœจ Share your finished toy and tag the designer to spread the crafty joy! ๐Ÿงต

You ask,

we answer.

FAQs

What size will the finished piece be?

The finished toy size with the recommended materials is about 19 cm, though size depends on your tension and yarn weight.

What materials and hook size are recommended?

This pattern uses Yarn Art Jeans in multiple colors and a 1.75 mm crochet hook; 10-12 mm black safety eyes and polyester stuffing are recommended.

At what point should I install the safety eyes?

Install safety eyes between rounds 30-31 of the head, spacing them 13 single crochets apart, before completing the head shaping.

Can a beginner follow this pattern?

This pattern is rated intermediate; basic amigurumi experience and familiarity with increases, decreases, BLO/FLO and sewing pieces together are recommended.

How long does it typically take to complete?

Most crocheters finish this project in about 5-7 hours, depending on experience level and speed.