🧢 Beautiful ✨ Detailed πŸ’ Adorable

Positive Potato Amigurumi Pattern

Positive Potato Amigurumi Pattern
4.7β˜… Rating
2-3 Hours Time Needed
1.2K Made This
βœ‚οΈ

Beginner Friendly Level

Perfect for those just starting their crochet journey, with clear instructions and simple techniques

⏱️

Bite-Sized Project

Finishes in 2-4 hoursβ€”perfect for an afternoon of creative relaxation.

🧸

Cute Companion

An adorable friend to cherish, handcrafted with love to bring comfort and joy for years to come.

About This Positive Potato Amigurumi Pattern

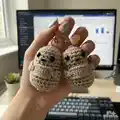
This pattern makes a small Positive Potato amigurumi keychain measuring about 7 cm (2.75"). The design is quick and beginner-friendly, using simple UK double crochet rounds to create a plump potato shape. You will finish with tiny arms, safety eyes (or embroidered eyes for children), and a printable saying to tuck in the hands.

Positive Potato Amigurumi Pattern crochet pattern - detailed view of completed project

The pattern includes full round-by-round instructions, an arms pattern (make two), and clear assembly steps for attaching the saying and optional clasp. Ideal for gifts, school projects, or cheerful pocket companions.

Why You'll Love This Positive Potato Amigurumi Pattern

I absolutely love this pattern because its so fast and satisfying to make; you can finish a whole potato in under an hour once you get the rhythm. The tiny size and simple shaping make it forgiving for new crocheters and perfect for batch-making as gifts. I also adore the little sayings β€” they turn a small crochet object into a thoughtful keepsake. Finally, the pattern is flexible: you can use different yarns, swap safety eyes for embroidery for safety, or add a clasp for a keychain.

Positive Potato Amigurumi Pattern step 1 - construction progress Positive Potato Amigurumi Pattern step 2 - assembly progress Positive Potato Amigurumi Pattern step 3 - details and accessories Positive Potato Amigurumi Pattern step 4 - final assembly and finishing

Switch Things Up

I love that this pattern is so adaptable; try different yarn weights and hooks for unique sizes and textures.

Use sport weight yarn and a 2.5mm hook to make tiny keychain versions that fit on necklaces or phone charms.

Try bulky yarn with a 5mm hook for a plush, squishy pocket pal perfect for toddlers (embroider eyes for safety).

Change the color to make themed potatoes: rosy for a sweet potato, speckled yarn for a new look, or bright colors for fun characters.

I often add tiny accessories like a crocheted hat or scarf to give each potato personality and seasonal flair.

Embroider different mouth shapes to change expressions β€” a smile, surprised o, or tiny smirk transforms the character instantly.

Swap safety eyes for French knots or felt pieces if you prefer sewn features or want a fully soft toy variant.

Personalize the printed sayings or handwrite special messages to make each one a more meaningful gift.

Add a small wire inside the arms if you want posable hands to hold tiny props or the saying more securely.

I recommend experimenting with different printed paper weights and laminating the sayings for durability when making lots of pieces.

Common Mistakes & How to Fix Them

βœ— Placing eyes too high or too low on the face will change the potatos expression; follow the instruction to place eyes between rows 5 and 6 with three stitches between to achieve the intended look. βœ— Forgetting to move the place marker after each round can make counting rounds confusing; place a marker at the first stitch and move it after every round to keep accurate counts. βœ— Overstuffing the potato makes the shape hard and distorted; stuff gradually and top up in the last rounds to keep a soft, rounded profile. βœ— Using safety eyes for toys intended for young children can be unsafe; embroider the eyes if the item is for a child under three and ensure all parts are secured firmly. βœ— Not securing the printed saying will mean it slips out easily; place tape across the saying for strength and stitch it through the margin when attaching to the hands.

Positive Potato Amigurumi Pattern

Create these tiny, uplifting Positive Potatoes β€” quick, charming amigurumi keychains that bring a smile. You will love how simple the stitches are and how fast they come together. Perfect for making little gifts, classroom treats, or a cheerful accessory to brighten someones day.

Beginner Friendly 2-3 Hours

Materials Needed for Positive Potato Amigurumi Pattern

β€” Main Fabric

  • 01
    20g 8ply (DK) yarn in beige or any potato-coloured yarn (any yarn and crochet hook can be used as size is unimportant)
  • 02
    Black yarn to embroider mouth
  • 03
    Stuffing (small amount)
  • 04
    2 x 8mm safety eyes (or embroidered eyes if for a child under 3)
  • 05
    Printable paper for sayings (and sticky tape to strengthen the printed sayings)

β€” Tools Required

  • 01
    Crochet hook size 3.5mm (UK 9, US 4)
  • 02
    2 x 8mm safety eyes (or yarn and needle for embroidered eyes)
  • 03
    Scissors
  • 04
    Yarn needle for sewing and weaving ends
  • 05
    Stitch marker
  • 06
    Pins for assembly and positioning sayings/arms
  • 07
    Sticky tape to strengthen printed sayings
  • 08
    Small clip, clasp or keyring chain (optional)
  • 09
    Printer and paper to print sayings (optional)

Progress Tracker

0% Complete

β€” Body :

Info :

With 3.5mm hook and 8ply yarn, 6dc into magic circle

Round 1 :

6dc into magic circle (6)

Round 2 :

2dc in each around, (12), PM and move after every round

Round 3 :

(dc, 2dc) around, (18)

Round 4-8 :

dc around, (5 rounds)

Info :

Place eyes between rows 5 and 6 with 3 sts in between.

Round 9 :

(dc 5, 2dc) around, (21)

Round 10 :

dc around,

Round 11 :

(dc 6, 2dc), around, (24)

Round 12 :

dc around,

Round 13 :

(dc 6, dc dec) around, (21)

Round 14 :

(dc 5, dc dec) around, (18)

Round 15 :

(dc, dc dec) around, (12)

Stuff potato :

Top up stuffing before final decrease rounds to achieve desired shape

Round 16 :

(dc dec) around, (6), top up stuffing, cut yarn and thread through the last 6sts and pull up tight, FO

β€” Arms/hand :

Arms/hand (make 2) :

Leaving a long end, ch 3, turn

Round 2 :

dc in 2nd ch from hook, dc, (2), turn

Round 3-4 :

ch 1, dc 2

Round 5 :

dc dec, FO leaving a long end of yarn.

β€” Assembly :

Infos :

Print the sheet of 'sayings'. Cut out your chosen 'saying' leaving a margin on each side (see pic). Place a piece of sticky tape across the 'saying' to strengthen it.

Info :

Centre the 'saying' on the body, place the arms on each side so that the hands are on the margin of the 'saying'. Pin the arms in place and using the long yarn end, stitch firmly across the end.

Info :

Using the long end of yarn, at the hand end, and holding the 'saying' in place, push the needle through the 'saying' in the middle of the margin, secure the end firmly by weaving through the body.

Info :

Make a mouth using black yarn and attach a clasp or keyring chain, (optional).

Assembly Instructions

  • Place eyes between rounds 5 and 6 with three stitches between for correct facial placement and secure safety eyes firmly.
  • Centre the printed saying on the body and pin the arms so the hands sit on the edges of the saying, then stitch the arms in place using the long yarn ends.
  • Using the long yarn end at the hand, push the needle through the margin of the taped saying and weave the end through the body to secure the saying permanently.
  • Top up stuffing before closing the top, then cut yarn and thread through the last six stitches, pull tight and finish off securely.
  • Make a small embroidered mouth with black yarn and attach an optional clasp or keyring through the top for a keychain.

Important Notes

  • πŸ’‘Use a stitch marker and move it after every round to keep accurate stitch counts and prevent accidental increases or decreases.
  • πŸ’‘For toys intended for children under three, embroider the eyes instead of using safety eyes to ensure the piece is child-safe.
  • πŸ’‘Place a piece of sticky tape across the printed saying to strengthen it before stitching through the margin for attachment.
  • πŸ’‘Pin the arms and saying in place before stitching to ensure correct placement and symmetry.
  • πŸ’‘Stuff gradually and check shape frequently; overstuffing will distort the potatos shape.

This Positive Potato pattern is a cheerful, pocket-sized amigurumi perfect for gifts, school projects, or little reminders of kindness. 🧢 Its quick to make and wonderfully customizable with different yarns, expressions, and sayings. πŸ’– Keep a stash of these bright little friends on hand to spread smiles wherever you go! 😊

You ask,

we answer.

FAQs

What size will the finished piece be?

The finished amigurumi measures approximately 7 cm (2.75") tall when using 8ply/DK yarn and a 3.5mm hook.

Can I use different yarn weights for this pattern?

Yes, you can use different yarn weights; using thicker yarn and a larger hook makes a chunkier potato, while thinner yarn with a smaller hook makes a mini version.

Do I need prior crochet experience for this pattern?

This pattern is beginner friendly and uses basic stitches and shaping, so a crocheter with basic knowledge of chains, double crochet (UK) and decreases should be able to follow it.

How long does this project typically take to complete?

Most crocheters complete one Positive Potato in about 2-3 hours, although experienced makers can finish faster; time varies with practice and finishing details.