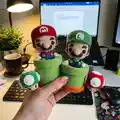
Make adorable Mario and Luigi amigurumi figures plus their iconic pipes and mushrooms with step-by-step crochet instructions. This pattern gives you all the rounds, parts and assembly details so you can recreate these charming pocket-size characters. Perfect for gifting, display, or playful decor — follow along and customize colors to make your own plumbers come to life.
Progress Tracker
0% Complete
— Mario Pattern :
— Head :
R1 :
6sc in magic ring [6]
R9-R17 :
sc around (9 rounds) [48]
Info :
Insert the eyes (I inserted it between round 16 and 17, and about 10 sts in between), snap the washer in and stuff firmly.
Info :
Slst, fasten off, weave the tail in, add more stuffing if needed.
— Collar :
Left collar :
(red) ch 4, (starting from 2nd ch from hook) 2sc, slst [3]
Right collar :
ch 4, (starting from 2nd ch from hook) slst, 2sc [3]
Info :
Fasten off and leave a tail for sewing, or not leaving a tail and just glue them later.
— Body :
R1 :
(in red) 6sc in magic ring [6]
R5-R9 :
sc around (5 rounds) [24]
R10 :
(dec, 2sc) x2, dec, sc, (change to beige) sc, (change to red) (dec, 2sc) x3 [18]
R11 :
8sc, (change to beige) 2sc, (change to red) 8sc [18]
Info :
Slst, fasten off, leave a tail for sewing and stuff fully.
— Legs (make 2) :
R1 :
(in tan) 6sc in magic ring [6]
R3 :
(change to brown) BLO, sc around [12]
Info :
Flip the upper part inside out to make it easier to work with (so the back loops will show up), you'll flip it back again after you finish the piece.
R5 :
(crochet into the back loops of R3) (change to blue) 5sc, sk 1 st, 5sc, sk 1 st [10]
R6-R7 :
sc around (2 rounds) [10]
Info :
Slst, fasten off, leave a tail for sewing and stuff firmly.
— Uniform (blue) :
R1 :
6sc in magic ring [6]
R6-R8 :
sc around (3 rounds) [26]
Info :
Now we\'re making the back "flap". Continue and work in rows. Ch 1 to start off.
R9 :
8sc, ch1 and turn [8]
R10 :
sc, sk 1 st, 4sc, sk 1 st, sc [6]
Info :
Cut the yarn and fasten off. Now we\'re making the front "flap". Skip 5 sts from the left side of the back "flap" (see picture). Repeat the "back" flap pattern for the front "flap". Fasten off. Weave in/seal off the tails.
— Pocket (blue) :
Instruction :
Ch 5, (starting from 2nd ch from hook) sc, 2dc, sc [4]. Fasten off and leave a tail for sewing, or not leaving a tail and just glue them later.
— Straps (make 2) :
Instruction :
(blue) Ch 14, (starting from 2nd ch from hook) 13slst [13]. Fasten off and leave a tail for sewing, or not leaving a tail and just glue them later.
— Buttons (make 2) :
Instruction :
(bronze) Ch 3, (starting from 3rd ch from hook) hdc [1]. Fasten off and seal off the tails.
— Arms (make 2) :
R1 :
(in white) 4sc in magic ring [4]
Info :
Flip the upper part inside out to make it easier to work with (so the back loops will show up), you'll flip it back again after you finish the piece.
R5 :
(crochet into the back loops of R3) (change to red) sc around [8]
R6-R9 :
sc around (4 rounds) [8]
Info :
Slst, fasten off, leave a tail for sewing and stuff lightly.
— Sideburns (make 2) :
Instruction :
(dark brown) Ch 7, (starting from 2nd ch from hook) slst, 3sc, 2hdc [6]. Fasten off and leave a tail for sewing, or not leaving a tail and just glue them later.
— Eyebrows (make 2) :
Instruction :
(dark brown) Ch 5, (starting from 2nd ch from hook) slst, 2sc, slst [4]. Fasten off and leave a tail for sewing, or not leaving a tail and just glue them later.
— Moustache :
Instruction :
(dark brown) Ch 10, (starting from 2nd ch from hook) slst, hdc inc, slst, (dc inc, slst) x2, hdc inc, slst [13]. Fasten off and leave a tail for sewing, or not leaving a tail and just glue them later.
— Hair base (dark brown) :
R1 :
6sc in magic ring [6]
R9-R17 :
sc around (9 rounds) [48]
Info :
Slst, fasten off and leave a long tail for sewing.
— Nose (beige) :
R1 :
5sc in magic ring [5]
Info :
Slst, fasten off, leave a long tail for sewing and stuff lightly.
— Ears (make 2) :
Instruction :
(beige) Ch 5, (starting from 2nd ch from hook) slst, 2dc, slst [4]. Fasten off and leave a tail for sewing.
— Cap (red) :
R1 :
6sc in magic ring [6]
R12-R15 :
sc around (4 rounds) [66]
Info :
Cut off yarn and fasten off. Skip 18sts from the stitch you fastened off (see picture). Work FRONT loops only. Start off by chain 1.
R19 :
FLO, slst, sc, hdc, dc, htc, tc inc, 6tc, tc inc, htc, dc, hdc, sc, slst [20]
Info :
Weave in/seal off all the tails. Now make the small white circle for the logo: Ch10 (starting from 2nd ch), slst patterns below:
R1 :
(in white) 5sc in magic ring [5]
Info :
Slst, fasten off and leave a tail for sewing, then embroider "M" using red yarn and attach it in the centre of the cap.
— Assembly :
Info :
I recommend to use ball point pins for assembly. This way will help you to keep the pieces in place and make it easier to do the sewing. I'm using a hot glue gun to attach some of the parts, but if you make this amigurumi for kids, I recommend to make it fully sewn.
Step 1 :
Sew the body to the head.
Step 2 :
Sew the hair base to the head diagonally like so:
Step 3 :
Sew the left and right collar outlining the beige area on the body like so:
Step 4 :
Attach the uniform to the body. Make sure the front and back "flaps" are in the centre.
Step 5 :
Sew the legs to the lower part of the body, approximately on R4-R7 of the uniform, and about 4sts in between.
Step 6 :
This step is optional, I inserted a wire through the upper part of the body for the arms. (Not recommended if you make this amigurumi for kids)
Step 7 :
Sew the arms to the sides of the upper body.
Step 8 :
Attach the pocket to the centre of the uniform.
Step 9 :
Attach both straps from the front flap, to the shoulders then to the back flap.
Step 10 :
Attach the buttons on the left and right side of the front flap, in front of the straps.
Step 11 :
Sew the ears to the sides of the face, approximately 5sts away from the eyes, and in the same level of the eyes.
Step 12 :
Place the moustache slightly under the eyes. Don't attach it yet. Sew the nose in between the eyes, then sew/glue only the upper part of the moustache (leave the lower part hanging).
Step 13 :
Attach the eyebrows above the eyes, attach the sideburns in front of the ears and slightly upper, then insert the cap on the head.
Step 14 :
Using light blue yarn, embroider a line surrounding the outside half of both eyes like so. Then apply peach/pink eyeshadow/real blush for the cheeks (optional).
— Luigi Pattern :
Instruction :
For Luigi's pattern, follow Mario's pattern, but: 1) Change red to green (body, collar, arms). 2) Change brown to dark brown (legs). 3) Change blue to navy blue (uniform, straps, pocket). 4) For the head, cap, hair base and moustache, use different pattern variations that are provided after this. 5) For the assembly, follow exactly Mario's assembly.
— Luigi Cap & details :
Cap (green) R1 :
6sc in magic ring [6]
R12-R15 :
sc around (4 rounds) [63]
R18 :
dec, 8sc, dec, 7sc, dec, 8sc, dec, 7sc, dec, 8sc, dec, 7sc [51]
Info :
Cut off yarn and fasten off. Skip 17sts from the stitch you fastened off. Start off by chain 1. Work FRONT loops only.
R19 :
FLO, slst, sc, hdc, dc, htc, tc inc, 5tc, tc inc, htc, dc, hdc, sc, slst [19]
Info :
Weave in/seal off all the tails. Now embroider an "L" on the white disk using green yarn and attach it to the cap centre.
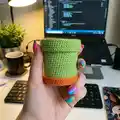
— Pipe Pattern :
Instruction :
We\'re making the pipe in a continuous piece. (terracotta, light green, green)
R1 :
(in terracotta) 6sc in magic ring [6]
Info :
Flip the upper part inside out to make it easier to work with (so the back loops will show up), you'll flip it back again later.
R15 :
(crochet into the back loops of R13) (change to light green) (dec, 9sc) x6 [60]
R16-R24 :
sc around (9 rounds) [60]
R25 :
FLO, (inc, 9sc) x6 [66]
R28-R31 :
sc around (4 rounds) [72]
Info :
Fold the piece every time there's a line of loops forming a horizontal line appearing from the FLO/BLO (see picture).
R32 :
BLO, (dec, 10sc) x6 [66]
Info :
Now we\'re making the inner part of the pipe.
R34 :
(change to green) BLO, (dec, 18sc) x3 [57]
R35-R43 :
sc around (9 rounds) [57]
R44 :
FLO, (17sc, dec) x3 [54]
Info :
Finish off and weave the tail in.
Additional steps :
1) Your pipe is looking like this. 2) Insert the darker green coloured piece inside. 3) Push it and shape it inside the inner pipe. Make it neat. 4) Don\'t forget the outer part, shape the edges and make it neat. 5) You\'re done making pipe 1. 6) Make pipe 2. Follow pipe 1's pattern, but double the height: From R16, instead of sc around for 9 rounds, you sc around for 18 rounds.
— Bonus Pattern!!! Mushrooms :
— Head (red/green) :
R1 :
6sc in magic ring [6]
R8-R10 :
sc around (3 rounds) [36]
Info :
Slst, fasten off, leave a tail for sewing and stuff fully.
— Body (beige) :
R1 :
6sc in magic ring [6]
R5-R8 :
sc around (4 rounds) [21]
Info :
Slst, fasten off, hide the tail later (inside the head), and stuff fully. Insert safety eyes on R5-R6, 4sts in between.
— Dots (make 5) :
R1 :
4sc in magic ring [4]
Info :
Fasten off and leave a tail for sewing, or not leaving a tail and just glue them later.
— Mushrooms Assembly :
Step 1 :
Insert the body to the head, place the head diagonally like so, then sew them in place using the head's tail.
Step 2 :
Attach one dot on the top of the head.
Step 3 :
Attach 2 dots on the front and back side of the head.
Step 4 :
Attach 2 dots on the left and right side of the head.
Step 5 :
(Optional) Apply light blush on the cheeks.
This playful Plumbers and Pipes set includes Mario, Luigi, pipes and mushrooms — a pocket-sized tribute to classic gaming! Make one for yourself or gift to a friend who loves handmade nostalgia. The set is compact, customizable, and perfect for display or gentle play. 🧶✨