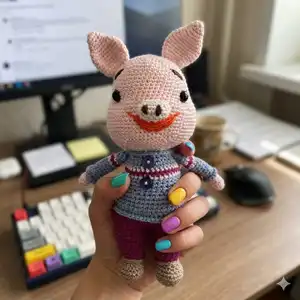
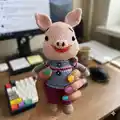
Make a sweet Pinky Pig amigurumi with step-by-step instructions and photos to guide you. This charming handmade pig features a cozy sweater, tiny corn in a basket, and detailed facial features. Perfect for gifting or decorating, you'll enjoy stitching every cute detail. The pattern includes full part instructions and assembly tips so you can finish with confidence.
Progress Tracker
0% Complete
— Head and Torso :
Ring 1 :
work a magic ring with a color thread Make 8 sc into a 1ch ring pull the rope tightly carry the looper in each ring
Ring 2 :
ring increments inside each sc (16 sc)
Ring 3-8 :
(sc into next sc, inc next sc) 24 sc
Ring 4 :
8 times (sc into next 2sc inc next) 32 sc
Ring 5 :
8 times (sc in the next 3 sc in the next) 40 sc
Ring 6 :
sc into next sc inc next sc (7 times) (sc into each of next 4scs inc next sc) sc in next 3 scs (48 sc)
Ring 7 :
loop 7-6 times (sc in each of the next 7 scs, inc in the next) 54 sc
Ring 8-17 :
(10 loops) sc 54 sc in each sc along the ring
Ring 18 :
sc in each of the next 14 scs (inc 12 sc in each of the next 6 scs) sc in each of the next 14 scs (inc 12 sc in each of the next 6 scs) sc on each of the remaining 13 scs (66 sc)
Ring 19-27 :
(9 loops) sc in each sc 66 sc
Ring 28 :
5 times (sc in each of the next 11 sc in the next dec) 61 sc
Ring 29 :
56 sc in the ring 29-5 times (sc in every 10 sc in the next dec)
Ring 30 :
51 sc in the ring 30-5 times (dec the next sc into each 9 sc)
Ring 31 :
46 sc in the ring 31-5 times (sc in each 8 sc in the next dec)
Ring 32 :
38 sc in the ring 32-8 times (sc in each 4 sc dec the next)
Ring 33 :
32 sc in the ring 33-5 times (dec the next sc into each 5sc)
Info :
start filling the head fill as you progress
Info :
place the safe eyes between rings 15-16 with 14 scoops between them
Ring 34-35 :
last two loops sc into each sc finish 32 sc fo finish leave a long thread to sew
— Torso :
Info :
Work 1 magic ring with legs first leg b color thread
Rnd 1 :
Make 8 sc into the loop do not connect, pull the rope tightly
Rnd 2 :
Inc (16 sc) in each sc
Rnd 3 :
sc into the next sc in the next sc in the next 4 sc in the next 4 scs (inc each of the next 4 scs) in the next 4 sc in the next sc in the next 22 sc
Rnd 4-6 :
(3 loops) sc 22 sc in each sc along the ring
Rnd 7 :
sc in each of the next 7 sc (4 times sc dec) sc in each of next 7 scs 18 sc
Rnd 8 :
sc into next 5 scs (4 times sc dec) switch to sc c each of next 5 scs leave out color b
Rnd 9 :
Work back loops only sc 14 sc in each sc across the loop
Rnd 10 :
sc in each of the next 3 scs inc the next sc in each of the next 6 sc inc in the next sc in each of the next 3 scs 16 sc in each start filling the leg fill as it progresses
Rnd 11 :
sc into each sc along the ring (16 sc)
Rnd 12 :
2 times (sc in each of the next 7 scs, inc in the next) 18 sc
Rnd 13-14 :
(2 loops) sc into each sc along the ring (18 sc)
Rnd 15 :
sc in each of the next 4 scs, incl the next sc in each of the next 8 scs, incl the next sc in each of the next 4 scs (20 sc)
Rnd 16-17 :
(2 loops) sc into each sc along the ring (20 sc)
Rnd 18 :
sc in next 14 sc in next do not try to finish fill the leg tightly
Info :
SECOND LEG: Repeat loop 1-17 on the first leg
Rnd 18 (second leg) :
sc into each sc along the ring (20 sc)
Rnd 19 :
sc in each of the next 6 scs, do not try to sc left sc
Info :
LEG DETAIL: Finish fo ring 8 in only work to the front rings
— Arms :
Ring 1 :
work 1 magic ring with the main color thread make 6 sc into the ring pull the rope tightly
Ring 2-4 :
(sc into next 2 sc, inc next one) 10 sc
Ring 3-7 :
(5 loops) sc in each sc 10 sc in
Ring 8 :
2 times (sc into next 5 sc, inc next one) 12 sc
Ring 9 :
work only back loops sc into each sc (12 sc)
Ring 10-15 :
(6 loops) sc into each sc 12 sc switch to d color sc into each sc through the ring 16-ring (12 sc) switch to color C sc into each sc along the 17-ring (12 sc) Switch to color D sc into each sc through the 18-ring in the ring (12 sc) Switch to color A
Ring 19-20 :
(2 loops) sc into each sc across the ring (12 sc)
Info :
straighten the last loop crochet in both layers make 6 sc finish fo finish leave a long thread end to sew the sleeves do not fill
Info :
Arm Detail: Arm detail work unworked rings in ring 6 clear tips
— Tail :
Ring 1 :
work 1 magic ring with the main color thread make 6 sc into the ring pull the rope tightly
Ring 2 :
sc into each sc along the 2-ring of the ring (6 sc)
Ring 3 :
3-2 times sc inc (8 sc)
Ring 4 :
sc into each sc through the 4-ring (8 sc)
Ring 5 :
3 times (2 sc in next 2 sc in next) 12 sc in ring
Ring 6 :
sc into each sc (12 sc)
Ring 7 :
3 times (sc in the next 3 sc in the next) 15 sc
Ring 8 :
sc into each sc (15 sc)
Ring 9 :
3 times (sc in next 3 sc in inc next) 18 sc
Ring 10 :
sc into each sc (18 sc)
Ring 11 :
3 times (sc in the next 3 sc in the next dec) 15 sc
Ring 12 :
3 times (sc in the next 3 sc in the next dec) 12 sc
Ring 13-14 :
(2 loops) sc in each sc 12 sc
Info :
don't fill the tail too tight straighten the last loop dip both layers of the crochet do 6sc fo finish leave a long thread end to sew
— Nose :
Ring 1 :
1-5 ch make 2 sc in the 2nd ch from the crochet sc in the next 3 sc in the next sc 2 sc in the next sc work in the unworked loops of ch (7 sc)
Ring 2 :
sc in first sc in 2 sc in each of next 4 sc in next sc in next 4 sc in 2 sc in last sc (12 sc)
Ring 3 :
3-4 times (sc in next 3 sc in inc next) 16 sc
Info :
Leave the long thread end to sew Finish the sc into each sc (16 sc) fo through the 4-ring in the ring of the crochet do 6sc fo finish leave a long thread end to sew
— Legs :
Info :
first work 1 magic ring with leg b color thread
ring 1 :
make 8 sc into the ring do not join together pull the rope tightly
ring 2 :
inc (16 sc) inside each sc
ring 3 :
sc into next sc in next sc in next 4 scs (inc each of next 4 scs) sc into next 4 scs inc next sc in next 22 sc
ring 4-6 :
(3 rings) sc 22 sc in each sc along the ring
ring 7 :
sc in each of next 7 sc (4 times sc dec) sc in each of next 7 scs 18 sc
ring 8 :
sc into next 5 scs (4 times sc dec) sc in each of next 5 scs switch to color c leave out color b
ring 9 :
work only back loops sc 14 sc in each sc across the ring
ring 10 :
sc in each of the next 3scs inc the next sc in each of the next 6sc include the next sc in each of the next 3 scs 16 sc in each start filling the leg fill as it progresses
ring 11 :
sc into each sc (16 sc)
ring 12 :
2 times (sc in each of the next 7 scs, inc in the next) 18 sc in the loop
ring 13-14 :
(2 loops) sc into each sc along the ring (18 sc)
ring 15 :
sc in each of the next 4 scs inc the next sc in each of the next 8 sc in the next sc in the next sc in each of the next 4 sc (20 sc)
ring 16-17 :
(2 loops) sc into each sc along the ring (20 sc)
ring 18 :
sc in next 14 sc in next do not try to finish fill the leg tightly
Info :
second leg repeat loop 1-17 on the first leg sc in each sc through the 18-ring (20 sc)
ring 19 :
sc in each of the next 6 scs, do not try to sc left sc
Info :
Leg Detail: Finish fo ring 8 in only work to the front rings
— Ears :
Rnd 1 :
Work a magic ring with the main color yarn, make 6 sc into the ring, pull the rope tightly, do not connect
Rnd 2 :
3 times sc inc (sc in 2 sc inc next to inc) 9 sc in each loop move the loop marker
Rnd 3 :
sc in each sc along the length of the ring 9 sc in each sc
Rnd 4 :
3 times sc inc (sc in each 2 sc in the next
Rnd 6 :
6 times (sc in next 2 sc in inc in next sc) 24 sc
Rnd 7 :
6 times (sc in each of the next 3 sc in next sc inc) 30 sc
Rnd 8-11 :
(4 loops) sc in each sc along the ring 30 sc
Rnd 12 :
6 times sc dec (3 sc into each of the next dec) 24 sc
Rnd 13 :
6 times (sc into 2 sc in the next dec) 18 sc
Rnd 14 :
6 times (sc into 2sc dec the next) 12 sc
Rnd 15 :
sc into each sc along the ring, 12 sc
Rnd 16 :
2 times (5sc each sc dec the next) 10 sc
Rnd 17 :
10 sc in each sc along the ring
Info :
Finish FO leave a long thread end to sew
— Making of the Parts :
Info :
Sew the ears between the 4-7 loops of the head.
Info :
Sew the tail between the two legs.
Info :
Attach the eyes to the ring 14-15 with 15 sc in between. Make eyebrows over 4 circles of eyes.
Info :
Sew the nose to the middle of the face, between the ring 18-22.
Info :
Knit the mouth under the nose with the wrapping technique.
Info :
Sew the leaves under the corn.
Info :
Sew the sleeves to the sides of the shoulder, ring 35.
— Basket :
Info :
Work 1 magic ring with E color thread. Make rings 1 and 5 on the head. At the end of the ring should be 40 sc.
Ring 6 :
8 times (sc in each of next sc, inc next sc) (48 sc)
Ring 7 and 11 :
(5 loops) sc in each sc along the ring (48 sc)
Ring 12 :
Make 9 ch. Leave 4 sc in between Immerse in 5th sc in each of next 19 sc, then make 9 ch in between Leave 4 sc in between Immerse in 5th sc in next sc in next 19 sc (48 sc)
Ring 13 :
Fill the top of 9 ch with 9 sc. (9 times) skip one sc. 2 hdc into 1sc 9 sc on top of 9 ch. (9 times) Skip 2 hdc 1 sc into 1 sc.
— Corn :
Ring 1 :
Work 1 magic ring with f color thread Make 12 sc into the ring Do not join, pull the rope tightly.
Ring 2 :
make 1 hdc inside each sc. (12 hdc)
Ring 3-7 :
(5 rings) hdc (12 hdc) into each hdc through the ring
Ring 8 :
hdc dec (next hdc, dec hdc to each remaining hdc) (11 hdc)
Ring 9 :
next hdc to each of the remaining hdc to dec hdc (10 hdc)
Ring 10 :
next hdci dec to each of the remaining hdc hdc (9 hdc)
Ring 11 :
each hdc to hdc (9 hdc)
Ring 12 :
1hdc dec (8 hdc)
Info :
Fill the corn and keep filling as it progresses.
Ring 13 :
1 hdc dec (7 hdc)
Ring 14 :
1hdc dec (6 hdc)
Info :
Finish clean the thread ends.
— Leaves :
Info :
Make 10 ch with thread E color. Make 1 hdc in each ring of 10 ch. Make 10 ch. Make 1 hdc in each ring of ch. Finish fo. leave a long thread end to sew.
This Pinky Pig amigurumi pattern includes every little detail to create a charming handmade friend for gifting or display. Follow the rounds carefully and enjoy the process of shaping and finishing each part with love. Happy stitching and may your Pinky Pig bring smiles and warmth to its new home! 🧶🧵✨