About This Pillow- unicorn Amigurumi Pattern
This pattern creates a square unicorn pillow with plush yarn textures and cute facial features. You will crochet the pillow body and separate details (ears, nose, horn, mane, legs and nostrils) then assemble everything for a cheerful finished piece. The instructions use standard amigurumi rounds with photos to guide placement and finishing.
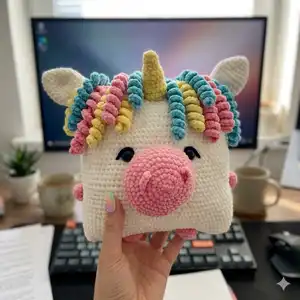
Worked with Himalaya Dolphin Baby plush yarn and a 3.5 mm hook (recommended), the finished pillow measures roughly 31x31 cm. Perfect as a gift or nursery decor, this pattern balances fun details with accessible techniques.
Why You'll Love This Pillow- unicorn Amigurumi Pattern
I absolutely love this pattern because it turns simple stitches into a whimsical and tactile pillow that both kids and adults adore. I enjoy how the plush yarn creates a super soft surface and how the curly mane adds bright pops of color. Sewing the nose, ears and horn in place gives a real sense of progress — you can see the character come to life quickly. I also appreciate that the pattern is modular: you crochet small, satisfying pieces and then assemble them, which keeps the project interesting every step of the way.
Switch Things Up
I love how easy it is to customize this pattern by changing the mane colors: try pastels for a soft nursery version or bold brights for a playful statement.
I often swap the plush yarn for a worsted weight yarn and a larger hook to create a bigger, sturdier pillow for the sofa.
Want a mini keychain version? Use thin yarn and a smaller hook to recreate the same shapes in miniature and skip the stuffing for a flat charm.
I like adding felt or embroidered details for the eyelids instead of yarn to get a cleaner facial expression—just stitch or glue carefully in place.
Try different eye options: sewn black beads, safety eyes, or embroidered eyes for a child-safe finished toy depending on intended use.
Vary the mane style by making longer chains or more spiral clusters so the mane drapes differently across the pillow top.
If you want extra posability, consider adding lightweight wire into the horn or limbs before final stuffing for a slightly poseable effect.
To make the pillow more durable for play, double the stitches on corners and reinforce seams when sewing pieces onto the pillow body.
I sometimes create matching accessories like a small blanket or star applique in the same yarn colors to make a coordinated gift set.
Don't be afraid to mix yarn textures—combining plush with a smooth cotton accent can create a really interesting tactile contrast on the face or mane.
Common Mistakes & How to Fix Them
✗ Skipping the instruction to fix the beginning of each new circle can cause your rounds to shift and become uneven; secure the loop with a pin or short thread at the start of each round to maintain correct stitch placement.
✗ Not leaving long threads for sewing makes assembly difficult and messy; always leave the indicated long tail after finishing each part so you can sew pieces securely without extra joins.
✗ Under-stuffing the pillow creates flat corners and poor shape; stuff tightly and evenly, paying attention to the angles so the pillow keeps its square, plump look.
✗ Counting rounds incorrectly will misplace facial features and details; mark your rounds and count stitches when placing nose, eyes, ears and limbs to ensure symmetrical placement.


