🧢 Beautiful ✨ Detailed πŸ’ Adorable

Pillow-koala Amigurumi Pattern

Pillow-koala Amigurumi Pattern
4.7β˜… Rating
5-7 Hours Time Needed
3.0K Made This
βœ‚οΈ

Intermediate Level

Ideal for those with basic crochet experience, featuring slightly more advanced stitches and techniques to expand your skills.

⏱️

Weekend Treat

Takes 5-7 hours, making it an enjoyable project to finish over a couple of days.

🧸

Cute Companion

An adorable friend to cherish, handcrafted with love to bring comfort and joy for years to come.

About This Pillow-koala Amigurumi Pattern

This pattern creates a plush koala pillow with removable details and a secret pocket on the back. The design uses plush yarn to give a soft, snuggly texture suitable for both children and adults. Youll crochet a square pillow body and separately make ears, nose, arms and legs to sew on for a charming finished look.

Pillow-koala Amigurumi Pattern crochet pattern - detailed view of completed project

Pattern uses single crochet shaping and small amigurumi pieces to build the koala features. Includes clear row-by-row instructions and assembly guidance to position eyes, nose and limbs accurately.

Why You'll Love This Pillow-koala Amigurumi Pattern

I absolutely love this pattern because it turns a simple pillow into a whimsical koala that feels like a cozy companion. I enjoy how the plush yarn gives a super soft texture that invites snuggles. The secret pocket on the back adds a playful, practical touch that makes this pillow great for kids rooms. Sewing the separate ears and nose on lets you position them for personality, and I find that finishing touches like embroidered eyelids really bring the face to life.

Pillow-koala Amigurumi Pattern step 1 - construction progress Pillow-koala Amigurumi Pattern step 2 - assembly progress Pillow-koala Amigurumi Pattern step 3 - details and accessories Pillow-koala Amigurumi Pattern step 4 - final assembly and finishing

Switch Things Up

I love how easy it is to customize this Pillow-koala with different yarns and colors; changing the main color instantly changes the mood of the pillow.

To make a mini keychain version, switch to thin yarn and a smaller hook and reduce chain counts for the body β€” youll get a tiny koala companion in no time.

I often swap the plush yarn for a regular worsted yarn to get a firmer, more structured pillow that is easier to embroider details on.

You can change the size of the secret pocket by adjusting the chain and the skipped loops on Row 32 β€” make it wider for bigger items or narrower for coins and keys.

Try adding different eye types: safety eyes, buttons, or embroidered eyes will each give a distinct look; always secure safety eyes before stuffing when using them.

For a more realistic effect, sew the ears slightly tilted or folded to give character and expression to your koala face.

I like to embroider freckles, blush or small patterns on the cheeks with contrasting yarn to add personality to each pillow.

Use brightly colored yarn or variegated yarn for the inner ear or nose to make playful accents that stand out from the main color.

Consider adding removable accessories like tiny crocheted scarves, bows, or a small hat so you can change the koalas outfit depending on the season.

When I want extra posability, I add a short piece of wire inside arms before attaching, but be sure to cover wire ends well and keep it away from childrens toys.

Common Mistakes & How to Fix Them

βœ— Not securing the beginning of the round can cause a drift in stitch placement; fix the beginning of each new circle with a pin or a thread marker at the start of the round. βœ— Understuffing or stuffing unevenly leads to flat or lumpy corners; fill tightly and evenly and pay attention to the angles so the pillow keeps a nice square shape. βœ— Skipping stitch counts during increases or decreases creates uneven shaping; count after every round and mark increases so you keep the correct stitch totals. βœ— Sewing parts without leaving long tails makes assembly difficult; leave a long thread on pieces for sewing and to hide ends inside the pillow after attaching.

Pillow-koala Amigurumi Pattern

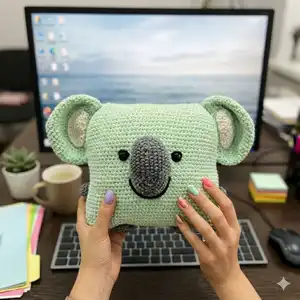
Make a soft, cuddly koala pillow that doubles as a cozy home accessory. This pattern guides you step-by-step through crocheting the pillow body, ears, nose, arms, legs and a hidden back pocket. Youll get clear round-by-round instructions and helpful assembly tips so your finished koala looks neat and professional.

Intermediate 5-7 Hours

Materials Needed for Pillow-koala Amigurumi Pattern

β€” Main Fabric

  • 01
    Himalaya Dolphin Baby plush yarn (120 m /100 g) - Light green - about 3 skeins (main body)
  • 02
    Himalaya Dolphin Baby plush yarn - Gray - 1 skein (nose, legs, arms)
  • 03
    Himalaya Dolphin Baby plush yarn - White - less than 1 skein (inner ear details)
  • 04
    Small amount of black yarn for smile and eyelids
  • 05
    Optional: YarnArt Dolce or any similar plush yarn as a substitute
  • 06
    Filler: hollofayber (polyester stuffing) - quantity as needed to stuff a 29x46 cm pillow

β€” Tools Required

  • 01
    Crochet hook size 3.5 mm (I used No 3.5; package recommends 3.5-4 mm)
  • 02
    Black beads or buttons for eyes - 22 mm (2 pieces)
  • 03
    Scissors
  • 04
    Yarn needle for sewing
  • 05
    Pins for fixing the beginning of rounds and positioning pieces
  • 06
    Stitch markers (optional)
  • 07
    Needle for embroidery (for eyelids and smile)
  • 08
    Polyester stuffing (hollofayber)

Progress Tracker

0% Complete

β€” Materials :

Info :

I used Himalaya Dolphin Baby yarn. (120 m /100 g.). Colors: light green (3 clews), gray, white (less than 1 clew) and some black yarn for smile and eyes. You can crochet any other plush yarn - Himalaya Dolphin Baby or YarnArt Dolce. Filler (I used hollofayber). Hook No 3.5-4 mm (The size of the hook is specified on the package of yarn.). I used No3.5. black beads (or buttons) for eyes (22 mm). Needle. Do not forget to fix the beginning of each new circle with a pin or thread.

β€” Symbols :

Infos :

sc - single crochet. inc - increase. dec - invisible decrease (single crochet 2 together): (We knit two loops together behind the front wall of the loop). ch - chain.

β€” Pillow :

Info :

Use light green plush yarn

Round 1 :

90 ch, connect with the first loop

Round 2 – 39 :

90 sc

Info :

Leave a long thread and sew the top of the pillow. We fasten the thread and hide inside the pillow.

Info :

Fill tightly and evenly. Fill the angle of the pillow well. Sew and fasten the thread and hide inside the pillow.

β€” Ear (2 details) :

Info :

Use light green plush yarn

Round 1 :

6 sc in magic Ring {6}

Round 2 :

(inc) – repeat 6 times {12}

Round 3 :

(1 sc, inc) – repeat 6 times {18}

Round 4 :

(2 sc, inc) – repeat 6 times {24}

Round 5 :

(3 sc, inc) – repeat 6 times {30}

Round 6 :

(4 sc, inc) – repeat 6 times {36}

Round 7 :

(5 sc, inc) – repeat 6 times {42}

Round 8 :

(6 sc, inc) – repeat 6 times {48}

Round 9 :

(7 sc, inc) – repeat 6 times {54}

Round 10 – 14 :

(5 rounds): 54 sc

Round 15 :

(7 sc, dec) – repeat 6 times {48}

Round 16 :

(6 sc, dec) – repeat 6 times {42}

Round 17 :

42 sc

Info :

Leave a long thread for sewing

β€” Ear inner detail (white) :

Info :

Use white yarn and make 2 details for ears

Row 1 :

5 sc in Magic ring, turn

Row 2 :

(inc) – repeat 5 times, turn {10}

Row 3 :

10 sc, turn

Row 4 :

(2 sc, inc) – repeat 3 times, sc, turn {13}

Row 5 :

(3 sc, inc) – repeat 3 times, sc, turn {16}

Row 6 :

16 sc, crochet along the bottom of the ear: inc, 10 sc

Info :

Leave a long thread for sewing

β€” Nose :

Info :

Use gray plush yarn

Round 1 :

make 11 ch

Round 2 :

we begin to work from the second loop from the hook: 9 sc, 3 sc in 1 loop, 8 sc, inc {22}

Round 3 :

inc, inc, 9 sc, 3 sc in 1 loop, 11 sc {27}

Round 4 :

inc, inc, inc, 11 sc, inc, inc, inc, 10 {33}

Round 5 :

inc, sc, inc, sc, inc, 12 sc, inc, sc, inc, sc, inc, 11 sc {39}

Round 6 :

2 sc, inc, 2 sc, inc, 2 sc, inc, 12 sc, inc, 2 sc, inc, 2 sc, inc, 11 sc {45}

Round 7 :

45 sc

Info :

Leave a long thread for sewing

β€” Leg (2 details) :

Info :

Use gray plush yarn

Round 1 :

6 sc in magic Ring {6}

Round 2 :

(inc) – repeat 6 times {12}

Round 3 :

(1 sc, inc) – repeat 6 times {18}

Round 4 :

18 sc

Info :

Leave a long thread for sewing

β€” Arm (2 details) :

Info :

Use gray plush yarn

Round 1 :

6 sc in magic Ring {6}

Round 2 :

(inc) – repeat 6 times {12}

Round 3 :

12 sc

Info :

Leave a long thread for sewing

β€” Secret pocket :

Row 1 :

make 35 ch

Row 2 – 31 (30 rows) :

we begin to work from the second loop from the hook: 34 sc, turn

Row 32 :

we begin to work from the second loop from the hook: 16 sc, make 4 ch, skip 2 loops of the previous row and crochet 16 sc (You can make more or less chain. It depends on the size of the button)

β€” Assembly :

Info :

Sew ears: we put ears edge on the angles of the pillow. Sew with pillow and then sew the ear in circle.

Info :

Sew nose (and fill) between 12 and 27 rounds.

Info :

Sew arms and legs. Sew eyes between 22 and 23 rounds.

Info :

Use black yarn and make eyelids. Leave the long end of the thread to make a smile. Insert a needle between 17 and 18 rounds. Leaving a long end for a smile. We withdraw the needle to the left of the eye and make a seam above the eye.

Info :

Sew white details on ears. Sew a secret pocket and a button on the back of the pillow.

Assembly Instructions

  • Sew ears: place each ear edge on the top corners (angles) of the pillow, sew the ear edge to the pillow and then sew around the ear in a circular fashion to secure it.
  • Sew the nose between rounds 12 and 27 of the pillow front, stuff the nose slightly while sewing and secure it firmly with the long tail.
  • Attach arms and legs at the lower sides and corners of the pillow respectively and sew eyes between rounds 22 and 23 for correct placement.
  • Make eyelids with black yarn: insert a needle between rounds 17 and 18 to create an eyelid seam and leave a long thread to embroider the smile, then hide and secure all ends inside the pillow.
  • Sew white inner ear details onto the ears using the long sewing tail, centering them inside each ear.
  • Sew the secret pocket to the back of the pillow and add a button closure aligned with the chain opening you made on Row 32 of the pocket.

Important Notes

  • πŸ’‘Do not forget to fix the beginning of each new circle with a pin or thread so your rounds dont slip out of alignment.
  • πŸ’‘Stuff firmly but evenly and pay special attention to corners and angles for a neat square pillow shape.
  • πŸ’‘Leave long sewing tails on small pieces so you have enough yarn to securely attach and hide ends inside the pillow.

This sweet Pillow-koala is designed to be soft, tactile and full of character β€” perfect for hugs and room decor. Make it in pastel tones for a nursery or bold colors for a playful accent. Add the secret back pocket to tuck away small treasures or bedtime notes. 🧢🧡

You ask,

we answer.

FAQs

What size will the finished piece be?

The finished pillow measured approximately 29 x 46 centimeters in the sample pictured (width 46 cm including ears), though final size depends on yarn and hook choice.

Can I use different yarn weights for this pattern?

Yes, you can use different plush yarns but the final size will change; use an appropriate hook for your chosen yarn and expect to adjust stuffing and placement accordingly.

Do I need prior crochet experience for this pattern?

This pattern is rated intermediate, so basic knowledge of single crochet, increases, decreases and magic ring techniques is recommended for best results.

How long does this project typically take to complete?

Most crocheters finish this project in about 5-7 hours, depending on experience level, yarn choice, and time spent on assembly and finishing details.