🧢 Beautiful ✨ Detailed πŸ’ Adorable

Octopus Surprise Amigurumi Pattern

Octopus Surprise Amigurumi Pattern
4.3β˜… Rating
5-7 Hours Time Needed
2.0K Made This
βœ‚οΈ

Intermediate Level

Ideal for those with basic crochet experience, featuring slightly more advanced stitches and techniques to expand your skills.

⏱️

Weekend Treat

Takes 5-7 hours, making it an enjoyable project to finish over a couple of days.

🧸

Cute Companion

An adorable friend to cherish, handcrafted with love to bring comfort and joy for years to come.

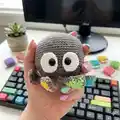
About This Octopus Surprise Amigurumi Pattern

This pattern teaches you how to crochet a large octopus with eight colorful arms and eight matching mini octopuses. It uses fingering-weight cotton yarn and a small hook for tight stitches and tidy shaping. The design features separate colored arm pieces sewn onto the octopus for a playful, rainbow look. Detailed rounds and row instructions guide you through assembly and finishing.

Octopus Surprise Amigurumi Pattern crochet pattern - detailed view of completed project

Includes instructions for the inner lining, arm construction, eyes, and sewing everything together for a neat finish. Suitable for making charming gifts, keychains, or a stacked rainbow display of minis.

Why You'll Love This Octopus Surprise Amigurumi Pattern

I absolutely love this pattern because it blends simple amigurumi techniques with a playful color assembly that makes each piece unique. I enjoy how the separate colored arm pieces allow for customization and bright, cheerful designs. The combination of a larger centerpiece octopus and tiny companions creates a delightful set that is fun to gift or display. I also appreciate the clear step-by-step rounds and photographic references which help me stay confident throughout the build.

Octopus Surprise Amigurumi Pattern step 1 - construction progress Octopus Surprise Amigurumi Pattern step 2 - assembly progress Octopus Surprise Amigurumi Pattern step 3 - details and accessories Octopus Surprise Amigurumi Pattern step 4 - final assembly and finishing

Switch Things Up

I love how easy it is to customize the arms and colors; try pastel shades for a softer nursery set or neon brights for a modern display.

You can change size by using a different yarn weight and hook; bulky yarn with a larger hook creates a chunky, squishy octopus while finer yarn makes tiny keychain versions.

I often swap the number of colored arms or make all arms the same color for a monochrome look β€” it changes the personality completely.

Embroidery is a great way to change expressions: a small stitched mouth or eyebrows can make each octopus look sleepy, surprised, or happy.

Try adding tiny accessories like a crocheted bow, hat, or tiny blanket to transform your octopus into a themed gift for holidays or birthdays.

I sometimes replace safety eyes with embroidered eyes for baby-safe toys or to create a vintage handmade aesthetic.

Consider using gradient or variegated yarn for the arm pieces to give a subtle, blended color effect without changing yarns for each arm.

Make a set in sea-tones to match a nautical nursery or in candy-colors for a cheerful shelf display β€” each choice gives a completely different vibe.

I recommend experimenting with stuffing levels to change firmness; a slightly under-stuffed mini looks softer and more squishable while a firm stuffing gives better shape for display.

For a fun project, make several minis in a color palette and attach them as a garland or mobile for whimsical decor.

Common Mistakes & How to Fix Them

βœ— Skipping stitch markers during the assembly of the big octopus can cause misaligned arms; place a marker in each marked stitch to keep the arms evenly spaced. βœ— Forgetting to stuff as indicated will lead to a floppy finished toy; stuff gradually and only where the pattern specifies to preserve shape. βœ— Pulling yarn too tightly when attaching colored arm pieces can distort the octopus edge; sew with even tension and adjust before tightening completely. βœ— Not inserting the inner lining correctly will make the arms pucker; align marked stitches between the arms and secure the lining before closing the round. βœ— Attaching safety eyes too late or in the wrong round can make placement tricky; add safety eyes at the rounds specified and double-check spacing first.

Octopus Surprise Amigurumi Pattern

Create an adorable family of octopuses with this friendly, colorful crochet pattern. You will make one larger octopus and eight mini octopuses with bright, interchangeable arms. The pattern includes step-by-step rounds, row instructions, eye pieces, and assembly guidance so you can follow along easily. Perfect for gifting, decor, or a fun crochet project to brighten your day.

Intermediate 5-7 Hours

Materials Needed for Octopus Surprise Amigurumi Pattern

β€” Main Fabric

  • 01
    8/4 cotton ply fingering weight (#1) - 170 m / 50 g skein
  • 02
    Colorwork: 2 g each in 8 different colors for the mini octopuses (total eight small color scraps)
  • 03
    Grey: 36 g for the big octopus body
  • 04
    White: 1 g for the white eye pieces

β€” Tools Required

  • 01
    Crochet hook: 2.5 mm
  • 02
    Yarn needle
  • 03
    Stuffing (polyester fiberfill)
  • 04
    Stitch markers
  • 05
    16 x 6 mm safety eyes
  • 06
    2 x 8 mm safety eyes

Progress Tracker

0% Complete

β€” COLORED ARM PIECE (MAKE 8 - ONE IN EACH MINI OCTOPUS COLOR) :

Row RW1 :

7 ch - inc in 2nd ch from hook - 5 sc - ch - turn (7)

Row RW2 :

skip ch - 7 sc - 2 ch - turn (7)

Row RW3 :

skip 1 ch - inc - 7 sc - ch - turn (9)

Row RW4 :

skip ch - 6 sc - dec - turn (7)

Row RW5 :

skip 1 st - 6 sc (6)

Info :

Fasten off

β€” INSIDE OF BIG OCTOPUS (GREY) :

Round R1 :

6 sc in mr (6)

Round R2 :

6 inc (12)

Round R3 :

(inc - sc) x 6 (18)

Round R4 :

(inc - 2 sc) x 6 (24)

Round R5 :

(inc - 3 sc) x 6 (30)

Round R6 :

(inc - 4 sc) x 6 (36)

Round R7 :

(inc - 5 sc) x 6 (42)

Round R8 :

(inc - 6 sc) x 6 (48)

Round R9 :

(inc - 7 sc) x 6 (54)

Round R10 :

(inc - 8 sc) x 6 (60)

Round R11-21 :

60 sc (60)

Round R22 :

(dec - 8 sc) x 6 (54)

Round R23 :

54 sc (54)

Round R24 :

(dec - 7 sc) x 6 (48)

Round R25-26 :

48 sc (48)

Info :

Fasten off.

Info :

Put a stitch marker in 8 sts with 5 sts between each.

β€” BIG OCTOPUS (GREY) :

Round R1 :

6 sc in mr (6)

Round R2 :

6 inc (12)

Round R3 :

(inc - sc) x 6 (18)

Round R4 :

(inc - 2 sc) x 6 (24)

Round R5 :

(inc - 3 sc) x 6 (30)

Round R6 :

(inc - 4 sc) x 6 (36)

Round R7 :

(inc - 5 sc) x 6 (42)

Round R8 :

(inc - 6 sc) x 6 (48)

Round R9 :

(inc - 7 sc) x 6 (54)

Round R10 :

(inc - 8 sc) x 6 (60)

Round R11 :

(inc - 9 sc) x 6 (66)

Round R12-23 :

66 sc (66)

Round R24 :

(dec - 9 sc) x 6 (60)

Round R25 :

60 sc (60)

Round R26 :

(dec - 8 sc) x 6 (54)

Round R27 :

(dec - 7 sc) x 6 (48)

Round R28-29 :

48 sc (48)

Info :

Now make the arms. The arms are made in rows.

β€” OCTOPUS ARMS (WORKED FROM R29) :

Row RW1 :

slst in flo of the next st of R29 - 7 ch - inc in 2nd ch from hook - 5 sc - slst in flo of the next 2 sts of R29 - turn (7)

Row RW2 :

Skip 2 slst - 7 sc - 2 ch - turn (7)

Row RW3 :

Skip 1 ch - inc - 7 sc - slst in flo the next 2 sts of R29 - turn (9)

Row RW4 :

Skip 2 slst - 6 sc - dec - turn (8)

Row RW5 :

Skip 1 st - 6 sc - slst in flo of the next st of R29

Info :

Repeat RW1-RW5 8 times

Info :

Now crochet the colored arm pieces onto the octopus.

Info :

Attach them in this order: red - orange - yellow - green - turquoise - blue - purple - pink.

Info :

Put the colored arm piece on top of the octopus arm. RW1 of the arm piece should be on top of RW1 of the octopus.

Round R30 :

(slst in next st - sc around the arm through both the octopus arm and the colored arm piece and make [3 sc] in the tip of the arm - slst in next st) Repeat everything in the parenthesis 8 times.

Info :

Insert the inside of the octopus. The marked sts should be between the arms.

Info :

Tug in the colored arm piece ends between the octopus and the inside.

Info :

Crochet the colored arm pieces, the inside of the octopus and the octopus together in the next round.

Round R31 :

(Crochet 1 sc through both the remaining back loop of R29 and the marked st between the arms - crochet 5 sc through both the colored arm piece and the inside of the octopus) Repeat everything on the parentheses 8 times (48)

Round R32 :

(dec - 4 sc) x 8 (40)

Round R33 :

(dec - 3 sc) x 8 (32)

Round R34 :

(dec - 2 sc) x 8 (24)

Round R35 :

24 slst (24)

Info :

Fasten off and weave in end. You may have to pull some of the the colored ends in with your hook again.

β€” EYE (MAKE 2) (WHITE) :

Round R1 :

6 sc in mr (6)

Round R2 :

6 inc (12)

Round R3 :

(inc - sc) x 6 (18)

Info :

Fasten off leaving a long end for sewing the eye onto the octopus.

Info :

Attach 8 mm safety eye between R1 and R2.

Info :

Sew the eyes onto the octopus.

β€” MINI OCTOPUS (MAKE 8 IN DIFFERENT COLORS) :

Round R1 :

6 sc in mr (6)

Round R2 :

6 inc (12)

Round R3 :

(inc - sc) x 6 (18)

Round R4 :

(inc - 2 sc) x 6 (24)

Round R5-7 :

24 sc (24)

Round R8 :

(dec - 4 sc) x 4 (20)

Round R9 :

(dec - 3 sc) x 4 (16)

Info :

Pause here to attach 6 mm safety eyes. They should be between R7 and R8 with 3 sts between them.

Info :

The arms are crocheted in the next round.

Round R10 :

(5 ch - slst in 2nd ch from hook - sc - 2 hdc - 2 slst in flo of the next sts in R9) x 8

Info :

The next round is crocheted entirely in the remaining backloops of R9 that are visible on the inside.

Info :

Fill with stuffing

Round R11 :

8 dec in blo of R9 (8)

Info :

Close off and weave in yarn end.

Assembly Instructions

  • Attach the colored arm pieces to the octopus arms in order: red, orange, yellow, green, turquoise, blue, purple, pink, aligning RW1 of the arm piece with RW1 of the octopus arm.
  • Insert the inside lining of the octopus into the body so that the marked stitches sit between the arms, then pull in the colored arm piece ends between the inside and outside before stitching the next round.
  • Crochet the colored arm pieces, the inside of the octopus and the outer octopus together in Round R31, making sure to crochet through both layers as instructed.
  • Attach the two white eye pieces by sewing them onto the front and adding 8 mm safety eyes between R1 and R2, then secure and hide the yarn tails.
  • After closing R35, weave in all ends and gently tug colored ends through the seam; check symmetry and adjust stuffing as needed.

Important Notes

  • πŸ’‘The total amount of stitches in a round is stated in the parentheses at the end; chains and slip stitches are not counted.
  • πŸ’‘Rounds are worked in a spiral and are not joined with slip stitches unless specified by the pattern.
  • πŸ’‘Rows are worked from side to side and turned after each row when instructed, take care to follow row turning points.
  • πŸ’‘Do not fill with stuffing unless the pattern explicitly instructs you to, or you may change the intended shape.
  • πŸ’‘Place stitch markers as instructed to maintain correct spacing for arms and attachment points.

This Octopus Surprise pattern brings clever colorwork and joyful mini companions to your crochet table. Make a stack of tiny octopuses or a big cuddly centrepiece for playful decor. Share your finished friends with loved ones and brighten someones day with handmade charm. 🧢✨

You ask,

we answer.

FAQs

What size will the finished piece be?

The big octopus will be about 10 cm / 4 in tall and the small octopuses about 3 cm / 1 in when using the recommended yarn and hook.

Can I use different yarn weights for this pattern?

Yes, you can use other yarn weights but your finished size will change; choose an appropriate hook and adjust stuffing and eye size accordingly.

Do I need prior crochet experience for this pattern?

This pattern is rated intermediate and assumes you are comfortable with amigurumi basics such as working in the round, increases, decreases, and sewing pieces together.

How long does this project typically take to complete?

Most crocheters finish this project in 5-7 hours, though time will vary depending on experience, color changes, and assembly pace.