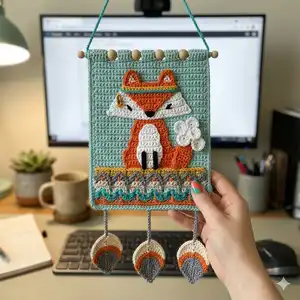
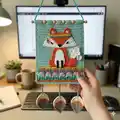
Make a charming Nordic fox wall hanging to decorate a nursery or cozy corner of your home. This pattern mixes texture stitches, color changes and simple macrame feathers to create a playful, boho-inspired piece. You will find full step-by-step instructions, charts and tips to help you finish a professional-looking tapestry-style wall hanging. Perfect for making a thoughtful handmade gift or adding a handcrafted accent to your space.
Progress Tracker
0% Complete
— Wall hanging base: Guard :
Row 07 :
*1sc, 1sc extending the strand to the previous row, 1sc extending the strand to 2 previous rows, 1sc extending the strand to 3 previous rows, 1sc extending the strand to 2 previous rows, 1sc extending the strand to the previous row* repeat until the end of the row, 1ch.
Row 11 :
*1sc, 1sc extending the strand to the previous row, 1sc extending the strand to 2 previous rows, 1sc extending the strand to 3 previous rows, 1sc extending the strand to 2 previous rows, 1sc extending the strand to the previous row* repeat until the end of the row, 1ch.
Row 15 :
*2sc, 1sc extending the strand to the previous row, 1sc extending the strand to 2 previous rows, 1sc extending the strand to the previous row, 1sc* repeat until the end of the row, 1ch.
Info :
Turn over and on the other side of the starting chain make a complete row of pb (single crochet). Use the graphic on page 8 as a reference guide. The stitches are marked with the yarn color you should use (bluish green, cream, gray, mustard, tangerine).
Info :
ADVICE: Each row must have 40 stitches.
— Wall hanging base: Fox :
Row 17-18 :
11sc, 6sc, 6sc, 6sc, 11sc, 1ch.
Row 19-20 :
10sc, 6sc, 8sc, 6sc, 10sc, 1ch.
Row 21-24 :
10sc, 5sc, 10sc, 5sc, 10sc, 1ch.
Row 25-26 :
12sc, 3sc, 10sc, 3sc, 12sc, 1ch.
Row 27-28 :
12sc, 4sc, 8sc, 4sc, 12sc, 1ch.
Row 29-33 :
13sc, 3sc, 8sc, 3sc, 13sc, 1ch.
Row 34-35 :
13sc, 4sc, 6sc, 4sc, 13sc, 1ch.
Row 36 :
14sc, 3sc, 6sc, 3sc, 14sc, 1ch.
Row 37 :
14sc, 4sc, 4sc, 4sc, 14sc, 1ch.
Row 38 :
14sc, 12sc, 14sc, 1ch.
Row 39 :
15sc, 10sc, 15sc, 1ch.
Row 40 :
15sc, 10sc, 15sc, 1ch.
Row 41-42 :
4sc, 32sc, 4sc, 1ch.
Row 43-44 :
5sc, 30sc, 5sc, 1ch.
Row 45-46 :
6sc, 28sc, 6sc, 1ch.
Row 47-48 :
7sc, 26sc, 7sc, 1ch.
Row 49-50 :
8sc, 24sc, 8sc, 1ch.
Row 51 :
9sc, 22sc, 9sc, 1ch.
Row 52-53 :
10sc, 20sc, 10sc, 1ch.
Row 54 :
12sc, 16sc, 12sc, 1ch.
Info :
IMPORTANT: I do not use the tapestry technique; I use a separate yarn ball for each color that starts in a row, so on the next round the thread is waiting to be used again. Example: use an aqua yarn ball, then an orange one and a white one; repeat as colors appear.
Info :
Grips to the road (grips/strips): In the row 66 make grips: 6 sc back and forth, make 9 rows, leave a long thread to sew. Cut the thread. *Jump 4 stitches. 4 sc back and forth, make 9 rows, leave long thread to sew. Cut the thread.* Repeat 3 times. Jump 4 stitches. 6 sc back and forth, make 9 rows, leave a long thread to sew.
Info :
Edges (bluish green): Finish the bottom and laterals with a complete row of single crochet. After a complete row of crab stitch. Depending on your tension stretch the piece down until the edges are straight if tapestry appears wavy.
— Wall hanging details :
Snout :
Orange. Crochet back and forth. 1) 20ch. 2) 19sc. 3) 1dec, 15sc, 1dec (17). 4) 1dec, 13sc, 1dec (15). 5) 1dec, 11sc, 1dec (13). 6) 1dec, 9sc, 1dec (11). 7) 1dec, 7sc, 1dec (9). 8) 1dec, 5sc, 1dec (7). 9) 1dec, 3sc, 1dec (5). 10) 1dec, 1sc, 1dec (3). 11) 1dec (1). Finish with a complete round of sc all around.
Paw x 2 :
Black. 1) 8 ch. 2) From the 2nd ch: 7sc (follow image for shape and assembly).
Headband :
Bluish green: 1) 23ch. 2) From the 2nd ch: 22sc. Mustard: 3) *1sc, 1sc extending the strand to the previous row* repeat.
Ears x 2 :
Orange. 1) 6sc in a magic ring. 2) *1sc, 1inc* repeat (9). 3) 9sc (9). 4) *2sc, 1inc* repeat (12). 5) *3sc, 1inc* repeat (15). 6) Flatten the two sides and join with 8sc (8). Embroider with white the lines in the ears.
Tail - Curl 1 :
1) Orange: 15ch. White: 16ch. 2) White: from the 2nd ch 15inc, Orange: 15sc.
Tail - Curl 2 :
1) Orange: 12ch. White: 16ch. 2) White: from the 2nd ch 15inc, Orange: 12sc.
Tail - Curl 3 :
1) Orange: 9ch. White: 16ch. 2) White: from the 2nd ch 15inc, Orange: 9sc.
Tail - Curl 4 x 2 :
1) White: 16ch. 2) White: from the 2nd ch 15inc.
— Process: Guard :
Step 1 :
Row 1-6 single crochet back and forth in bluish green.
Step 2 :
Row 7, sc extended in cream (extended single crochet / spike stitch).
Step 3 :
Rows 8-9-10 in cream color (single crochet back and forth).
Step 4 :
Row 11, sc extended in gray.
Step 5 :
Rows 12-13-14 single crochet in gray.
Step 6 :
Row 15 single crochet extended in mustard.
Step 7 :
Row 16 single crochet in mustard (continue following color chart for pattern repeats).
Step 8 :
Turn over and on the other side of the starting chain work sc extended in tangerine where indicated by the chart.
Step 9 :
Single crochet in tangerine to create the lower accent line.
Step 10 :
Embroidery dots: in color tangerine over the gray, and navy blue over the bluish green. See images and link to video for dot technique.
Step 11 :
From the mustard area start to crochet the fox motif following the fox chart. Work row counts as listed for Rows 17-65.
— Pieces :
Grips to the road :
In the row 66 make grips: 6 sc back and forth, make 9 rows, leave a long thread to sew. Cut the thread. *Jump 4 stitches. 4 sc back and forth, make 9 rows, leave a long thread to sew. Cut the thread.* Rep. 3 times. Jump 4 stitches. 6 sc back and forth, make 9 rows, leave a long thread to sew.
Edges :
Finish the bottom and laterals with a complete row of single crochet in bluish green. Then make a complete row of crab stitch (reverse single crochet) around the piece.
— Macrame feathers :
Step 25 :
Use double yarn as base for macrame feather loop.
Step 26 :
Roll several turns of yarn in your fingers to create a bundle.
Step 27 :
Cut one side of the yarn bundle to release the strands.
Step 28 :
Trim yarn to get strands of the same large length for the feather shape.
Step 29 :
Use double yarns to make a thick feather base (folded loop base).
Step 30 :
Interlace the horizontal yarns, one above and one below the vertical thread. Then adjust to align strands.
Step 31 :
Alternate the yarn that is above to generate inverted knots and create the feather texture.
Step 32 :
Make 5 knots in gray for the feather center section.
Step 33 :
Make 2 knots in tangerine and 4 knots in cream to form layered colors of the feather.
Step 34 :
Comb the yarns to separate fibers and create a feathered look.
Step 35 :
Cut the edges to shape the feather and trim to desired outline.
Step 36 :
Feather done. Twist the excess end and tie a wooden bead to the top; final feather approx 9cm high x 6cm wide. Apply hair spray if needed to keep form.
— Assembly :
Step 13 :
Sew the snout from row 55 down. Place safety eyes between row 44 and 45, 16 stitches between both.
Step 14 :
Sew the ears above the snout on both sides of the head.
Step 15 :
Sew the headband across the top of the head as shown in images.
Step 16 :
Thread wooden beads and sew them to the side of the headband as decoration.
Step 17 :
Embroider the nose with black yarn at the bottom center of the snout.
Step 18 :
Sew the legs on both sides of the white belly according to the chart placement.
Step 19 :
Sew the tail on the right side. Put curl 1 first, then curl 2 and curl 3 up to the edge.
Step 20 :
Complete with the white curls: sew or glue the white spiral curls to create the tail curl decoration.
Step 21 :
Finish the bottom and laterals with a complete row of single crochet. Then make a complete row of crab stitch.
Step 22 :
Sew the upper ends by wrapping the rod to hold the base; create tabs to pass the wooden rod through.
Step 23 :
Tie the feathers to the bottom of the wall hanging using the long sewing threads from the feather tops and secure with wooden beads.
Step 24 :
Tie the strip to the rod to hang the wall hanging and adjust overall alignment.
This Nordic fox wall hanging pattern is designed to bring a playful handcrafted accent into your home, combining texture and color with clever applique details. It includes full row-by-row instructions, charts for the fox and guard, and step-by-step macrame feather guidance for a polished finish. Whether you make it for a nursery, a gift, or to brighten your wall, this project is sure to add charm and personality to any room. 🧶✨