๐Ÿงถ Beautiful โœจ Detailed ๐Ÿ’ Adorable

Ninja Turtle Amigurumi Pattern

Ninja Turtle Amigurumi Pattern
4.1โ˜… Rating
5-7 Hours Time Needed
1.3K Made This
โœ‚๏ธ

Intermediate Level

Ideal for those with basic crochet experience, featuring slightly more advanced stitches and techniques to expand your skills.

โฑ๏ธ

Weekend Treat

Takes 5-7 hours, making it an enjoyable project to finish over a couple of days.

๐Ÿงธ

Cute Companion

An adorable friend to cherish, handcrafted with love to bring comfort and joy for years to come.

About This Ninja Turtle Amigurumi Pattern

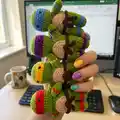
This pattern creates a plush, chenille Ninja Turtle amigurumi complete with a removable shell and belly. You'll work in the round to crochet the head, body, arms, legs, shell, and accessories with clear round-by-round instructions. The design includes a colorful mask option so you can make different turtles with unique personalities. Photos and assembly guidance help you position and sew parts securely.

Ninja Turtle Amigurumi Pattern crochet pattern - detailed view of completed project

The pattern uses blanket chenille yarn for a soft, squishy finish and 7mm hook for quick stitching. Ideal for makers who enjoy tactile, fun toys with visible, cozy texture.

Why You'll Love This Ninja Turtle Amigurumi Pattern

I absolutely love this pattern because it transforms simple stitches into a charming, tactile toy that kids and adults adore. I enjoy how the chenille yarn gives the turtles a cuddly, plush feel that invites hugs and play. The mask color change offers a fun way to personalize each turtle and make a matching set. I also appreciate the straightforward assembly instructions which make finishing and securing parts satisfying and reliable. Sewing the shell and belly in place feels rewarding and the finished height is just right for display or play.

Ninja Turtle Amigurumi Pattern step 1 - construction progress Ninja Turtle Amigurumi Pattern step 2 - assembly progress Ninja Turtle Amigurumi Pattern step 3 - details and accessories Ninja Turtle Amigurumi Pattern step 4 - final assembly and finishing

Switch Things Up

I love customizing this pattern by changing the mask and stripe colours to create unique characters; try pastel shades for a soft, nursery-friendly look.

For a mini keychain, use a finer plush yarn and a smaller hook; you can also make a giant version by using bulky yarn and a larger hook.

I often add embroidered mouths or tiny felt cheeks to change the expression and personality of each turtle.

Try using safety eyes of different sizes for varied facial proportions or embroider eyes for a softer, child-safe finish.

Make the waist strap removable by sewing only one side so it can be taken off and used as an accessory for play.

Experiment with textured stitches on the shell or belly to add realistic details or decorative patterns.

Add a loop at the top of the shell to turn the turtle into a hanging ornament or tree decoration for seasonal variations.

Use sparkly or variegated chenille for a whimsical effect that catches light and adds visual interest.

I sometimes insert a small bell or lavender sachet inside the shell for multisensory appeal and a personalized gift touch.

Combine different yarn brands with similar gauges to achieve unique textures while keeping the same stitch counts for shape consistency.

Common Mistakes & How to Fix Them

โœ— Skipping stitch markers while working in continuous rounds leads to losing your start point; place a stitch marker at the first stitch of every round and move it up as you go. โœ— Not stuffing as you go causes lumps and uneven shaping; stuff gradually while crocheting and shape firmly but not tightly to maintain the plush texture. โœ— Changing colour carelessly creates visible gaps at joins; carry yarn neatly or fasten off and weave in ends, ensuring colour changes are done on the last loop of a stitch where noted. โœ— Forgetting to attach safety eyes at the recommended rounds can misplace the face; attach safety eyes between rounds 7-8 as instructed, keeping them five stitches apart for correct positioning.

Ninja Turtle Amigurumi Pattern

Create your own adorable Ninja Turtle amigurumi with this detailed crochet pattern. You will make a soft, cuddly turtle with a removable shell, belly, and colorful mask using plush chenille yarn. The pattern includes full round-by-round instructions, assembly tips, and customization ideas so you can make each turtle unique. Perfect as a gift or a fun project to expand your amigurumi skills.

Intermediate 5-7 Hours

Materials Needed for Ninja Turtle Amigurumi Pattern

โ€” Main Fabric

  • 01
    Blanket Chenille Yarn (Porta craft) - Forest Green - 1 x 80m skein (main body)
  • 02
    Blanket Chenille Yarn (Porta craft) - Chocolate Brown - small amount for shell and waist strap
  • 03
    Blanket Chenille Yarn (Porta craft) - Beige - small amount for belly
  • 04
    Accent mask colours (small amounts each): Red, Purple, Orange, Blue - used for mask and leg/arm stripes

โ€” Tools Required

  • 01
    Crochet hook size 7mm
  • 02
    Safety eyes 15mm (2 pieces)
  • 03
    Fiberfill / Hobbyfill for stuffing
  • 04
    Yarn needle for sewing
  • 05
    Scissors
  • 06
    Stitch markers
  • 07
    4mm knitting needles (optional, for holding pieces while sewing)

Progress Tracker

0% Complete

โ€” Head :

Round 1 :

6 sc in MC (6)

Round 2 :

inc x6 (12)

Round 3 :

sc, inc x6 (18)

Round 4 :

2 sc, inc x6 (24)

Round 5 :

3 sc, inc x6 (30)

Info :

This is where you choose your Ninja turtle mask colour

Round 6-9 :

CC sc around (30) (4 rounds)

Round 10-11 :

CC sc around (30) (2 rounds)

Info :

Attach safety eyes in between rounds 7-8, 5 stitches apart.

Round 12 :

3 sc, dec x6 (24)

Round 13 :

sc around (24)

Info :

STUFF AS YOU GO!

Round 14 :

2 sc, dec x6 (18)

Round 15 :

sc, dec x6 (12)

Round 16 :

6 dec (6)

Info :

Use your needle now to weave in and out the FLO to close the circle and fasten off.

โ€” Arms make 2 :

Round 1 :

6 sc in MC (6)

Round 2 :

sc, inc x6 (9)

Round 3 :

sc around (9)

Round 4 :

CC sc around (9)

Round 5-7 :

CC sc around (9) (3 rounds)

Info :

Lightly stuff the arm

Info :

2 ARM OPTIONS: READ CAREFULLY!

Round 8 :

Fold the top in half a SC closed (4)

Round 8 (option) :

Do NOT sc closed if you would like your arms to stick out of the body.

Info :

Fasten off and leave tail for sewing

โ€” Legs make 2 :

Round 1 :

sc 6 in MC (6)

Round 2 :

inc x6 (12)

Round 3 :

sc around (12)

Info :

Changing colour to same as mask colour

Round 4-5 :

CC sc around (12) (2 rounds)

Round 6-7 :

CC sc around (12) (2 rounds)

Info :

Fasten off first leg.

Info :

CH 2 after finishing second leg but DO NOT cut the yarn. Insert you crochet hook into any stitch on first leg and continue with BODY instructions.

โ€” Body :

Round 7 :

sc around (12 in first leg, 2 sc in the ch, 12 sc second leg, 2 sc in ch) (28)

Round 8 :

6 sc, inc x3, 6 sc (30)

Round 9-15 :

sc around (30) (7 rounds)

Info :

Stuff firmly

Round 16 :

3 sc, dec x6 (24)

Round 17 :

sc around (24)

Round 18 :

2 sc, dec x6 (18)

Round 19 :

sc around (18)

Round 20 :

sc, dec x6 (12)

Round 21 :

sc around (12)

Info :

Slst and leave a tail for sewing. DO NOT close circle

โ€” Shell :

Round 1 :

sc 8 in MC (8)

Round 2 :

inc x8 (16)

Round 3 :

sc, inc x8 (24)

Round 4 :

3 sc, inc x8 (30)

Round 5-6 :

sc around (30)

Round 7 :

FLO hdc around (30)

Info :

Slst and leave a long tail for sewing. Roll up the last row of HDC to create a lip of the shell.

โ€” Belly :

Round 1 :

6 sc in MC (6)

Round 2 :

inc x6 (12)

Round 3 :

sc, inc x6 (18)

Round 4 :

2 sc, inc x6 (24)

Round 5 :

sc around (24)

Info :

Slst and leave a long tail for sewing.

Info :

If you crochet tightly: using light motions loosen up the belly by stretching it out, this will help it lay flat against your turtle when it comes to sewing.

โ€” Waist Strap :

Round 1 :

ch 46

Round 2 :

turn chain and sc into 2nd stitch from hook, all the way down.

Info :

Fasten off and weave in ends.

โ€” Assembly :

Info :

Head to the body: Using the tail from the body we are going to attach the head of the ninja turtle to the body. TIP: I use 4mm knitting needles to help keep my attachments in place whilst I sewing them on. Sticking a needle through the head into the body. Sew all around the head until you are happy and it's secured.

Info :

Arms to the body: OPTION 1: Using the same method with the knitting needles I position my arms in place on ROW 2 under the neck. Sewing the top half of the arms until secured.

Info :

OPTION 2: Using the same method with the knitting needles, I position my arms on ROW 2 under the neck. Sew all the way around the arm until secured.

Info :

Shell to the body: Using the same method, secure your shell onto the body with knitting needle. Using the back loops of the last row sew half way around the shell. Stuff lightly and continue sewing around until secured.

Info :

Belly to the body: Once again using knitting needles to hold into place, sew the belly onto the body of the turtle until secured. Then tie your waist band around the turtle and you are finished.

Assembly Instructions

  • Attach head to the body using the tail from the body; use a knitting needle to position pieces and sew all around the head until secure.
  • Position arms on ROW 2 under the neck and sew the top half of the arms in place for Option 1, or sew all the way around the arm for Option 2.
  • Secure the shell onto the body by sewing into the back loops of the last shell row, stuff lightly and continue sewing until fully attached.
  • Sew the belly onto the front of the body with knitting needles holding it in place; tie the waist strap around the turtle once secured.

Important Notes

  • ๐Ÿ’กMeasurements of plush will vary depending on yarn and hook size used.
  • ๐Ÿ’กStitch count is provided at the end of each round; always check your stitch count as you go.
  • ๐Ÿ’กStuff firmly but not overstuffed to maintain plush shape and smooth seams.

Thank you for making this cuddly Ninja Turtle toy with love and creativity! ๐Ÿงถ This pattern is perfect for gifting or building a full set of different mask colors to display together. ๐ŸŽ Enjoy stitching each round and celebrating the playful personality of your handmade turtle! ๐Ÿข

You ask,

we answer.

FAQs

What size will the finished piece be?

The finished amigurumi measures approximately 28 cm (11 inches) tall when using the recommended blanket chenille yarn and 7mm hook.

Can I use different yarn weights for this pattern?

Yes, you can use different yarn weights, but this will change the final size and texture; adjust hook size accordingly and expect a different height.

Do I need prior crochet experience for this pattern?

This pattern is rated intermediate and requires working in the round, increases, decreases, and colour changes, so basic crochet experience is recommended.

How long does this project typically take to complete?

Most crocheters finish this pattern in 5-7 hours, depending on experience, yarn familiarity, and the time spent on assembly.