🧢 Beautiful ✨ Detailed πŸ’ Adorable

Mussel Amigurumi Pattern

Mussel Amigurumi Pattern
4.2β˜… Rating
2-4 Hours Time Needed
2.2K Made This
βœ‚οΈ

Intermediate Level

Ideal for those with basic crochet experience, featuring slightly more advanced stitches and techniques to expand your skills.

⏱️

Bite-Sized Project

Finishes in 2-4 hoursβ€”perfect for an afternoon of creative relaxation.

🎁

Tiny Treasure

Small, sweet, and gift-worthy creations that fit perfectly in the palm of your hand with detailed charm.

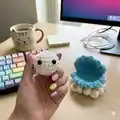
About This Mussel Amigurumi Pattern

This pattern teaches you to crochet a tiny mussel with a pearl tucked inside, using super bulky yarn for a plush finish. It includes separate instructions for the pearl and for two seashell pieces, plus clear assembly guidance. The project uses basic amigurumi shaping and a few small finishing techniques for a polished result.

Mussel Amigurumi Pattern crochet pattern - detailed view of completed project

Ideal for intermediate crocheters who want a quick, charming make. The finished piece is small and perfect for gifts, keychains, or shelf decor.

Why You'll Love This Mussel Amigurumi Pattern

I absolutely love this pattern because it combines cute character design with simple, satisfying construction techniques. I enjoy how the super bulky yarn creates instant plush texture and makes the piece quick to complete. The seashell pieces introduce a fun shaping challenge that gives the project personality without being overwhelming. Sewing the pearl into the shell feels rewarding, and I always smile at the finished tiny face. This pattern is a joy to customize with different colors and facial expressions.

Mussel Amigurumi Pattern step 1 - construction progress Mussel Amigurumi Pattern step 2 - assembly progress Mussel Amigurumi Pattern step 3 - details and accessories Mussel Amigurumi Pattern step 4 - final assembly and finishing

Switch Things Up

I love how easily this pattern adapts to different color schemes; try pastel blues and creams for a soft nursery look or bright jewel tones for a playful set.

I often change yarn weight and hook size to make smaller or larger versionsβ€”using thinner yarn with a smaller hook makes adorable mini keychain-sized mussels.

I sometimes replace safety eyes with French knots or embroidered eyes for a softer, baby-safe version that is perfect for little ones.

I like to add glitter or metallic yarn accents to the shell edge for a magical, pearlescent finish that catches the light.

I recommend trying alternating two colors in the shell rows to create a striped or layered effect for extra visual interest.

I sometimes attach a small keyring to the top of the shell so the mussel becomes a cute bag charm or zipper pull.

I also enjoy embroidering tiny faces with different expressionsβ€”moving the eyes or mouth slightly changes the whole personality of the pearl.

I suggest experimenting with stuffing amounts to create a firmer or squishier pearl, depending on how you want it to sit inside the shell.

I occasionally sew tiny felt accessories like a bow or tiny star to the shell for seasonal or themed decorations.

I encourage you to make a whole collection in different sizes and colors to create an undersea display or a set of handmade gifts.

Common Mistakes & How to Fix Them

βœ— Skipping stitch markers during rounds can make counting difficult and lead to misaligned shaping; place a stitch marker at the start of every round and move it each round to stay on track. βœ— Not stuffing the pearl evenly results in a lumpy or misshapen finished piece; stuff gradually with small amounts of fiberfill and shape as you go for a smooth round result. βœ— Forgetting to work in the BLO for the seashell (rows 2 to 11) will change the texture and fit of the shell; follow the BLO instruction carefully so the scalloped edge forms correctly. βœ— Placing safety eyes too close or too far apart will alter the face proportions; follow the pattern placement exactly (between rows 4 and 5 with 5 stitches between) before securing them. βœ— Pulling the yarn too tight on joining stitches can distort the shell pieces; use consistent tension when making the 15 SLST joins and check alignment frequently.

Mussel Amigurumi Pattern

Create an adorable mussel with a cozy shell and a tiny pearl using super bulky yarn. This pattern guides you step-by-step through crocheting the pearl and two matching shells, then assembling them into a charming little amigurumi. Youll love this quick, tactile project that makes a sweet gift or shelf buddy. Perfect for experimenting with texture and simple shaping.

Intermediate 2-4 Hours

Materials Needed for Mussel Amigurumi Pattern

β€” Main Fabric

  • 01
    Super Bulky yarn (Category 6) - main weight used throughout
  • 02
    White yarn - for the pearl (use super bulky/category 6)
  • 03
    Blue yarn - for the seashell pieces (use super bulky/category 6)
  • 04
    Purple color (listed in materials) - additional color option (no amount specified)

β€” Tools Required

  • 01
    3.5mm (E) Hook
  • 02
    Stitch maker / stitch marker
  • 03
    Sewing needle
  • 04
    Scissors
  • 05
    Plastic safety eyes (8mm)
  • 06
    Hot gun glue
  • 07
    Fiberfill

Progress Tracker

0% Complete

β€” Materials :

Info :

Yarn: Super Bulky / Category 6. Color: Purple color. 3.5mm (E) Hook. Stitch maker. Sewing needle. Scissors. Plastic safety eyes (8mm). Hot gun glue. Fiberfill.

β€” Abbreviations :

Info :

MR : Magic Ring. st(s) : stitch(es). sl st : slip stitch. ch: Chain. SC : Single crochet. DC: Double crochet. DEC: Decrease. INC: Increase. HDC: Half double crochet. BLO: back loop only.

β€” Pearl :

Round 1 :

6SC in a MR (6)

Round 2 :

6INC (12)

Round 3 :

(SC, INC) 6 times (18)

Round 4 :

(2SC, INC) 6 times (24)

Round 5-7 :

24SC (24)

Round 8 :

(2SC, DEC) 6 times (18)

Info :

*Stuffing*

Round 9 :

(SC, DEC) 6 times (12)

Round 10 :

6DEC (6)

Info :

Cut the yarn. Attach the eyes between rows 4 and 5, with 5 stitches between them. Embroider pink for the mouth.

β€” Seashell (MAKE 2) :

Info :

Begin with Blue yarn

Info :

From rows 2 to 11, crochet all stitches in the BLO. On even rows, start crocheting into the second stitch from the hook. On odd rows, start crocheting into the third stitch from the hook.

Round 1 :

13Ch, turn: 7DC, HDC, SC, 2Slst, turn (11)

Round 2 :

Ch, 11Slst, turn (11)

Round 3 :

3Ch, 8DC, HDC, SC, 2Slst, turn (12)

Round 4 :

Ch, 12Slst, turn (12)

Round 5 :

3Ch, 9DC, HDC, SC, 2Slst, turn (13)

Round 6 :

Ch, 13Slst, turn (13)

Round 7 :

2Ch, 9DC, HDC, SC, 2Slst, turn (13)

Round 8 :

Ch, 12Slst, turn (12)

Round 9 :

2Ch, 8DC, HDC, SC, 2Slst, turn (12)

Round 10 :

Ch, 11Slst, turn (11)

Round 11 :

2Ch, 7DC, HDC, SC, 2Slst (11)

Round 12 :

Thread the needle through the loops in pairs as shown in the image, with a total of 3 pairs. When you have all 4 loops on the needle, pass the thread through all 4 loops to create one stitch.

β€” Assembly :

Info :

After completing the two seashell pieces, fold them in half and place the wrong sides together. Use SLST to join the two pieces together.

Info :

Starting from the single stitch in row 12, count backward to row 11, adding 7 stitches. Begin joining from this point. Make 15 SLST. 7Slst (row 11), Slst (row 12), 7Slst (row 1). Cut the yarn and finish product.

Assembly Instructions

  • After completing the two seashell pieces, fold them in half and place the wrong sides together, then use SLST to join the edges as described.
  • Starting from the single stitch in row 12 count backward to row 11 and add 7 stitches; begin joining from this point and make 15 SLST total.
  • Join with the sequence: 7Slst (row 11), Slst (row 12), 7Slst (row 1) to close the shell and form the mussel shape.
  • Attach the finished pearl inside the shell and secure it so it sits centered; attach with a few whipstitches through the inner shell base if needed.
  • Attach safety eyes between rows 4 and 5 of the pearl with 5 stitches between them, then embroider a small pink mouth and finish by cutting the yarn and weaving in ends.

Important Notes

  • πŸ’‘Use a stitch marker to identify the beginning of each round to maintain correct stitch counts and shaping.
  • πŸ’‘Work the seashell rows in the back loops only (BLO) from rows 2 to 11 for the correct textured edge.
  • πŸ’‘Stuff the pearl gradually and evenly to keep a smooth round shape; do not overstuff as this can distort the stitches.
  • πŸ’‘Pin the two shell pieces together with wrong sides facing before joining to ensure alignment and symmetry.
  • πŸ’‘Weave in yarn ends securely and trim excess to prevent unraveling; hot glue may be used for added security on small parts.

This tiny mussel amigurumi brings a little ocean charm to your home or gift list. Handcrafted with super bulky yarn for plush texture and easy assembly, it makes a delightful quick project you'll return to again and again. Perfect for gifting or shelving with other sea friends. 🧢🐚

You ask,

we answer.

FAQs

What size will the finished piece be?

The finished amigurumi is a small, palm-sized mussel when using super bulky yarn and a 3.5mm hook; exact size will vary with yarn and tension.

Can I use different yarn weights for this pattern?

Yes, but changing yarn weight will change the finished size and may require a different hook; use a suitable hook to maintain the recommended gauge and shape.

Do I need prior crochet experience for this pattern?

This pattern is rated intermediate; basic knowledge of single crochet, increases, decreases, DC, HDC, and working in BLO is recommended.

How long does this project typically take to complete?

Most crocheters finish the mussel and pearl in about 2-4 hours, depending on experience and whether you add extra embellishments.