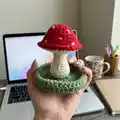
Make a charming mushroom-shaped jewelry holder that doubles as a sweet decorative amigurumi. This beginner-friendly pattern walks you through crocheting a red cap, an off-white stem with gills, and a green dish to hold rings and earrings. Youll get clear round-by-round instructions, assembly tips, and finishing ideas so you can create a gift-ready piece in a few hours.
Progress Tracker
0% Complete
— Cap of the mushroom :
Round 1 :
Using the red color, Make a MR of 6 SC – 6 SC
Round 2 :
INC in each of the 6 stitches – 12 SC
Round 3 :
INC in the first stitch, then SC in the next – repeat this for the remaining 10 stitches – 18 SC
Round 4 :
SC in each of the 18 stitches – 18 SC
Round 5 :
INC in the first stitch, then SC in the next 2 stitches – repeat this for the remaining 15 stitches – 24 SC
Round 6 :
SC in each of the 24 stitches – 24 SC
Round 7 :
INC in the first stitch, then SC in the next 3 stitches – repeat this for the remaining 20 stitches – 30 SC
Round 8 :
SC in each of the 30 stitches – 30 SC
Round 9 :
INC in the first stitch, then SC in the next 4 stitches – repeat this for the remaining 25 stitches – 36 SC
Round 10 :
FLO INC in the first stitch, then FLO SC in the next 8 stitches – repeat this for the remaining 27 stitches – 40 SC
Info :
After this round we will fasten off, leaving a tail that measures about 5 – 10 inches long. We will then hide any remaining tails and we’re done with the cap!
— Stem of the mushroom :
Round 1 :
Using the off - white color, Make a MR of 6 SC – 6 SC
Round 2 :
INC in each of the 6 stitches – 12 SC
Round 3 :
INC in the first stitch, then SC in the next – repeat this for the remaining 10 stitches – 18SC
Round 4 :
BLO SC in each of the 18 stitches – 18 SC
Rounds 5 - 6 :
SC in each of the 18 stitches – 18 SC
Round 7 :
DEC using the first 2 stitches, then SC in the next 4 stitches – repeat for the remaining 12 stitches – 15 SC
Round 8 :
DEC using the first 2 stitches, then SC in the next 3 stitches – repeat for the remaining 10 stitches – 12 SC
Round 9 :
SC in each of the 12 stitches – 12 SC
Round 10 :
DEC using the first 2 stitches, then SC in the next 4 stitches – repeat for the remaining 6 stitches – 10 SC
Rounds 11 - 13 :
SC in each of the 10 stitches – 10 SC
Round 14 :
INC in the first stitch, then SC in the next – repeat this for the remaining 8 stitches – 15 SC
Round 15 :
INC in the first stitch, then SC in the next 2 stitches – repeat for the remaining 12 stitches – 20 SC
Round 16 :
INC in the first stitch, then SC in the next 3 stitches – repeat for the remaining 16 stitches – 25 SC
Round 17 :
INC in the first stitch, then SC in the next 4 stitches – repeat for the remaining 20 stitches – 30 SC
Round 18 :
INC in the first stitch, then SC in the next 2 stitches – repeat for the remaining 27 stitches – 40 SC
Info :
After this round we will fasten off, leaving a tail that measures about 15 – 20 inches long. We may then stuff the mushroom stem. We will then use this tail to sew the two pieces together. To do this insert your needle through the cap in round 10, through the remaining loop we didn’t work in.
Info :
Insert your needle through the back loop of the stem to begin sewing the cap and stem together. Repeat these two steps all the way around your mushroom until you only have 10 stitches remaining.
Info :
At this point we will stuff the cap of the mushroom, making sure to only stuff it enough to keep its shape, so that the stem lays nicely later on.
Info :
Now we can finish sewing the two pieces together and hide any remaining tails. You can stop here and enjoy your mushroom as is or move on to sew on the gills.
— How to Make the Gills of the Mushroom :
Step 1 :
Cut a 20” piece of the off – white color and thread it through our needle (If you run out of yarn you can always just cut another piece and thread it through where you left off)
Step 2 :
Starting anywhere on the edge of our stem we will insert our needle, then insert our needle into the 15th row of the stem and we have created our first gill. (See pictures below)
Step 3 :
Repeat the pattern in step 2 all the way around the mushroom, until you are happy with the amount and the arrangement.
Step 4 :
Now we just have to hide any remaining tails and done!
— How to Make the Dish of the Jewelry Holder :
Round 1 :
Make a MR, then CH 2, and 12 DC – 12 DC
Round 2 :
DC INC in each of the 12 stitches – 24 DC
Round 3 :
DC INC in the first stitch, then DC in the next 3 stitches – repeat both steps for the remaining 20 stitches – 30 DC
Round 4 :
DC INC in the first stitch, then DC in the next 4 stitches – repeat both steps for the remaining 25 stitches – 36 DC
Round 5 :
DC INC in the first stitch, then DC in the next 5 stitches – repeat both steps for the remaining 30 stitches – 42 DC
Round 6 :
CH 1, then Reverse SC in each of the 42 stitches
Info :
To reverse SC, we begin with a CH 1. Then we will work in the round going right to left, rather than the normal left to right. So, skipping the first right stitch, insert our hook into the second one and pull up yarn and complete a SC. This creates the first reverse SC. Repeat for the remaining 41 stitches – 42 SC.
Info :
After this round we will fasten off, leaving a long tail that measures about 5 – 10 inches long. Then hide the tails and done! The finished dish will remain inside out – so the wrong side of the stitches is facing outwards. Flatten the entire piece so it resembles an actual jewelry dish. You can also roll up rounds 5 and 6 to create the rim of the dish.
— How to Attach the Dish to the Completed Mushroom :
Step 1 :
Place the base of the mushroom on round 6 of the dish.
Step 2 :
Cut a 15 – 20 inch piece of green yarn and insert our needle. Use this piece to sew the mushroom to the dish, making sure to get under both the mushroom and dish stitches to secure them together. We will only sew the bottom of the mushroom to the bottom of the dish so you will not see any of our sewed stitches later on.
Step 3 :
Now hide the tails and we are now done!
Thank you for choosing this Mushroom Jewelry Holder pattern — I hope it brings a touch of handmade whimsy to your home and makes a lovely gift. 🧶
This pattern is designed to be approachable yet satisfying, with photos and step notes to guide you through assembly. 🌿
Happy crocheting and enjoy your new tiny treasure, perfect for holding rings and small earrings! ✨