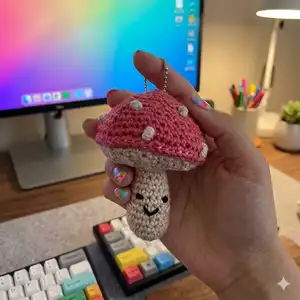
Bring a little bit of forest magic with you wherever you go with this adorable mushroom backpack charm. This compact amigurumi is perfect for attaching to a backpack, tote, or keyring and is made from small scraps of worsted weight yarn. The pattern includes full step-by-step instructions, finishing tips, and a materials list so you can make one quickly and confidently.
Progress Tracker
0% Complete
— Project Info :
Info :
Finished Measurements: This mushroom stands about 4" [10cm] tall.
Info :
Materials: Approximately 35 yds [32 m] worsted weight yarn (CYCA #4) for Main Color (Cap), and about 35 yds [32 m] for Contrast Color (Stem and Gills, and Support Circle). US E/4 [3.5mm] crochet hook or size needed to obtain gauge. Stitch marker. Small amount of fiberfill for stuffing. Yarn needle. Small amount of black embroidery floss (or thin black yarn). Small amount of pink embroidery floss (or thin pink yarn). 6" [15.5 cm] ball chain for attaching to backpack.
Info :
Yarn used for sample: We Crochet Wool of the Andes Worsted (110 yards [100 m]/50 g): Papaya Heather #25071 (MC) and Oyster #24649 (CC).
Info :
Gauge: To check gauge, make the Support Circle. The circle should measure about 1 5/8" [4 cm] in diameter. Getting exact gauge isn’t as important as getting a firm fabric that will not show stuffing through the holes.
— Support circle :
Round 1 :
With CC, make an adjustable loop, 6 SC into loop, pull on beginning yarn tail to close loop. 6 sts.
Round 2 :
2 SC into each st around. 12 sts.
Round 3 :
[SC into the next st, 2 SC into next st] 6 times. 18 sts.
Round 4 :
[2 SC into the next st, SC into each of the next 2 sts] 6 times. 24 sts.
Info :
Fasten off leaving long yarn tail.
Info :
Check gauge. Insert one end of the ball chain down through the top surface of the support circle, and then up through the Support circle so that it comes out through the top surface of the circle about 1/2" [1.5 cm] away from where it went down. Fasten ends of ball chain together.
— Stem :
Round 1 :
With CC, make an adjustable loop, 6 SC into loop, pull on beginning yarn tail to close loop. 6 sts.
Round 2 :
2 SC into each st around. 12 sts.
Round 3 :
[SC into each of the next 3 sts, 2 SC into next st] 3 times. 15 sts.
Round 4-8 :
SC into each st around.
Round 9-11 :
SC around making one inv dec per round. Place each decrease in a different place during each round so that a decrease is not worked into another decrease. 12 sts after working Rnd 11. Stuff stem firmly with fiberfill.
Round 12 :
Working into the back loop only on this round, SC2tog 6 times. 6 sts.
Info :
Fasten off with a sl st. Using a yarn needle, weave yarn tail through each of the remaining 6 sts and pull tight to close hole. Do not weave in end, instead, use ending yarn tail for sewing later.
— Gills :
Row 1 :
Beginning with 2nd Ch from hook YOslst in each of next 5 chs. 5 sts.
Rows 2-30 :
Ch 1 turn, YOslst blo in each st.
Info :
Rotate work 90-degrees to work along the side edge of previous rows. You will be working only into the raised ridges that occur every other row in the YOslst blo stitch pattern. SC2tog across edge 7 times, SC into the last raised ridge. Fasten off leaving long yarn tail for sewing. 8 sts.
Info :
Weave yarn tail through each of the SC stitches made along edge and pull tight to form a circle. Continue using yarn tail to whip stitch short edges of fabric together to create circle. Weave in ends.
— CC edging :
Info :
With a new piece of CC, pull up a loop anywhere around outer edge of Gills circle. Ch 1 to anchor yarn, SC twice between ridges, and SC once in each ridge for a total of 45 SC around, sl st to fasten off. 45 sts.
— Cap of mushroom :
Round 1 :
Pull up loop of MC in any st from CC edging rnd. Sl st in each st around. Do not join but continue working in continuous rnds.
Round 2 :
Working into the SC sts from the CC edging round (not working into the previous Rnd of sl sts), [SC in each of next 14 sts, 2 SC in next st] 3 times. 48 sts.
Round 3 :
[SC in each of next 3 sts, 2 SC in next st, SC in each of next 4 sts] 6 times. 54 sts.
Round 4 :
[SC in each of next 7 sts, inv dec] 6 times. 48 sts.
Round 5 :
[SC in each of next 3 sts, inv dec, SC in each of the next 3 sts] 6 times. 42 sts.
Round 6 :
[SC in each of next st, inv dec, SC in each of the next 4 sts] 6 times. 36 sts.
Round 7 :
[SC in each of next 3 sts, inv dec, SC in the next st] 6 times. 30 sts.
Round 9 :
[Inv dec, SC in each of the next 3 sts] 6 times. 24 sts.
Info :
Place stitch marker in working loop so that it will not ravel while you are working on the next step.
Info :
Stuff cap with fiberfill. Place Support circle (with ball chain attached) on the inside of the cap on top of the fiberfill. This should fit just inside of the opening at the top of the cap. Using the ending yarn tail at the top of the stem and a yarn needle, stitch the top of the stem to the underside of the gills (stitching through the fiberfill and through the top surface of the Support circle). In other words, you are using the support circle to squish the fiberfill so that the gills indent a bit where the stem is attached. Tip: the unused loops around the top edge of the stem will give you a distinct edge to stitch to the gills.
— Continuing with the Cap :
Info :
Remove stitch marker and place hook back in working loop. Continue to add fiberfill as needed.
Round 12 :
[SC in the next st, inv dec, SC in the next st] 6 times. 18 sts.
Round 13 :
[Inv dec, SC in the next st] 6 times. 12 sts.
Round 15 :
When you work this round you will need to "trap" each strand of the ball chain in place with your stitches. Un-hook the ball chain so there are two separate ends. *Place one strand of the ball chain just to the left (right if you crochet left-handed) of the working loop. Let the chain hang to the outside of your work. Inv dec in next st, trapping the ball chain in place, inv dec twice more, repeat from * trapping the other end of the ball chain, and working 3 more decreases. 6 sts.
Info :
Fasten off. Using yarn needle, weave yarn tail through the front loop of each of the remaining 6 sts and pull tight to close top of Cap. Weave in ends.
Info :
Use a double strand of CC to make French knots on mushroom cap as desired.
— Finishing :
Info :
Use black embroidery floss and embroidery needle to embroider a small "v" shape for a mouth, and two large French knots for eyes onto the stem using photos for reference. Use light pink embroidery floss to embroider small circular shapes below each eye using small chain stitches.
This tiny Mushroom Backpack Charm is made to bring a smile and a touch of forest whimsy to your bag, keyring, or gift. It uses small yarn scraps and simple shaping to create an adorable finished piece you can make in an afternoon. Personalize the cap color and spot placement to match your style and give as a sweet handmade present. 🍄🧶