🧢 Beautiful ✨ Detailed πŸ’ Adorable

Mr. Pistachio The Dinosaur Amigurumi Pattern

Mr. Pistachio The Dinosaur Amigurumi Pattern
4.6β˜… Rating
5-7 Hours Time Needed
2.0K Made This
βœ‚οΈ

Intermediate Level

Ideal for those with basic crochet experience, featuring slightly more advanced stitches and techniques to expand your skills.

⏱️

Weekend Treat

Takes 5-7 hours, making it an enjoyable project to finish over a couple of days.

🧸

Cute Companion

An adorable friend to cherish, handcrafted with love to bring comfort and joy for years to come.

About This Mr. Pistachio The Dinosaur Amigurumi Pattern

This pattern creates a sweet, small amigurumi dinosaur named Mr. Pistachio with colorful spikes and decorative dots. You will crochet legs, body, tail, arms, spikes and small dots then assemble them for the finished character. The instructions guide you through joining the legs into the body and shaping the head with clear round-by-round directions.
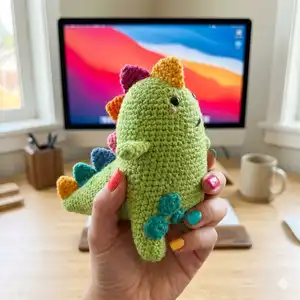
Mr. Pistachio The Dinosaur Amigurumi Pattern crochet pattern - detailed view of completed project

Techniques used are standard amigurumi methods: magic ring, single crochet, increases and decreases. The pattern is great for practicing seamless joins and small detail sewing.

Why You'll Love This Mr. Pistachio The Dinosaur Amigurumi Pattern

I absolutely love this pattern because it combines simple stitches with a lot of personality in such a small package. The colorful spikes and little dots let you be creative while keeping construction straightforward. I enjoy how the joined legs form a solid base and make the sewing stage quick and rewarding. Making Mr. Pistachio feels fast and satisfying, and it's a great way to use small yarn scraps for bright accents.

Mr. Pistachio The Dinosaur Amigurumi Pattern step 1 - construction progress Mr. Pistachio The Dinosaur Amigurumi Pattern step 2 - assembly progress Mr. Pistachio The Dinosaur Amigurumi Pattern step 3 - details and accessories Mr. Pistachio The Dinosaur Amigurumi Pattern step 4 - final assembly and finishing

Switch Things Up

I love experimenting with colors for the spikesβ€”try pastel tones for a softer look or neon shades for a playful style.

You can change yarn weight and hook size to make Mr. Pistachio larger or smaller; bulky yarn with a larger hook gives a chunky version.

I often embroider different facial expressions to change personality; a small smile or a big grin can transform the toy.

Swap safety eyes for embroidered eyes if you are making this for small children to keep it fully soft and safe.

Add tiny accessories like a crocheted scarf, bag or hat to give your dinosaur seasonal charm and make it gift-ready.

I sometimes use felt for spikes instead of crocheting them to save time and create a flat, stylized look.

Try making a whole family with different colored bodies and matching spike palettes for a coordinated set.

You can add a small bell or a loop to turn it into a hanging decoration or keychain by using thinner yarn and smaller hook.

For a posable version, consider inserting thin wire into the arms and tail before stuffing to slightly bend their positions.

I recommend practicing the spike placement on a scrap piece first so you can visualize spacing before sewing them on.

Common Mistakes & How to Fix Them

βœ— Skipping the placement of safety eyes too late causes difficulty positioning; place the safety eyes between rounds 34 - 35 before heavy stuffing to get symmetric placement. βœ— Overstuffing the legs and body early will distort shaping and make sewing difficult; stuff gradually and continue stuffing as you crochet to maintain the intended form. βœ— Cutting the yarn after the second leg will prevent joining the legs properly; do not cut the yarn after the second leg because you need to chain 12 and join to crochet around both legs. βœ— Forgetting to count rounds when increasing will change the stitch counts and shape; count after each increase round and mark the beginning of rounds with a stitch marker to stay accurate.
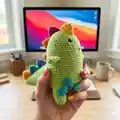
Mr. Pistachio The Dinosaur Amigurumi Pattern

Make a charming Mr. Pistachio dinosaur amigurumi with clear, step-by-step instructions and simple shaping techniques. This cuddly little character features colorful spikes, tiny dots and a friendly face that you can personalize. Perfect as a gift or a cozy handmade companion, the pattern walks you through each piece from legs to finishing touches. Grab your hook and enjoy creating a whimsical, pocket-sized dinosaur!

Intermediate 5-7 Hours

Materials Needed for Mr. Pistachio The Dinosaur Amigurumi Pattern

β€” Main Fabric

  • 01
    Paintbox DK Cotton lime green 429 - 50 g (main color)
  • 02
    Paintbox DK Cotton seville orange 419 - small amount, approx 2 g (for spikes)
  • 03
    Paintbox DK Cotton bubblegum pink 451 - small amount (accent)
  • 04
    Paintbox DK Cotton slate green 427 - small amount (dots)
  • 05
    Paintbox DK Cotton raspberry pink 444 - small amount (accent)
  • 06
    Paintbox DK Cotton dolphin blue 437 - small amount (accent)
  • 07
    Paintbox DK Cotton mustard yellow 424 - small amount (accent)

β€” Tools Required

  • 01
    Crochet hook 3.00 mm
  • 02
    Safety eyes 7 mm
  • 03
    Fiberfill stuffing
  • 04
    Tapestry needle
  • 05
    Scissors

Progress Tracker

0% Complete

β€” Legs, Bosy and Head :

First Leg :

Start with lime green colour and make a magic ring

Round 1 :

6 sc (6)

Round 2 :

inc in all stitches (12)

Round 3 - 7 :

sc in all stitches (12)

Info :

Fasten off, leaving a long tail for sewing

Second leg and body :

Start with a magic ring

Round 1 :

6 sc (6)

Round 2 :

inc all stitches (12)

Round 3 - 7 :

sc in all stitches (12)

Info :

Don't cut the yarn, we will join the legs.

Round 8 :

after finishing the last sc of second leg, crochet 12 chains and connect another leg with slip stitch. Make a sc in same stitch and and continue crocheting around two legs and chain. 12 sc second leg, 12 sc over the 12 ch, 12 sc first leg, 12 sc back side of the 12 ch = so you will have 48 sc

Round 9 - 31 :

48 sc (23 rnds)

Info :

Start stuffing legs and continue stuffing while you go

Round 32 :

6 sc, dec (42)

Round 33 - 34 :

sc in all stitches (42)

Round 35 :

5 sc, dec (36)

Round 36 :

sc in all stitches (36)

Info :

Place safety eyes between 34. - 35. rounds and continue to stuffing. Embroider the cheeks and the mouth (see the photo)

Round 37 :

4 sc, dec (30)

Round 38 :

3 sc, dec (24)

Round 39 :

2 sc, dec (18)

Round 40 :

1 sc, dec (12)

Round 41 :

dec (6)

Info :

Leave a long tail, cut the yarn, weave the end

β€” Tail :

Info :

Start with lime green colour and make a magic ring

Round 1 :

6 sc (6)

Round 2 :

sc in all stitches (6)

Round 3 :

inc, 1 sc (9)

Round 4 :

sc in all stitches (9)

Round 5 :

inc, 2 sc (12)

Round 6 :

sc in all stitches (12)

Round 7 :

inc, 3 sc (15)

Round 8 :

sc in all stitches (15)

Round 9 :

inc, 4 sc (18)

Round 10 :

sc in all stitches (18)

Round 11 :

inc, 5 sc (21)

Round 12 :

sc in all stitches (21)

Round 13 :

inc, 6 sc (24)333

Round 14 :

sc in all stitches (24)

Round 15 :

inc, 7 sc (27)

Round 16 :

sc in all stitches (27)

Round 17 :

inc, 8 sc (30)

Round 18 :

sc in all stitches (30)

Round 19 :

inc, 9 sc (33)

Round 20 :

sc in all stitches (33)

Round 21 :

inc, 10 sc (36)

Round 22 :

sc in all stitches (36)

Round 23 :

inc, 11 sc (39)

Round 24 :

sc in all stitches (39)

Round 25 :

inc, 12 sc (42)

Round 26 :

inc, 13 sc (45)

Info :

Leave a long tail, cut the yarn, weave the end

β€” Arms :

Info :

ARMS : (make 2)

Info :

Start with a magic circle

Round 1 :

8 sc (8)

Round 2 - 8 :

sc in all stitches (8)

Info :

Leave a long tail, cut the yarn, weave the end

β€” Spikes :

Info :

SPIKES ( make 7)

Info :

Start with a magic ring

Round 1 :

5 sc (5)

Round 2 :

sc in all stitches (5)

Round 3 :

inc (10)

Round 4 :

sc in all stitches (10)

Round 5 :

1 sc, inc (15)

Round 6 :

sc in all stitches (15)

Info :

Leave a long tail, cut the yarn, weave the end

β€” Dinosaur Dots :

Info :

With slate green colour make a magic ring

Round 1 :

1. dot : 6 sc in magic ring

Round 2 :

2. dot : 8 hdc in magic ring

Round 3 :

3. dot : 10 hdc in magic ring

β€” Finishing :

Round 1 :

1. Sew the arms between the rounds 25 - 26

Round 2 :

2. Sew the tail back of the body between to legs.

Round 3 :

3. Sew the spikes as seen in the photo.

Round 4 :

4. Sew the dots on the body

Info :

Mr. Pistacio is ready for new adventures.

Assembly Instructions

  • Place safety eyes between rounds 34 - 35 before heavy stuffing so the eyes sit correctly and symmetrically.
  • Sew the arms between rounds 25 and 26 on each side, positioning them evenly and securing with a hidden stitch.
  • Attach the tail to the back of the body between the two legs, aligning the base of the tail with the rear center and sewing firmly.
  • Sew the spikes along the top/back of the body as seen in the photo, spacing them evenly and securing the ends with a few stitches.
  • Sew the slate green dots onto the body in a pleasing arrangement, tucking the thread ends into the stuffing.
  • Embroider the cheeks and mouth after the eyes are placed to ensure correct facial positioning.

Important Notes

  • πŸ’‘Place safety eyes early (between rounds 34 - 35) to ensure even placement before the head is fully stuffed.
  • πŸ’‘Stuff gradually and evenly while you crochet to keep the shape smooth and avoid lumps in the amigurumi.
  • πŸ’‘Leave long tails where instructed and weave in ends securely to prevent unraveling after assembly.
  • πŸ’‘Pin parts in place before sewing to check symmetry and overall positioning for the best finished look.

Mr. Pistachio is a small, handmade dinosaur full of personality and color, perfect for gifts or keepsakes. 🧢 The pattern uses simple amigurumi techniques and bright accent spikes to add fun and charm. 🐾 Have fun stitching and sharing your little companion with friends and family! ✨

You ask,

we answer.

FAQs

What size will the finished piece be?

The finished amigurumi measures approximately pocket-sized (about 12-20 cm tall) depending on your tension and yarn; using the recommended DK cotton and 3.0 mm hook will produce the sample size.

Can I use different yarn weights for this pattern?

Yes, you can use different yarn weights, but the final size will change. Choose an appropriate hook for your yarn and expect the number of stitches and shaping to remain the same while the toy becomes larger or smaller.

Do I need prior crochet experience for this pattern?

This pattern is rated intermediate, so basic knowledge of magic ring, single crochet, increases and decreases is recommended for best results.

How long does this project typically take to complete?

Most crocheters complete this project in 5-7 hours, though time may vary based on experience, customization, and assembly time.