🧢 Beautiful ✨ Detailed πŸ’ Adorable

Moose Slippers Pattern

Moose Slippers Pattern
4.3β˜… Rating
2-4 Hours Time Needed
3.2K Made This
βœ‚οΈ

Beginner Friendly Level

Perfect for those just starting their crochet journey, with clear instructions and simple techniques

⏱️

Bite-Sized Project

Finishes in 2-4 hoursβ€”perfect for an afternoon of creative relaxation.

🧣

Snug Essential

Everyday comfort with practical charm, designed for both functionality and style through changing seasons.

About This Moose Slippers Pattern

This pattern creates a pair of cute moose-themed slippers with an optional buffalo-plaid cuff. The slippers are worked primarily in single crochet with a double-strand foot for durability and a single-strand cuff and details. The design includes ears, antlers, and gem-button eyes for a charming finish.

Moose Slippers Pattern crochet pattern - detailed view of completed project

Available in women's sizes S through XL, plus instructions to adjust cuff length and an optional plaid sock trim. The pattern is easy to follow and includes special stitch notes and tutorial photos for the heel.

Why You'll Love This Moose Slippers Pattern

I absolutely love this pattern because it turns a practical slipper into a playful handmade gift that makes people smile. I enjoy the combination of a sturdy double-strand foot and a soft single-strand cuff β€” it gives great structure while staying cozy. The optional buffalo-plaid cuff lets me play with color and make each pair unique. I also love how small details like the antlers and gem eyes add big personality with very little extra work.

Moose Slippers Pattern step 1 - construction progress Moose Slippers Pattern step 2 - assembly progress Moose Slippers Pattern step 3 - details and accessories Moose Slippers Pattern step 4 - final assembly and finishing

Switch Things Up

I love customizing these slippers by changing the cuff colors β€” try pastel shades for a softer look or bold plaids for a rustic feel.

I often make a mini keychain version by using fingering weight yarn and a smaller hook to create tiny moose slippers as gifts.

I sometimes add embroidery details around the eyes or nose to give each pair a unique expression and personality.

To make a roomier slipper, I increase the foot rounds slightly or use a thicker hook with the same yarn to achieve a chunkier finish.

I recommend swapping the gem eyes for safety eyes if the slippers are for older kids, or embroidering eyes for baby-safe options.

I like to experiment with different yarn textures β€” a slightly fuzzy yarn for the cuff creates a cozy, winter-ready look.

Want a holiday theme? Use green and red for the cuff and add a tiny pompom behind the heel for a festive touch.

I sometimes line the sole with a thin felt piece glued or sewn inside to extend wear and add grip on smooth floors.

I enjoy mixing yarn brands β€” a slightly thicker worsted with the same hook gives a different drape and can help tune the final size.

For a matching set, I crochet a simple eye mask or mitts using the same plaid cuff color palette for a coordinated gift box.

Common Mistakes & How to Fix Them

βœ— Not holding two strands together for the foot can cause the sole to be too flimsy; use a double strand for the foot as instructed to create a sturdier slipper. βœ— Skipping the stitch count changes during the heel setup will lead to a misshapen heel opening; count 10 stitches to the left of the seam and follow the attach-and-turn directions carefully. βœ— Failing to use the third loop when attaching the sock or working the cuff can make the cuff sit incorrectly; attach the sock yarn to the TLO left of the seam as directed. βœ— Using the wrong hook size will change finished fit and gauge; check the gauge (3 sts x 4 rows = 1" for the double strand foot and 4 sts x 4 rows = 1" for cuff) and adjust hook or yarn accordingly.

Moose Slippers Pattern

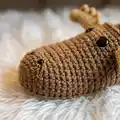
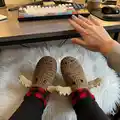
Keep your toes warm and smile-ready with these adorable Moose Slippers. Youll enjoy a fun, quick crochet project that includes an optional buffalo plaid cuff for a cozy, rustic look. Clear instructions and photos guide you through each step so you can make slippers for yourself, children, or 18" dolls.

Beginner Friendly 2-4 Hours

Materials Needed for Moose Slippers Pattern

β€” Main Fabric

  • 01
    Worsted weight yarn (#4) Brown - 7 (8, 9, 10) ozs (women's sizes S, M, L, XL respectively)
  • 02
    Color A: Red (Bright Red) - 1 oz
  • 03
    Color B: Dark Red - 1 oz
  • 04
    Color C: Black - 1 oz
  • 05
    Beige - 1/2 oz for antlers

β€” Tools Required

  • 01
    Crochet hook H/8/5.00mm
  • 02
    Yarn needle
  • 03
    Assorted sew-on gem buttons for eyes and nose
  • 04
    Scissors
  • 05
    Stitch markers (optional)
  • 06
    Tapestry needle for weaving ends

Progress Tracker

0% Complete

β€” Materials :

Info :

Worsted Weight Yarn (#4). Brown - 7 (8, 9, 10) ozs. Red (A) - 1 oz. Dark Red (B) - 1 oz. Black (C) - 1 oz. Beige - 1/2 oz. H/8/5.00mm Hook. Yarn Needle. Assorted Sew-on Gem Buttons.

β€” Gauge :

Info :

Foot (double strand sc): 3 sts x 4 rows = 1". Cuff (single strand sc): 4 sts x 4 rows = 1".

β€” Sizes :

Info :

Womens S (5/6) = 9"/22.9cm. M (7/8) = 9 3/4"/24.8cm. L (9/10) = 10 1/4"/26cm. XL (11/12) = 10 3/4"/27.3cm.

β€” Stitch Guide :

Info :

arnd = around. Bobble = See Special Stitches. ch = chain. dec = decrease. sc = single crochet. sl st(s) = slip stitch(es). TLO = See Special Stitches. YO = yarn over.

β€” Notes :

Infos :

Beginning ch-1 does not count as a stitch. Where asterisks appear, repeat the instructions between them. Join and chain where indicated only. The base is worked using the double strand method (holding two strands together). The sock, ears, and antlers are worked with single strand. The plaid "sock" is optional; Cuff row 6 includes two instruction sets depending on if you will add the "sock" or not. Tutorial photos are at the end of the pattern.

β€” Special Stitches :

Info :

Third Loop Only (TLO) - The loop on the back side of a half double crochet that runs parallel to the front and back loops. Bobble - *YO, insert hook in stitch indicated, YO draw up a loop, YO, draw through 2 loops on hook* 5X, YO, pull through all loops on hook.

β€” Foot :

Round R1 :

Make a magic ring, ch 1, 6 sc in ring, sl st to join in 1st sc, turn (6)

Round R2 :

Ch 1, 2 sc in each st arnd, sl st to join in 1st sc, turn (12)

Round R3 :

Ch 1, *2 sc, sc* arnd, sl st to join in 1st sc, turn (18)

Round R4 :

Ch 1, *2 sc, sc x 2* arnd, sl st to join in 1st sc, turn (24)

Round R5 :

Ch 1, *2 sc, sc x 3* arnd, sl st to join in 1st sc, turn (30)

Round R6 :

Ch 1, sc in each st arnd, sl st to join in 1st sc, turn (30)

Round R7-21(23,25,27) :

Repeat 6. Fasten.

Info :

Count 10 sts to the left, attach yarn, turn,

Round R22(24,26,28) :

Ch 1, sc in same space as join and in next 19 sts, turn (20) [20,20,20]

Round R23(25,27,29) :

Ch 1, sc across, turn (20)[20,20,20]

Round R24(26,28,30)-34(36,38,40) :

Repeat 23(25,27,29).

Round R35(37,39,41) :

At the end of round 34(36,38,40): Ch 1, turn, hold the two [heel] ends together with the RS touching & sl st in each st down (working through both layers) to join; Fasten.

β€” Cuff :

Info :

Double Strand. With Brown, Attach yarn to seam,

Round 1 :

Ch 1, sc in end of each row and in each st arnd, sl st to join, turn (36)

Round 2 :

Ch 1, sc in each st arnd, sl st to join, turn (36)

Round 3-5 :

Repeat 2

Round R6 (WITHOUT SOCK) :

Ch 1, hdc in each st arnd, sl st to join; Fasten. (36)

Round R6 (WITH SOCK) :

Ch 1, *2 hdc, hdc x 4* arnd, sl st to join; Fasten. (42)

β€” Sock :

Info :

Single Strand. Attach yarn to TLO left of seam, Starting Plaid,

Round 1 :

(RS) With Color A: Ch 1, sc x 3, With Color B: sc x 3, * With Color A: sc x 3, With Color B: sc x 3* arnd, sl st to join in 1st sc, turn (42)

Round 2 :

With Color B: Ch 1, sc x 3, With Color A: sc x 3, * With Color B: sc x 3, With Color A: sc x 3* arnd, sl st to join in 1st sc, turn (42)

Round 3 :

Repeat round 1

Round 4 :

With Color C: Ch 1, sc x 3, With Color B: sc x 3, * With Color C: sc x 3, With Color B: sc x 3* arnd, sl st to join in 1st sc, turn (42)

Round 5 :

With Color B: Ch 1, sc x 3, With Color C: sc x 3, * With Color B: sc x 3, With Color C: sc x 3* arnd, sl st to join in 1st sc, turn (42)

Round 6 :

Repeat round 4

Round 7-9 :

Repeat rounds 1-3; Fasten.

Info :

Optional: Continue repeating 1-6 to desired length and roll cuff down.

β€” Ears :

Info :

Single Strand (Make 4). With Brown,

Round R1 :

Magic ring, ch 1, 4 sc in ring (4)

Round R2 :

sc arnd (4)

Round R3 :

2 sc in each st arnd (8)

Round R4-5 :

sc arnd (8)

Round R6 :

*2 sc, sc* arnd (12)

Round R7-8 :

sc arnd (12)

Round R9 :

*dec, sc* arnd; Fasten (8)

β€” Antlers :

Info :

Single Strand (Make 4). With Beige,

Round R1 :

Magic ring, ch 1, 5 sc in ring (5)

Round R2 :

sc arnd (5)

Round R3 :

2 sc in each st arnd (10)

Round R4 :

sc arnd (10)

Round R5 :

2 sc x 2, sc x 2, dec x 2, sc x 2 (10)

Round R6 :

sc, bobble, sc x 8 (10)

Round R7-8 :

sc arnd (10)

Round R9 :

sc x 2, bobble, sc x 7 (10)

Round R10-11 :

sc arnd (10)

Round R12 :

sc x 3, bobble, sc x 6 (10)

Round R13-14 :

sc arnd (10)

Round R15 :

sc x 2, dec x 2, sl st x 2 (leave last two sts unworked); Fasten. (8)

β€” Finishing :

Info :

Count 10 stitches to the left of the seam and attach ear to 10th stitch over rows 2 & 3. Count 10 stitches to the right of the seam and attach ear to 10th stitch over rows 2 & 3.

Info :

Count 12 stitches to the left of the seam and attach antler to 12th stitch over rows 4 - 6. Count 12 stitches to the right of the seam and attach antler to 12th stitch over rows 4 - 6.

Info :

Count 16 stitches to the left of the seam and attach large gem for an eye to 16th - 17th stitches over rows 2 & 3. Count 16 stitches to the left of the seam an attach large gem for an eye to 16th - 17th stitches over rows 2 & 3. Leave 2-3 stitches between eyes.

Info :

Attach smallest gems to front of slipper, between rows 5 & 6, so they are lined up with the eyes. Leave approximately 3 stitches between them.

Info :

Hide all strings.

Assembly Instructions

  • Attach ears: Count 10 stitches to the left of the seam and attach ear to 10th stitch over rows 2 & 3; repeat on the right side and secure firmly.
  • Attach antlers: Count 12 stitches to the left of the seam and attach antler to 12th stitch over rows 4-6; mirror on right side and sew securely.
  • Attach eyes: Count 16 stitches to the left of the seam and attach large gem for an eye to 16th-17th stitches over rows 2 & 3; repeat on the other side leaving 2-3 stitches between eyes.
  • Attach nose gems: Sew the smallest gems to the front of the slipper between rows 5 & 6, lined up with the eyes and spaced approximately 3 stitches apart.
  • Sew heel seam: At the end of the heel round, hold the two heel ends together with RS touching and slip stitch through both layers down to join, then fasten off and weave in ends.
  • Weave and hide all yarn ends with a tapestry needle, ensuring all pieces are firmly secured before wearing.

Important Notes

  • πŸ’‘Beginning ch-1 does not count as a stitch; always follow the pattern counts accordingly.
  • πŸ’‘The base (foot) is worked using the double strand method (hold two strands together) while ears, antlers, and sock are worked with single strand.
  • πŸ’‘The plaid sock is optional; cuff row 6 includes two instruction sets depending on whether you add the sock or not.
  • πŸ’‘Join and chain only where indicated and keep track of the seam to ensure correct placement of features.
  • πŸ’‘Tutorial photos for the heel are provided at the end of the pattern to guide you through the heel joining method.

These Moose Slippers are a whimsical and cozy winter project that add personality to your everyday lounging. The double-strand foot gives durability while the optional plaid cuff brings a playful, rustic charm. Perfect as a handmade gift or a cozy treat for yourselfβ€”craft with love and a smile. 🧢🧡

You ask,

we answer.

FAQs

What size will the finished slippers be?

The slippers are available in Womens sizes S (5/6) = 9"/22.9cm, M (7/8) = 9 3/4"/24.8cm, L (9/10) = 10 1/4"/26cm, and XL (11/12) = 10 3/4"/27.3cm using the recommended yarn and hook.

Can I skip the plaid sock cuff?

Yes, the plaid 'sock' is optional; cuff row 6 includes two instruction sets depending on whether you will add the sock or not.

Do I need to use double strand yarn for the entire slipper?

No β€” the base foot is worked using double strand for strength, while the cuff, ears, antlers, and sock are worked with a single strand as specified.

What skill level is required for this pattern?

This pattern is rated Easy (Beginner Friendly) and uses basic stitches and simple shaping, though familiarity with magic ring and bobble stitches is helpful.

How long will this project take to complete?

Most crocheters finish a pair in about 2-4 hours, depending on experience and whether you add the optional plaid cuff.