๐Ÿงถ Beautiful โœจ Detailed ๐Ÿ’ Adorable

Minimals Dog Amigurumi Pattern

Minimals Dog Amigurumi Pattern
4.6โ˜… Rating
5-7 Hours Time Needed
3.2K Made This
โœ‚๏ธ

Intermediate Level

Ideal for those with basic crochet experience, featuring slightly more advanced stitches and techniques to expand your skills.

โฑ๏ธ

Weekend Treat

Takes 5-7 hours, making it an enjoyable project to finish over a couple of days.

๐Ÿงธ

Cute Companion

An adorable friend to cherish, handcrafted with love to bring comfort and joy for years to come.

About This Minimals Dog Amigurumi Pattern

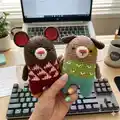
This pattern creates a small, stylized dog amigurumi from the Minimals mini animal series. You will work continuous rounds to form the head, body and legs with colour changes to create clothing and facial markings. The pattern includes separate pieces for arms, ears and a snout, plus clear placement notes for eyes and face details.

Minimals Dog Amigurumi Pattern crochet pattern - detailed view of completed project

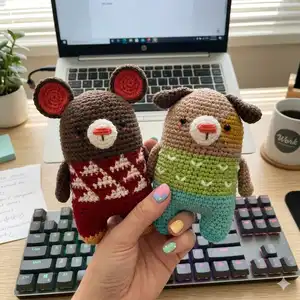
Designed to finish at approximately 15 cm tall when using fingering weight yarn on a 3mm hook, this amigurumi is a delightful gift or display piece. Complete with step-by-step rounds, symbol pattern references, and assembly tips for a polished finish.

Why You'll Love This Minimals Dog Amigurumi Pattern

I absolutely love this pattern because it combines simple amigurumi shaping with fun color-blocking and tiny embroidered details that bring the character to life. The rounds are repetitive enough to relax into, yet the colour changes and small parts keep the work interesting. I enjoy how the separate snout and ears add a playful personality to the doll. Making several in different color combinations is so addictive because each one feels unique.

Minimals Dog Amigurumi Pattern step 1 - construction progress Minimals Dog Amigurumi Pattern step 2 - assembly progress Minimals Dog Amigurumi Pattern step 3 - details and accessories Minimals Dog Amigurumi Pattern step 4 - final assembly and finishing

Switch Things Up

I love how easy it is to customize this pattern with different color palettes; try pastel hues for a soft nursery friend or bold primaries for a playful look.

I often swap the sky blue and neon blue sections to create striped legs or add tiny embroidered stars on the clothes area for detail.

If you want a larger doll, I change to worsted weight yarn and a 4mm hook and the proportions work nicely without other adjustments.

To make a tiny keychain version, use thinner yarn and a 2.5mm hook and shorten the body rounds to reduce height.

I sometimes embroider eyelashes or freckles to change expression โ€” small changes to eyes and mouth completely alter personality.

Consider adding felt clothing or a tiny crocheted scarf for seasonal variations; these small accessories are quick to make and removable.

For a poseable version, I insert thin wire into the arm seams before sewing to allow slight movement in the arms.

Try safety eyes in different sizes or embroidered eyes for a softer, child-safe toy suitable for babies.

I recommend experimenting with variegated yarns for the clothes band to get a subtle multicolour effect without changing yarns mid-round.

When making gifts, I mix yarn textures โ€” cotton for a firmer body, acrylic for fluffier colors โ€” and it gives a unique handmade feel.

To create a sibling set, change just one color per doll (for example, swap the light green for pink) so the collection looks cohesive but varied.

I always customize the nose color to match a theme โ€” orange for a playful look or brown for a classic puppy feel.

Common Mistakes & How to Fix Them

โœ— Skipping stitch markers when dividing the legs can make it hard to find the correct stitches later; place markers at the center spaces and at the start of each leg to ensure accurate shaping. โœ— Forgetting to change yarn colors at the indicated rounds will disrupt the symbol pattern; follow the color-change notes and the symbol chart on page 1 to match the design. โœ— Not leaving a long tail when fastening off small parts prevents secure sewing; always leave a long tail for sewing so you can attach pieces firmly without restitching. โœ— Overstuffing the head or body can distort the shape and make assembly difficult; stuff gradually and check the silhouette as you go to maintain the intended proportions. โœ— Closing leg openings without weaving the tail through the front loops may leave gaps; weave the yarn tail through the front loop of each remaining stitch and pull tight to close securely.

Minimals Dog Amigurumi Pattern

Make a charming Minimals dog amigurumi using clear step-by-step rounds and easy assembly instructions. This pattern guides you through the head, body, legs, arms, snout and ears with colour-change notes and chart references. Perfect for crafters who enjoy small, detailed toys and playful colourwork.

Intermediate 5-7 Hours

Materials Needed for Minimals Dog Amigurumi Pattern

โ€” Main Fabric

  • 01
    Worsted yarn (recommended) - Soft Brown yarn (main body color)
  • 02
    Worsted yarn - Yellow yarn (face patch)
  • 03
    Worsted yarn - White yarn (snout and details)
  • 04
    Worsted yarn - Brown yarn (ear color / dark accents)
  • 05
    Worsted yarn - Orange yarn (nose detail)
  • 06
    Worsted yarn - Sky blue yarn (lower body / legs)
  • 07
    Worsted yarn - Neon blue yarn (leg toes / accent)
  • 08
    Worsted yarn - Light green yarn (clothes section)
  • 09
    Size note: finished size approximately 15cm (5.9 inches) if using fingering weight yarn on a 3mm crochet hook

โ€” Tools Required

  • 01
    Crochet hook 5/0 (3mm)
  • 02
    Yarn needle for sewing and weaving ends
  • 03
    Fiberfill stuffing
  • 04
    Glue (to glue the eyes on the face if preferred)
  • 05
    5mm black plastic eyes x2 (or substitute embroidered eyes)
  • 06
    Scissors
  • 07
    Stitch markers (to mark rounds and leg division)
  • 08
    Pins for assembly (optional)
  • 09
    Wooden pins as shown to straighten doll feet (optional)

Progress Tracker

0% Complete

โ€” Head :

Round 1 :

scx6 in the yarn loop, tighten the loop [6 sts]

Round 2 :

(2-sc inc) x 6 [12]

Round 3 :

(scx1, 2-sc inc) x 6 [18]

Round 4 :

(scx2, 2-sc inc) x 6 [24]

Round 5 :

(scx3, 2-sc inc) x 6 [30]

Round 6 :

(scx4, 2-sc inc) x 6 [36]

Round 7 :

(scx5, 2-sc inc) x 6 [42]

Round 8 :

(scx6, 2-sc inc) x 6 [48]

Round 9~36 :

sc in all 48 st [48]

Info :

Do not forget to change the color as shown in the illustration to the right. (Check page 1 for more details.)

โ€” Body :

Infos :

Rnd 20~36 <Light green / Sky blue yarn> (change yarn color according to the symbol patterns on page 1)

โ€” Divide The Legs :

Info :

To make a leg, identify the center space between the legs by the 6 stitches, and each leg identifies the other by 18.(Use stitch markers to help.) Sc at the 31th st of the Rnd 36. *1 This sc is the first st of the first leg (left leg). Continue working on the first leg (left leg).

โ€” Legs :

Round 37~40 :

sc in all 18 st [18]

Round 41 :

(scx1, sc2tog) x 6 [12]

Round 42 :

(sc2tog) x 6 [6]

Info :

Fasten off, leaving a long tail. Stuff the leg. Using a yarn needle, weave the yarn tail through the front loop of each remaining st and pull tight to close.

Second Leg (Right leg) :

Rejoin the Sky blue yarn to 7th back unworked st of Rnd 36.*2 This sc is the first st for the second leg (right Leg). Continue working the second leg (right leg) the same way as the first leg (left leg), from Rnd 37~42. Using a yarn needle, sew the 6 sts between the legs.*3

โ€” Arms :

Round 1 :

scx5 in the yarn loop, tighten the loop [5 sts]

Round 2 :

(2-sc inc) x 5 [10]

Round 3~11 :

sc in all 10 st [10]

Info :

Fasten off, Leaving a long tail for sewing. Flatten the ARM, do not stuff.

โ€” Snout :

Info :

Use the White yarn to make 4 chains.

Round 1 :

scx1 in second ch from hook ,scx1 in the next chain, scx3 in the bottom chain, Working up the other side-scx1, scx2 in the next chain, slst [8 sts]

Round 2 :

ch 1, 2-sc inc, scx1, (2-sc inc) x 3, scx1, (2-sc inc) x 2, slst [14]

Round 3 :

ch 1, 2-sc inc, scx3, 2-sc inc, scx2, sc2tog, scx1, sc2tog, scx2, slst [14]

Round 4 :

ch 1, sc in all 14 st, slst [14]

Info :

Fasten off, Leaving a long tail for sewing. Fill in some stuffing to the snout. And then make a nose and mouth on the snout.

Info :

Eyes Location Between Rnd 13 and 14. Section for the snout stitching on the face. Use the symbol diagram on page 3 for placement (19sts and 8sts references).

โ€” Ear x2 :

Round 1 :

scx5 in the yarn loop, tighten the loop [5 sts]

Round 2 :

(2-sc inc) x 5 [10]

Round 3 :

(scx1, 2-sc inc) x 5 [15]

Round 4 :

sc in all 15 st [15]

Round 5 :

scx6, sc2tog, scx5, sc2tog [13]

Round 6 :

scx6, sc2tog, scx5 [12]

Round 7 :

sc in all 12 st [12]

Round 8 :

(scx4, sc2tog) x 2 [10]

Round 9~10 :

sc in all 10 st [10]

Info :

Fasten off, Leaving a long tail for sewing. Flatten the EAR, do not stuff. Fix Ear to the head as shown in illustrations.

โ€” Assembly :

Info :

Using a yarn needle, sew the 6 sts between the legs. Glue the eyes on the face or attach safety eyes before closing the head as preferred. Fix ears in position and sew arms on between Rnd 20 and 21 as indicated on the diagrams. Complete face details and doll assemblies by referring to illustrations showing location for each part and pictures in the following description.

Assembly Instructions

  • Attach the head to the top opening of the body, aligning the front centre (snout location) and sew securely using a yarn needle with the long tail left from the head fasten off.
  • Position and sew the arms on either side of the body between rounds 20 and 21, using pins to check placement before stitching for symmetry.
  • Sew the ears to the top sides of the head, fixing each ear with a few secure stitches and hiding ends inside the head; flatten ears as instructed and do not stuff.
  • After completing both legs, use a yarn needle to sew the 6 sts between the legs to close and secure them to the body base for stability.
  • Glue or attach the 5mm black plastic eyes between rounds 13 and 14, then stitch or embroider the nose and mouth on the snout according to the face placement diagram.

Important Notes

  • ๐Ÿ’กUse stitch markers to keep track of your rounds and to mark the centre and edges when dividing the legs.
  • ๐Ÿ’กFasten off each part leaving a long tail for sewing so you have enough yarn to stitch pieces together securely.
  • ๐Ÿ’กFlatten the arms and ears when instructed and do not stuff them to achieve the intended look and ease of sewing.
  • ๐Ÿ’กWeave yarn tails through the front loop of remaining stitches when closing small openings and pull tight to close neatly.

This little Minimals Dog makes a perfect handmade gift or shelf companion, full of personality and sweet colourwork.๐Ÿงถ Follow the symbol patterns and step-by-step rounds to create a neat and charming toy that stands about 15cm tall.๐Ÿงต Have fun customizing colors and expressions โ€” happy crocheting!โœจ

You ask,

we answer.

FAQs

What size will the finished piece be?

The finished amigurumi measures approximately 15 cm (5.9 inches) when using fingering weight yarn on a 3mm crochet hook as noted in the pattern.

Can I use different yarn weights for this pattern?

Yes, you can use different yarn weights, but this will affect the final size. If you use worsted weight instead of fingering, your doll will be larger; adjust hook size accordingly to maintain gauge.

Do I need stitch markers for this pattern?

Stitch markers are recommended, especially when dividing the legs at round 36 and when counting the 31st stitch to start the first leg; they help keep your place and ensure symmetry.

How do I attach the eyes and facial details?

The pattern suggests placing eyes between rounds 13 and 14; you can glue the 5mm plastic eyes on the face or attach safety eyes before closing the head. Embroider the nose and mouth onto the snout after sewing it in place.