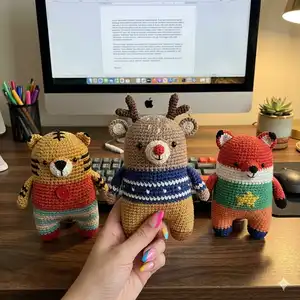
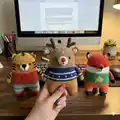
Make an adorable mini deer amigurumi with clear step-by-step instructions, perfect for intermediate crocheters who love character toys. This pattern includes full stitch-by-stitch rounds for head, body, legs, arms, horns, snout and ears plus assembly notes. You'll enjoy the colorwork sweater detail and compact 15 cm finished size while learning small-shaping techniques.
Progress Tracker
0% Complete
— Head / Body / Legs :
Info :
Use the Brown yarn to make MAGIC RING.
Round 1 :
scx6 in the yarn loop, tighten the loop [6 sts]
Round 2 :
(2-sc inc) x 6 [12]
Round 3 :
(scx1, 2-sc inc) x 6 [18]
Round 4 :
(scx2, 2-sc inc) x 6 [24]
Round 5 :
(scx3, 2-sc inc) x 6 [30]
Round 6 :
(scx4, 2-sc inc) x 6 [36]
Round 7 :
(scx5, 2-sc inc) x 6 [42]
Round 8 :
(scx6, 2-sc inc) x 6 [48]
Round 9~36 :
sc in all 48 st [48]
Info :
Place color changes according to symbol patterns. Rnd 20~36 use Navy / White / Yellow yarn for sweater section as shown in the symbol chart.
Info :
Rnd 1~19 constitute the head shaping before sweater colors begin; follow rounds above for full count.
Info :
Do not forget to change the color as shown in the illustration. Check the symbol pattern chart for color positions.
Info :
Eyes Location: Between Rnd 13 and 14.
Info :
Section for the snout stitching: 19sts across face, 8sts width for snout location as diagram shows.
Divide the legs :
To make a leg, identify the center space between the legs by the 6 stitches, and each leg identifies the other by 18. (Use stitch markers to help.) Sc at the 31th st of the Rnd 36. This sc is the first st of the first leg (left leg). Continue working on the first leg (left leg).
Round 37~40 :
sc in all 18 st [18]
Round 41 :
(scx1, sc2tog) x 6 [12]
Round 42 :
(sc2tog) x 6 [6]
Info :
Fasten off, leaving a long tail. Stuff the leg. Using a yarn needle, weave the yarn tail through the front loop of each remaining st and pull tight to close.
Second leg (Right leg) :
Rejoin the Yellow yarn to 7th back unworked st of Rnd 36. This sc is the first st for the second leg (right leg). Continue working the second leg (right leg) the same way as the first leg (left leg), from Rnd 37~42. Using a yarn needle, sew the 6 sts between the legs.
— Arm x2 :
Info :
Use the Brown yarn to make MAGIC RING for each arm.
Round 1 :
scx5 in the yarn loop, tighten the loop [5 sts]
Round 2 :
(2-sc inc) x 5 [10]
Round 3~11 :
sc in all 10 st [10]
Info :
Fasten off, Leaving a long tail for sewing. Flatten the ARM, do not stuff.
— Long Horn x2 :
Info :
Use the Dark brown yarn to make MAGIC RING for each long horn.
Round 1 :
scx4 in the yarn loop, tighten the loop [4 sts]
Round 2~5 :
sc in all 4 st [4]
Round 6 :
2-sc inc, scx3 [5]
Round 7 :
2-sc inc, scx4 [6]
Info :
Fasten off, Leaving a long tail for sewing. Do not stuff.
— Short Horn x2 :
Info :
Use the Dark brown yarn to make MAGIC RING for each short horn.
Round 1 :
scx4 in the yarn loop, tighten the loop [4 sts]
Round 2~4 :
sc in all 4 st [4]
Info :
Fasten off, Leaving a long tail for sewing. Do not stuff. Sew the Short horn to long horn.
— Snout :
Info :
Use the Light beige yarn to make 3 chains.
Round 1 :
scx1 in second ch from hook ,scx3 in the bottom chain, Working up the other side-scx1, scx1 in the next chain, slst [6 sts]
Round 2 :
ch 1, (2-sc inc) x 6, slst [12]
Round 3 :
ch 1, sc in all 12 st, slst [12]
Round 4 :
ch 1, scx4, 2-sc inc, scx6, 2-sc inc, slst [14]
Round 5 :
ch 1, sc in all 14 st, slst [14]
Info :
Fasten off, Leaving a long tail for sewing. Fill in some stuffing to the snout. And then make a nose and mouth on the snout.
— Ear x2 :
Info :
Use the Light beige yarn to make MAGIC RING for the inner ear; make two brown outer ears the same way and join as edging.
Round 1 :
scx6 in the yarn loop, tighten the loop [6 sts]
Round 2 :
(2-sc inc) x 6 [12]
Info :
Fasten off, and make another Light beige ear, two Brown ears by the same way.
Edging :
Locate light beige colored ear part on the brown ear, and then SC together with brown yarn. [12]
Info :
Fasten off, Leaving a long tail for sewing.
Info :
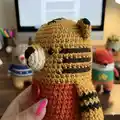
*Complete face details and doll assemblies by referring to illustrations showing location for each part and pictures in the following description.
Info :
TIP: How to straighten a doll: Plug wooden pin on the back of the doll's feet.
This sweet Minimals deer pattern brings cozy charm to your handmade collection with a striped sweater and tiny antlers. Perfect for gifting or keeping on a shelf, each small detail makes it utterly lovable. Enjoy every stitch and make one (or many!) to spread handmade joy. 🧶🧸