🧢 Beautiful ✨ Detailed πŸ’ Adorable

MINIMALS CAT Amigurumi Pattern

MINIMALS CAT Amigurumi Pattern
4.2β˜… Rating
5-7 Hours Time Needed
2.8K Made This
βœ‚οΈ

Intermediate Level

Ideal for those with basic crochet experience, featuring slightly more advanced stitches and techniques to expand your skills.

⏱️

Weekend Treat

Takes 5-7 hours, making it an enjoyable project to finish over a couple of days.

🧸

Cute Companion

An adorable friend to cherish, handcrafted with love to bring comfort and joy for years to come.

About This MINIMALS CAT Amigurumi Pattern

This pattern creates a pocket-sized minimal cat amigurumi with striped body and sweet facial features. It uses worsted weight yarn worked in continuous rounds with clear color-change guidance. The design includes separate instructions for head, body, legs, arms, ears and snout with placement diagrams for accurate assembly.

MINIMALS CAT Amigurumi Pattern crochet pattern - detailed view of completed project

You will work simple increases and decreases, single crochet rounds, and small sewn-on parts. The finished toy measures approximately 15 cm when using fingering weight yarn on a 3mm hook as noted.

Why You'll Love This MINIMALS CAT Amigurumi Pattern

I absolutely love this pattern because it blends simple construction with charming details that make the little cat full of personality. I enjoy the way the color-blocked face and striped body come together with minimal stitches to create a big expression. I also appreciate that it is modular β€” head, body, legs and accessories are worked separately, so it is easy to customize colors and placement. The pattern photographs and location guides make assembly straightforward and satisfying, so I always feel proud when I finish one.

MINIMALS CAT Amigurumi Pattern step 1 - construction progress MINIMALS CAT Amigurumi Pattern step 2 - assembly progress MINIMALS CAT Amigurumi Pattern step 3 - details and accessories MINIMALS CAT Amigurumi Pattern step 4 - final assembly and finishing

Switch Things Up

I love how easy it is to customize this cat by changing the colors β€” try pastel shades for a softer look or bold brights for a playful vibe.

You can make a tiny keychain version by using fingering yarn and a 2.5mm hook for a miniature pocket pal.

I often add surface embroidery for whiskers or freckles to change the expression and personality of each doll.

Swap the striped body for a solid color or gradient for a different style, and adjust the number of stripe rounds to lengthen or shorten the torso.

I sometimes use safety eyes for durable toys and glue them for display-only dolls; for baby toys, embroider the eyes instead.

To make the doll poseable, consider inserting thin wire into the arm seams before closing and sewing to allow slight movement.

I like to make tiny crocheted accessories like a scarf or hat to give the cat a seasonal look.

Try mixing yarn textures β€” a boucle eyelid or fuzzy accent yarn for a collar adds a tactile contrast that looks great.

Make matching sets by creating multiple animals with different color schemes using the same basic pattern and simple face changes.

If you want a softer, cuddlier version, use a larger hook and bulky yarn and increase stuffing for a plush finish.

Common Mistakes & How to Fix Them

βœ— Skipping stitch markers before dividing the legs can cause incorrect stitch counts; mark the dividing points and the first stitches of each leg before you separate them. βœ— Changing color without fastening or weaving tails securely will create loose ends; carry colors neatly or weave in ends as you change to prevent gaps. βœ— Forgetting to stuff gradually leads to lumps and uneven shaping; stuff small amounts frequently and shape as you go for smooth curves. βœ— Closing the leg or head too early makes final shaping difficult; leave a long tail, stuff fully, then weave the tail through front loops to close neatly.

MINIMALS CAT Amigurumi Pattern

Make a charming minimal cat amigurumi with clear, photo-supported instructions and simple shaping. This pattern uses basic single crochet, increases and decreases and color changes to create a striped body and cute face details. You will love the compact size and the sweet finished expression β€” perfect as a gift or shelf friend. Follow the step-by-step rounds and location guides to assemble with confidence.

Intermediate 5-7 Hours

Materials Needed for MINIMALS CAT Amigurumi Pattern

β€” Main Fabric

  • 01
    Worsted weight yarn (recommended)
  • 02
    Soft beige yarn (main face/body background)
  • 03
    Navy yarn (pants and stripes)
  • 04
    Green yarn (stripes)
  • 05
    Lime yarn (feet and accent)
  • 06
    Orange yarn (patch color)
  • 07
    Orange brown yarn (head patch)
  • 08
    Red yarn (nose and small details)
  • 09
    White yarn (snout and face details)
  • 10
    Brown yarn (accents)

β€” Tools Required

  • 01
    Crochet hook 5/0 (3mm)
  • 02
    Yarn needle (weave in ends and sewing)
  • 03
    Scissors
  • 04
    Stitch markers
  • 05
    Polyester stuffing (fiberfill)
  • 06
    Glue (to glue the eyes on the face if desired)
  • 07
    5mm Black plastic eyes x2
  • 08
    Pins for assembly (optional)

Progress Tracker

0% Complete

β€” Head :

Info :

*Change the color of the yarn according to the SYMBOL PATTERNS on page 1. Changing the yarn color is not mentioned in the descriptive design below.

Round 1 :

Use the Orange brown yarn to make MAGIC RING. scx6 in the yarn loop, tighten the loop [6 sts]

Round 2 :

(2-sc inc) x 6 [12]

Round 3 :

(scx1, 2-sc inc) x 6 [18]

Round 4 :

(scx2, 2-sc inc) x 6 [24]

Round 5 :

(scx3, 2-sc inc) x 6 [30]

Round 6 :

(scx4, 2-sc inc) x 6 [36]

Round 7 :

(scx5, 2-sc inc) x 6 [42]

Round 8 :

(scx6, 2-sc inc) x 6 [48]

Round 9~19 :

sc in all 48 st [48]

Info :

Do not forget to change the color as shown in the illustration to create the face patch (use Orange Brown and Soft Beige according to the SYMBOL PATTERN). Place the eyes between Rnd 13 and 14. Eyes: 5mm black plastic eyes x2 (glue if needed).

β€” Body :

Round 20~36 :

sc in all 48 st [48] (Change yarn color following the SYM BOL PATTERN for stripes; Rnd 20~36 use Green/Navy yarn as indicated)

Info :

When working rounds 20-36 change color stripes exactly as shown on page 1 symbol pattern. Rounds 9~19 form the head area, rounds 20~36 form the body area and rounds 37~42 are for the legs.

Infos :

DIVIDE THE LEGS: To make a leg, identify the center space between the legs by the 6 stitches, and each leg identifies the other by 18. (Use stitch markers to help.) Sc at the 31th st of the Rnd 36. This sc is the first st of the first leg (left leg). Continue working on the first leg (left leg).

β€” Legs :

First leg (Left leg) :

37~40. sc in all 18 st [18]

Round 41 :

(scx1, sc2tog) x 6 [12]

Round 42 :

(sc2tog) x 6 [6]

Info :

Fasten off, leaving a long tail. Stuff the leg. Using a yarn needle, weave the yarn tail through the front loop of each remaining st and pull tight to close.

Second leg (Right leg) :

Rejoin the Navy yarn to 7th back unworked st of Rnd 36. This sc is the first st for the second leg (right leg). Continue working the second leg (right leg) the same way as the first leg (left leg), from Rnd 37~42. Using a yarn needle, sew the 6 sts between the legs.

Info :

Rnd 37~42 (Leg) use Lime/Navy yarn for the feet and leg stripes according to the symbol pattern shown on page 1. After both legs are finished, sew the 6 center sts closed between the legs to form the crotch.

β€” Arms :

Info :

Make 2 arms. Use the Soft beige yarn for the arms.

Round 1 :

Use the Soft beige yarn to make MAGIC RING. scx5 in the yarn loop, tighten the loop [5 sts]

Round 2 :

(2-sc inc) x 5 [10]

Round 3~11 :

sc in all 10 st [10]

Info :

Fasten off, leaving a long tail for sewing. Flatten the ARM, do not stuff. Position arms between Rnd 20 and 21 on the body as shown in location diagrams.

β€” Snout :

Info :

Use White yarn to make the snout and sew to face. Eyes location: between Rnd 13 and 14. Section for the snout stitching on the face is shown on the pattern diagram; mark 19sts and an 8sts center area for snout placement.

Round 1 :

Use the White yarn to make 4 chains. scx1 in second ch from hook, scx1 in the next chain, scx3 in the bottom chain, working up the other side-scx1, scx2 in the next chain, slst [8 sts]

Round 2 :

ch 1, 2-sc inc, scx1, (2-sc inc) x 3, scx1, (2-sc inc) x 2, slst [14]

Round 3~4 :

ch 1, sc in all 14 st, slst [14]

Info :

Fasten off, leaving a long tail for sewing. Fill in some stuffing to the snout. Then embroider or crochet a small nose and mouth on the snout. Follow the snout symbol pattern for placement and stitches.

β€” Ears :

Info :

Make 2 ears. Use the Orange Brown (or Soft beige for inside) yarn as indicated by color pattern. Do not stuff ears; flatten for sewing.

Round 1 :

Use the Orange Brown (/Soft beige) yarn to make MAGIC RING. scx3 in the yarn loop, tighten the loop [3 sts]

Round 2 :

(2-sc inc) x 3 [6]

Round 3 :

(scx1, 2-sc inc) x 3 [9]

Round 4 :

(scx2, 2-sc inc) x 3 [12]

Info :

Fasten off, leaving a long tail for sewing. Flatten the EAR, do not stuff. Attach ears to the top of the head with position guide: each ear spacing shown as 4 rnds from top in the diagram; cheek location between Rnd 14 and 15; beard location between Rnd 15 and 16 & Rnd 17 and 18.

Info :

Complete face details and doll assemblies by referring to the illustrations showing location for each part and pictures in the following description. Use the diagrams for exact placement of eyes (between Rnd 13 and 14), beard, cheeks and arms (between Rnd 20 and 21).

Assembly Instructions

  • Place and glue or insert 5mm black eyes between Rnd 13 and 14, spacing them according to the diagram (centered on face patch) and secure; if gluing, allow to dry before further handling.
  • Sew the snout to the face centered on the marked 8sts section and embroider or attach a small red nose and mouth as shown on the snout location diagram.
  • Attach ears to the top of the head between Rnd 14 and 15, spaced approximately as shown in the placement guide; use pins to test placement before sewing.
  • Position and sew arms to the body between Rnd 20 and 21, angling slightly so they sit naturally on the sides; flatten arms and sew with the long tail left from fastening off.
  • After finishing both legs, use a yarn needle to sew the 6 center stitches between the legs from the inside to secure and shape the crotch area.
  • Embroider beard lines between Rnd 15 and 16 and between Rnd 17 and 18 as indicated by the beard location guide for the finished facial detail.

Important Notes

  • πŸ’‘Use stitch markers to keep track of rounds and the exact stitch when dividing for legs to avoid misplacement of the leg openings.
  • πŸ’‘Work color changes according to the symbol pattern on page 1; plan and weave tails or carry yarn to avoid loose gaps in stripes.
  • πŸ’‘Do not stuff the arms or ears; flatten them and sew them closed with the long tail left for sewing for a neat finish.
  • πŸ’‘Leave long tails when fastening off parts that will be sewn (head, snout, legs) so you can weave and close securely without extra joins.

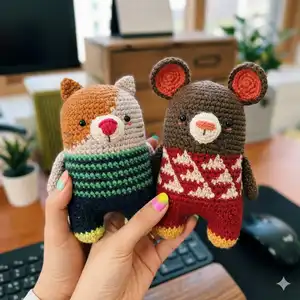
This minimal cat amigurumi combines a playful striped body with a sweet, two-tone face and tiny sewn details for a delightful handmade friend. The compact size and bold color blocks make it a wonderful gift or shelf companion. Enjoy the process of assembling the parts and adding your own small personal touches to each tiny face. 🧢🐾

You ask,

we answer.

FAQs

What size will the finished piece be?

The finished amigurumi measures approximately 15 cm (5.9 inches) when using fingering weight yarn on a 3mm crochet hook as noted in the pattern; sizes will vary with yarn weight and hook.

Can I use different yarn weights for this pattern?

Yes, you can use different yarn weights, but this will affect the final size and stitch counts visually; adjust your hook accordingly and be aware that the texture and proportions will change.

Do I need prior crochet experience for this pattern?

This pattern is rated intermediate and assumes you are comfortable with single crochet, increases, decreases, working in the round and simple color changes.

How long does this project typically take to complete?

Most crocheters complete this project in 5-7 hours depending on experience and how much time you spend on color changes and assembly.

Where should I place the eyes and snout?

Place the eyes between Rnd 13 and 14 as shown; the snout sits centered across an 8-stitch section of the face grid and is stitched on leaving the top open to shape.