About This Minimal Mouse Amigurumi Pattern
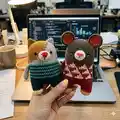
This pattern creates a stylized Minimal Mouse amigurumi about 15 cm (5.9 in) tall using worsted yarn and a 3mm hook. The design combines a rounded head, simple snout, patterned body, and small legs and arms for a minimalist, modern look. Color changes follow the provided symbol charts to create the sweater motif and leg detailing.

The pattern includes full round-by-round instructions, ear and snout construction, and finishing notes for sewing and facial placement. Photographs and symbol charts are provided to guide color placement and assembly.
Why You'll Love This Minimal Mouse Amigurumi Pattern
I absolutely love this pattern because it turns simple stitches into a character with personality using minimal shaping and smart color changes. I enjoy how the colorwork motif on the body feels more complex than the construction, yet remains achievable. Making the ears and snout gives a satisfying finishing touch that really brings the face to life. I created this design to be compact, giftable, and fun to crochet across a relaxing weekend.
Switch Things Up
I love customizing this pattern by changing the sweater colors and motif to match holidays or seasons.
I often make a pastel version with soft greys, pinks, and creams for a nursery-friendly look.
To make a larger or smaller mouse, I switch yarn weight and hook size — bulky yarn and a bigger hook gives a chunky toy while fingering creates a tiny keychain version.
I sometimes replace safety eyes with embroidered eyes for baby-safe toys or use larger eyes for a more playful expression.
I like to experiment with different snout shapes and embroidery for varied facial expressions — a small smile, a surprised mouth, or a tiny tongue all change the personality.
Adding felt accessories, tiny scarves, or a crocheted hat can make each mouse special and themed for gifting.
If I want posable limbs, I insert thin wire into the arms before flattening and sewing to allow gentle movement.
Try mixing yarn textures — a boucle or brushed yarn for the sweater can add charming texture against a smooth cotton body.
I sometimes add tiny buttons, beads, or patches on the sweater for character and detail — just be mindful for children's safety.
When I make multiples, I vary ears and foot colors for a playful set that looks great displayed together.
Common Mistakes & How to Fix Them
✗ Skipping stitch markers when dividing the legs can result in incorrect stitch counts; place markers to identify the 6 stitch center gap and the 31st stitch before splitting.
✗ Forgetting to change yarn colors according to the symbol chart will ruin the sweater motif; follow the SYMBOL PATTERNS on page 1 and change yarn colors at the indicated rounds.
✗ Overstuffing the legs or head causes distortion in shape; stuff gradually and lightly, especially before closing the last stitches to preserve rounds and seams.
✗ Not leaving a long tail when fastening off makes sewing parts difficult; always leave a long tail for sewing and weaving so you can close and attach pieces securely.
✗ Ignoring the front loop closing method when finishing the leg opening may leave a gap; weave the tail through the front loop of remaining stitches and pull tight to close properly.