🧶 Beautiful ✨ Detailed 💝 Adorable

Minimal Monkey Amigurumi Pattern

Minimal Monkey Amigurumi Pattern
4.1★ Rating
5-7 Hours Time Needed
3.9K Made This
✂️

Intermediate Level

Ideal for those with basic crochet experience, featuring slightly more advanced stitches and techniques to expand your skills.

⏱️

Weekend Treat

Takes 5-7 hours, making it an enjoyable project to finish over a couple of days.

🧸

Cute Companion

An adorable friend to cherish, handcrafted with love to bring comfort and joy for years to come.

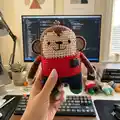
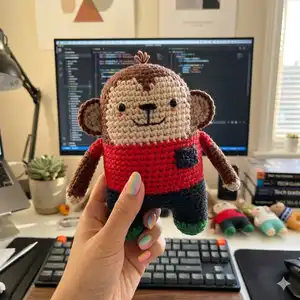
About This Minimal Monkey Amigurumi Pattern

This pattern creates a 15 cm mini monkey amigurumi worked mostly in single crochet with color changes for a striped outfit and facial panel. You will work the head, body and legs seamlessly, then add arms, ears and a tiny pocket. The design uses simple shaping, surface details and clear round-by-round instructions to guide you.

Minimal Monkey Amigurumi Pattern crochet pattern - detailed view of completed project

Includes stitch abbreviations, yarn/color guidance, and photo tips for assembly placement. Ideal for crafters who enjoy small, collectible amigurumi with charming details.

Why You'll Love This Minimal Monkey Amigurumi Pattern

I absolutely love this pattern because it packs a lot of personality into a small, manageable project. The continuous head-body-legs construction makes assembly quick and neat, so you see progress fast and feel motivated to finish. I enjoy the color-change rows that create the monkey's outfit—they add instant character without complicated colorwork. The pattern is also forgiving, allowing you to personalize facial expressions, pocket placement, and foot colors to make each monkey your own.

Minimal Monkey Amigurumi Pattern step 1 - construction progress Minimal Monkey Amigurumi Pattern step 2 - assembly progress Minimal Monkey Amigurumi Pattern step 3 - details and accessories Minimal Monkey Amigurumi Pattern step 4 - final assembly and finishing

Switch Things Up

I love how easy it is to customize this pattern with simple color swaps — try pastel shades for a softer, nursery-friendly monkey or bright primaries for a playful look.

I often change foot and pocket colors to create mini collections; swapping green for yellow or red for orange gives each monkey its own personality.

To change the size, I pick a thicker yarn and a larger hook for a chunky, cuddly version, or thinner yarn with a smaller hook to make mini keychain friends.

I sometimes embroider different mouth shapes or eyebrows to give each doll a different expression — a small curve makes a shy smile while a longer line becomes a grin.

I recommend adding tiny accessories like a crocheted scarf, bow or tiny hat for seasonal variations and gift-ready presentation.

If I want posability, I’ll insert thin wire into the arms before flattening and sewing so they can be gently posed while keeping the soft look.

I like to mix yarn textures too — a slightly fuzzy yarn for hair gives a cute contrast with the smooth body yarn and adds tactile interest.

Try different eye options: safety eyes for a polished look, or French knots/embroidered eyes for a fully handmade finish safe for babies.

I also experiment with surface crochet to add stripes or initials on the back of the body to personalize each toy — small details make them special gifts.

Finally, I enjoy grouping several color variants together to make a playful family set — coordinating colors but changing accessories makes each one unique.

Common Mistakes & How to Fix Them

✗ Skipping stitch markers when dividing the legs can make identifying the starting stitch confusing; place markers at the leg separation and at the first stitch of each leg to keep orientation clear. ✗ Not changing colors exactly where indicated makes the body stripes look uneven; follow the charted round numbers and change yarn at the end of the round for clean color joins. ✗ Overstuffing the head or legs causes flattening and distortion of the shape; stuff gradually and check shape often, adding small bits until firm but not stiff. ✗ Forgetting to fasten off and leave long tails for sewing leads to short ends when attaching parts; always leave a long tail for sewing and finishing to avoid rethreading. ✗ Pulling tight on decreases can create uneven gaps and visible holes; work decreases with consistent tension and use a yarn needle to close small holes by threading the tail through remaining stitches.

Minimal Monkey Amigurumi Pattern

Make a cute, compact monkey amigurumi with clear step-by-step instructions and color-change charts. This pattern guides you through the head, body, legs, arms, ears and pocket with easy-to-follow rounds and finishing tips. Perfect for making a small handmade gift or a shelf friend you can finish in a weekend.

Intermediate 5-7 Hours

Materials Needed for Minimal Monkey Amigurumi Pattern

— Main Fabric

  • 01
    Worsted weight yarn (#4) Brown yarn — small amount for head/body/hair
  • 02
    Worsted weight yarn (#4) Beige yarn — small amount for face and inner ears
  • 03
    Worsted weight yarn (#4) Black yarn — small amount for nose and embroidery details
  • 04
    Worsted weight yarn (#4) Green yarn — small amount for foot tips
  • 05
    Worsted weight yarn (#4) Red yarn — approx. for body stripe rounds 20-36
  • 06
    Worsted weight yarn (#4) Navy yarn — for lower body and leg rounds 20-42
  • 07
    Worsted weight yarn (#4) Orange yarn — small amount for cheek detail (optional)

— Tools Required

  • 01
    Crochet hook size 3.0mm (5/0)
  • 02
    Yarn needle for sewing and weaving ends
  • 03
    Stitch markers
  • 04
    Scissors
  • 05
    Polyester fiberfill stuffing
  • 06
    Glue (to glue eyes if preferred)
  • 07
    5mm black plastic safety eyes x2
  • 08
    Small wooden pins or wooden pegs (optional, for inserting in feet to straighten)

Progress Tracker

0% Complete

— Head / Body / Legs :

Info :

*Change the color of the yarn according to the SYMBOL PATTERNS. Changing the yarn color is not mentioned in the descriptive design. Size: 15cm (5.9 inches) if using fingering weight yarn on a 3mm crochet hook.

Round 1 :

scx6 in the yarn loop, tighten the loop [6 sts]

Round 2 :

(2-sc inc) x 6 [12]

Round 3 :

(scx1, 2-sc inc) x 6 [18]

Round 4 :

(scx2, 2-sc inc) x 6 [24]

Round 5 :

(scx3, 2-sc inc) x 6 [30]

Round 6 :

(scx4, 2-sc inc) x 6 [36]

Round 7 :

(scx5, 2-sc inc) x 6 [42]

Round 8 :

(scx6, 2-sc inc) x 6 [48]

Round 9~36 :

sc in all 48 st [48]

Infos :

Do not forget to change the color as shown in the illustration. (Check page 1 for more details.) Rnd 1~19 use Brown / Beige yarn for head area. Rnd 20~36 use Red / Navy yarn for body area. Rnd 37~42 are leg rounds using Navy / Green yarn.

Info :

To make a leg, identify the center space between the legs by the 6 stitches, and each leg identifies the other by 18. Use stitch markers to help.

Info :

Sc at the 31th st of the Rnd 36. This sc is the first st of the first leg (left leg). Continue working on the first leg (left leg).

Round 37~40 :

sc in all 18 st [18]

Round 41 :

(scx1, sc2tog) x 6 [12]

Round 42 :

(sc2tog) x 6 [6]

Info :

Fasten off, leaving a long tail. Stuff the leg. Using a yarn needle, weave the yarn tail through the front loop of each remaining stitch and pull tight to close.

Second leg (Right leg) :

Rejoin the Navy yarn to 7th back unworked st of Rnd 36. This sc is the first st for the second leg (right leg). Continue working the second leg (right leg) the same way as the first leg (left leg), from Rnd 37–42. Using a yarn needle, sew the 6 sts between the legs.

— Arm x2 :

Info :

Rnd Use the Beige yarn to make MAGIC RING. Flatten the ARM, do not stuff.

Round 1 :

scx5 in the yarn loop, tighten the loop [5 sts]

Round 2 :

(2-sc inc) x 5 [10]

Round 3~16 :

sc in all 10 st [10]

Info :

Fasten off, leaving a long tail for sewing.

— Pocket :

Info :

Rnd Use the Navy yarn to make 5 chains. *ch 2 = hdcx1

Round 1 :

hdcx1 in third ch from hook, hdcx2 [4 sts]

Round 2 :

ch 2, turn, hdcx3 [4]

Info :

Fasten off, leaving a long tail for sewing. Pocket symbol pattern shown on chart.

— Ear x2 :

Round 1 :

scx6 in the yarn loop, tighten the loop [6 sts]

Round 2 :

ch 1, turn, sc, hdc, dcx2, hdc, sc [6]

Round 3 :

ch 1, turn, sc, (2-sc inc) x 4, sc [10]

Round 4 :

Edging: Locate beige colored ear part on the brown ear, join the brown yarn into the bottom right corner of both ears and SC together. (Beige: the stitches only through backloop / Brown: go through both loops). [10]

Info :

Fasten off, and make another Beige ear, two Brown ears by the same way. Fasten off, leaving a long tail for sewing. Fold the ears slightly.

Info :

Complete face details and doll assemblies by referring to illustrations showing location for each part and pictures in the following description. Eyes location: between Rnd 13 and 14. Cheek location: between Rnd 14 and 15. Arms location: between Rnd 20 and 21. Pocket location: Rnd 22 and 24. Hair location: the crown of the head.

Assembly Instructions

  • Using a yarn needle, sew the open 6 sts between the legs together to close the crotch and secure the legs to the body.
  • Position and attach the pocket to the front of the body between rounds 22 and 24, sewing with a matching navy yarn and securing all edges firmly.
  • Place the safety eyes between rounds 13 and 14, spaced about 8 stitches apart, and secure or glue them before embroidering the nose and mouth.
  • Attach the arms on either side of the body between rounds 20 and 21, aligning the flat sewn edge of the arm with the body and sewing evenly.
  • Sew the ears onto the head at the positions shown (fold slightly) so the beige inner ear faces forward; edge the ears with brown and sew through indicated loops.
  • Embroider the nose and mouth with black yarn on the beige face panel and add small blush/cheek details between rounds 14 and 15 using orange or peach yarn.

Important Notes

  • 💡Use stitch markers to keep track of rounds and the leg division point for accurate shaping and color changes.
  • 💡Stuff the pieces gradually and evenly; overstuffing can distort the shape while understuffing leaves the toy limp.
  • 💡Weave in ends as you go to keep finishing simple and avoid bulky seams when attaching parts.
  • 💡Follow the color-change chart and change yarn at the end of rounds for clean transitions between body, pants and foot colors.

This adorable Minimal Monkey is designed to be a cheerful pocket-sized companion you can finish with a weekend of crocheting. It mixes simple shaping with playful color bands and tiny details for a charming handmade gift. Make a whole bunch in different colorways for a cozy collection! 🧶🧸

You ask,

we answer.

FAQs

What size will the finished piece be?

The finished amigurumi measures approximately 15 cm (5.9 inches) when using fingering weight yarn or comparable gauge with a 3.0mm hook.

Can I use different yarn weights for this pattern?

Yes, you can use different yarn weights but the final size will change; if you use bulkier yarn, increase the hook size and expect a larger monkey.

Do I need prior crochet experience for this pattern?

This pattern is rated intermediate; basic crochet experience with magic ring, single crochet, increases and decreases is recommended for best results.

How long does this project typically take to complete?

Most crocheters complete this project in 5-7 hours, depending on experience, speed and time spent on finishing and embroidery details.

Where should I place the eyes and other facial details?

Place the eyes between rounds 13 and 14, cheeks between rounds 14 and 15, and embroider the nose and mouth centered on the beige face panel as shown in the diagrams.