About This Mini Parrot Amigurumi Pattern
This pattern creates a tiny crochet parrot about 7 cm (3 inches) tall, worked top-down with simple shaping and color changes. You will use lightweight cotton yarn and a small hook to create a neat, dense fabric with minimal sewing. The project includes clear rounds, abbreviations and small photographic guides for the beak and wing construction. It is perfect for making keychains, décor, or a set of colorful birds.
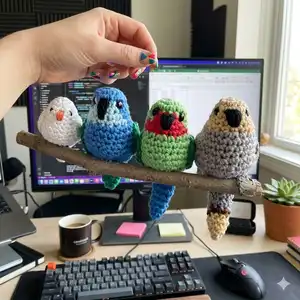
Designed to be quick and satisfying, the pattern uses basic stitches and a few increases/decreases. Change colors to personalize each bird and follow the explanatory photos for tricky steps.
Why You'll Love This Mini Parrot Amigurumi Pattern
I absolutely love this pattern because it turns simple stitches into a charming little companion that you can finish in an afternoon. I enjoy how little sewing is required, which makes the whole process fast and tidy. The color-change sections let me play with combinations to create personality in each bird. I also love that these minis work perfectly as gifts, keychains or a sweet shelf display. Making a flock of different colors is one of my favorite ways to relax and experiment.
Switch Things Up
I love how easy it is to customize this mini parrot by changing yarn colors; try pastel shades for a soft look or bold tropical hues for a vibrant flock.
To make the bird larger or smaller adjust your yarn weight and hook size — bulky yarn with a larger hook creates a chunky, cuddle-friendly parrot, while finer yarn makes a tiny charm.
I often change the eye style: use embroidered eyes, French knots, or safety eyes of different sizes to give different personalities.
Try adding tiny embroidered feet or a loop at the head to hang the parrot as an ornament or keychain for a functional twist.
Play with wing shapes and tail length — elongate the tail for a more dramatic look or add stripes for texture and interest.
I sometimes add a strip of contrasting color across the chest for a realistic parrot band or to mimic different species.
For a plusher look, use a slightly larger hook and add extra stuffing, which softens the silhouette and makes it more squeezable.
I recommend experimenting with different yarn fibers; mercerized cotton gives a neat finish while acrylic adds softness and color variety.
If I want a posable version I add a small wire inside the tail or body to adjust the pose, but make sure to secure ends safely inside the stuffing.
Finally, I enjoy making a set in a gradient of colors — arrange a row of birds in ombre shades for a cheerful display or gift set.
Common Mistakes & How to Fix Them
✗ Skipping the stitch marker and losing track of the rounds; always place a marker at the start of each round to keep your stitch count accurate.
✗ Changing color incorrectly and creating loose loops at the join; change color in the last stitch of the old color by completing the final yarn-over with the new color to secure a neat join.
✗ Under- or over-stuffing the body leading to a misshapen bird; stuff gradually while shaping, add small amounts of fiberfill, and stop when the shape is firm but not stretched.
✗ Forgetting to embroider the beak before closing the face area which makes placement difficult; embroider the beak and attach eyes between rounds 4 and 5 as instructed for accurate placement.
✗ Not weaving the final thread through the front loops properly which leaves an unfinished opening; follow the instruction to weave the thread through the 5 front loops of round 21 and pull tight before fastening off.


