🧢 Beautiful ✨ Detailed πŸ’ Adorable

Mini Flower Basket & Flowers Amigurumi Pattern

Mini Flower Basket & Flowers Amigurumi Pattern
4.3β˜… Rating
5-7 Hours Time Needed
2.6K Made This
βœ‚οΈ

Intermediate Level

Ideal for those with basic crochet experience, featuring slightly more advanced stitches and techniques to expand your skills.

⏱️

Weekend Treat

Takes 5-7 hours, making it an enjoyable project to finish over a couple of days.

🎁

Tiny Treasure

Small, sweet, and gift-worthy creations that fit perfectly in the palm of your hand with detailed charm.

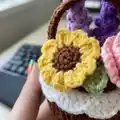
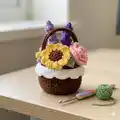
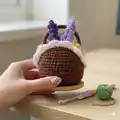
About This Mini Flower Basket & Flowers Amigurumi Pattern

This pattern teaches you how to crochet a mini basket and a variety of tiny flowers to fill it β€” lavender, sunflower, rose, tulip and forget-me-not. You will work with two yarn weights and thin wire to make realistic stems and shape the flowers. Clear round-by-round and row-by-row instructions help you assemble a compact, beautiful bouquet.

Mini Flower Basket & Flowers Amigurumi Pattern crochet pattern - detailed view of completed project

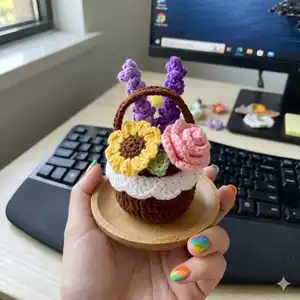
Perfect for gifting or display, this tutorial includes tips for wiring stems and sewing pieces together. The finished basket is small, detailed and a lovely way to practice tiny amigurumi techniques.

Why You'll Love This Mini Flower Basket & Flowers Amigurumi Pattern

I absolutely love this pattern because it combines simple shapes into a charming miniature bouquet that feels special to make and give. The variety of tiny flowers keeps the project interesting and lets me play with color and texture. I enjoy the small-scale construction β€” it is satisfying to see each bloom take shape quickly. Wiring the stems gives the arrangement a delicate realism that I find delightful.

Mini Flower Basket & Flowers Amigurumi Pattern step 1 - construction progress Mini Flower Basket & Flowers Amigurumi Pattern step 2 - assembly progress Mini Flower Basket & Flowers Amigurumi Pattern step 3 - details and accessories Mini Flower Basket & Flowers Amigurumi Pattern step 4 - final assembly and finishing

Switch Things Up

I love to change up the colors to create different moods β€” pastel shades create a soft, vintage bouquet while brights make a cheerful, modern look.

I sometimes swap the #2 fine yarn for a slightly thicker sport weight and a larger hook to make a chunkier, more visible bloom.

Try metallic or variegated yarn for tiny accent flowers to add shimmer and interest to the arrangement.

I often shorten or lengthen the wires to vary stem height and make my bouquet look more natural and layered.

You can omit the wire and sew flowers directly into the basket for a fabric-only, child-safe option that is easier for gifts for small children.

I like to combine multiple baskets with different color palettes to make a set of decorative pieces perfect for shelves or gifts.

For a winter-themed version I use cool blues, whites and silvers and add tiny bead centers to the flowers for a snowy sparkle.

To make a keychain or charm, use thinner yarn and a smaller hook to create an even tinier basket and attach a keyring to the handle.

I sometimes embroider tiny details like veins on leaves or little dots on petals to personalize each flower.

When I want a fuller bouquet, I add more leaves and small filler flowers β€” a mix of forget-me-nots and tiny tulips fills gaps nicely and looks very natural.

Common Mistakes & How to Fix Them

βœ— Skipping the recommendation to use wire at the beginning of rounds will make stems floppy; put the wire on the hook at the start of the specified round and crochet with the wire for that round. βœ— Not sewing the basket lace to the edge of round 8 before continuing will make the lace sit unevenly; align and sew the lace onto round 8 before starting round 9 for a neat edge. βœ— Forgetting to stuff the basket gradually can cause lumps or distortion; stuff the basket body halfway through sewing and adjust stuffing as you go for an even shape. βœ— Using inconsistent tension on tiny flowers will create uneven petals; work with consistent, slightly tighter tension for small pieces and count stitches carefully after every round.

Mini Flower Basket & Flowers Amigurumi Pattern

Create a charming mini flower basket filled with tiny crocheted blooms β€” perfect as a gift or cute shelf decor. This pattern includes complete instructions for the basket, handle, lace, leaves, lavender, forget-me-not, sunflower, rose and tulip. You will learn how to add wire stems and assemble the bouquet for a delightful finished piece.

Intermediate 5-7 Hours

Materials Needed for Mini Flower Basket & Flowers Amigurumi Pattern

β€” Main Fabric

  • 01
    Basket: #3 light 5ply yarn (pick colors you like; sample shows brown, beige, white)
  • 02
    Flowers: #2 fine 4ply yarn (pick colors you like; sample shows yellow, purple, pink, green, brown)
  • 03
    Green yarn for leaves and stems, small amounts of brown for sunflower center
  • 04
    Small amounts of white or cream for lace detail

β€” Tools Required

  • 01
    Crochet hook size 3.0mm
  • 02
    Crochet hook size 3.5mm (optional for basket)
  • 03
    Crochet hook size 2.0mm
  • 04
    Crochet hook size 2.5mm (optional for flowers)
  • 05
    Stitch markers
  • 06
    Tapestry needle
  • 07
    Scissors
  • 08
    Wire (0.3-0.5mm diameter) to be used as flower stems
  • 09
    Polyester stuffing

Progress Tracker

0% Complete

β€” Basket Cover :

Round 1 :

14dc in magic loop (14st)

Round 2 :

14dc inc (28st)

Round 3 :

14[dc, dc inc] (42st)

β€” Basket Lace :

Row 1 :

45ch, 44sc, turn (44st)

Row 2 :

11[ch, dc, dc inc, dc, ch, ss] (66st)

β€” Basket Body :

Round 1 :

14dc in magic loop (14st)

Round 2 :

14dc inc (28st)

Round 3 :

14[dc, dc inc] (42st)

Round 4 :

42dc blo (42st)

Round 5-8 :

21[dc, dc flo] (42st)

Info :

Sew the basket lace on the edge of Round 8 before starting Round 9.

Round 9 :

42sc (42st)

Infos :

Crochet the basket cover and the body together while crocheting Round 9, or sew them together after you finish Round 9. Stuffing the basket body halfway through sewing.

β€” Basket Handle :

Row 1 :

32ch, (put wire on) 31sc (31st)

β€” Mini Leaf :

Round 1 :

7ch, (put wire on) sc, hdc, 2dc, hdc, (3sc), hdc, 2dc, hdc, sc (13st)

β€” Mini Lavender :

Row 1 :

26ch, 10[sc, 3ch, ss-in the 3rd ch], 10[sc, 4ch, ss-in the 4th ch], 5[sc, 5ch, ss-in the 5th ch]

Info :

Wrap the fabric around a wire with the right side facing out.

β€” Mini Forget-Me-Not :

Round 1 :

5[3ch, dc, 3ch, ss] in magic loop

Info :

Make a stamen. 1. Wrap yarn around a wire about 1cm. 2. Bend it into a circle. 3. Insert the wire into the center of the flower.

β€” Mini Sunflower :

Round 1 :

6sc in magic loop (6st)

Round 2 :

6inc (12st)

Info :

Make one each with brown and green yarn.

Round 3 :

11[(3ch, dc, 3ch), ss]

Infos :

Make the 2 round pieces' wrong sides facing each other, work into any 2 parallel stitches of them, and crochet Round 3 with yellow yarn. Insert a wire in the center of the flower.

β€” Mini Rose :

Row 1 :

28ch, work into the 4th chain-12[(3dc), ch, sk], (3dc), turn (51st)

Row 2 :

13[ch, dc, dc inc, dc, ch, ss] (78st)

Infos :

Roll the fabric into the shape of a rose, and keep it in shape by sewing. Insert a wire in the center of the flower.

β€” Mini Tulip :

Round 1 :

6sc in magic loop (6st)

Round 2 :

6inc (12st)

Round 3 :

6[sc, inc] (18st)

Round 4-8 :

18sc (18st)

Infos :

Leave some yarn and sew a cross on the last round. Insert a wire in the center of the flower.

Assembly Instructions

  • Sew the basket lace onto the edge of Round 8 before starting Round 9 so the lace sits neatly around the basket edge.
  • Crochet the basket cover and the body together while working Round 9, or sew the cover and body together after finishing Round 9 for a secure join.
  • Put wire into the center of each flower as instructed (stamen or center) and bend or trim the wire to form stems before arranging.
  • Stuff the basket body gradually and stuff halfway through sewing to achieve an even shape and avoid lumps.
  • Insert arranged wired flower stems into the basket and adjust positions until you are happy with the bouquet composition.

Important Notes

  • πŸ’‘Use stitch markers to keep track of the beginning of rounds and any stitch repeats to avoid losing your place.
  • πŸ’‘When the pattern says (put wire on), place the wire on the hook at the start of the round and crochet with the wire in that round only.
  • πŸ’‘Stuff the basket body gradually and sew while stuffing so the shape remains even and stable.
  • πŸ’‘Pin or align pieces before sewing and weave in ends securely to prevent seams from loosening over time.

This delightful Mini Flower Basket & Flowers pattern brings a tiny bouquet to life with small-scale crochet and clever wiring techniques. It makes a beautiful handmade gift or a cute decorative accent that you can display anywhere. Enjoy mixing colors and flowers to create your own miniature floral arrangements. 🌸🧢✨

You ask,

we answer.

FAQs

What size will the finished piece be?

The finished mini basket measures approximately a few centimeters across (palm-sized) when using the recommended yarn weights and hook sizes; actual size varies with yarn tension.

Can I use different yarn weights for this pattern?

Yes, you can use different yarn weights, but this will change the final size; use an appropriate hook for your chosen yarn and expect the basket and flowers to scale proportionally.

Do I need prior crochet experience for this pattern?

This pattern is rated intermediate and assumes you know basic stitches like sc, hdc, dc, increases and decreases, plus working in magic loop and simple row shaping.

How long does this project typically take to complete?

Most crafters complete this project in 5-7 hours, depending on experience, number of flowers made, and time spent on assembly and wiring.