🧢 Beautiful ✨ Detailed πŸ’ Adorable

Mini Dragon Amigurumi Pattern

Mini Dragon Amigurumi Pattern
4.3β˜… Rating
5-7 Hours Time Needed
2.6K Made This
βœ‚οΈ

Intermediate Level

Ideal for those with basic crochet experience, featuring slightly more advanced stitches and techniques to expand your skills.

⏱️

Weekend Treat

Takes 5-7 hours, making it an enjoyable project to finish over a couple of days.

🐰

Whimsical Buddy

Playful characters full of personality, designed to spark imagination and become cherished playtime favorites.

About This Mini Dragon Amigurumi Pattern

This pattern creates a small, stuffed mini dragon worked in worsted weight yarn with clear round-by-round instructions. It includes separate pieces for head, body, arms, legs, ears, tail, spikes, horns, belly and wings, plus step-by-step assembly notes. The design features color changes, bobble details, and a textured snout for character.

Mini Dragon Amigurumi Pattern crochet pattern - detailed view of completed project

The pattern is written in continuous rounds (spiral) and uses common amigurumi techniques like magic ring, increases and decreases. Helpful photos and placement notes make assembly straightforward for intermediate crocheters.

Why You'll Love This Mini Dragon Amigurumi Pattern

I absolutely love this pattern because it brings a playful dragon character to life with simple shapes and a lot of charm. I enjoy how the color changes and bobble details add personality without being complicated. Sewing the parts together and arranging the spikes and wings always makes me smile when the character starts to take shape. This pattern is a delightful mix of straightforward rounds and small finishing steps that feel rewarding and fun.

Mini Dragon Amigurumi Pattern step 1 - construction progress Mini Dragon Amigurumi Pattern step 2 - assembly progress Mini Dragon Amigurumi Pattern step 3 - details and accessories Mini Dragon Amigurumi Pattern step 4 - final assembly and finishing

Switch Things Up

I love how easy it is to customize this mini dragon by changing yarn colors; try a pastel palette for a softer look or jewel tones for a bolder creature.

I often experiment with different yarn weights and hooks to change scale β€” bulky yarn with a larger hook makes a chunky plush while finer yarn creates a tiny keychain friend.

I like to embroider different facial expressions to give each dragon a unique personality; moving the eyes or changing the snout placement makes a surprising difference.

For a more whimsical effect I swap the spike color and add stripes to the tail β€” alternating colors every few rounds looks great and is simple to do.

If you want posable limbs, I sometimes add thin wire inside the arms and tail before stuffing so they can be posed for display.

I also like to create matching accessories like a tiny crochet scarf or a hat to give the dragon extra character and gift-ready charm.

Try sewing on felt or embroidered patches on the belly for texture, or add small safety buttons for extra details (securely sew for safety if for children).

For a baby-safe version, omit safety eyes and embroider the eyes instead, and choose hypoallergenic stuffing and securely sewn seams for durability.

I sometimes vary the number and placement of spikes for stylistic differences β€” fewer, larger spikes or many small spikes change the overall silhouette.

Don’t be afraid to mix textures by using a fuzzy or boucle accent yarn for the wings or spikes; it creates a playful contrast with the main body yarn.

Common Mistakes & How to Fix Them

βœ— Skipping a stitch marker when working in a continuous spiral leads to lost rounds; always place and move a stitch marker at the first stitch of each round to keep count. βœ— Forgetting to change colors cleanly causes messy joins and visible tails; carry the yarn neatly and change color at the last loop of the stitch, then weave in ends as you go. βœ— Understuffing or overstuffing limbs makes shaping inconsistent and unstable; stuff gradually and test shape as you go, especially before closing or sewing pieces together. βœ— Not placing safety eyes at the recommended rounds can shift facial placement; position and pin eyes between the specified rows (between rounds 12 and 13 for the head) before final sewing. βœ— Rounding decreases too quickly will flatten shapes unevenly; follow the decrease counts exactly and stuff the piece to the level recommended before continuing decreases.

Mini Dragon Amigurumi Pattern

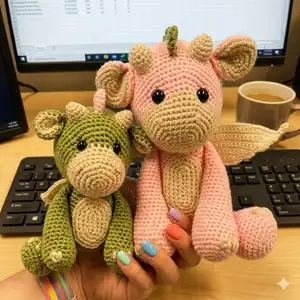
Make your own adorable mini dragon with this detailed crochet pattern. This pattern guides you through creating a cute stuffed dragon with spikes, horns, wings, and a belly panel. Clear step-by-step rounds and assembly photos help you finish a charming handmade toy you will love to gift or display. Perfect for crocheters who enjoy assembling small amigurumi characters.

Intermediate 5-7 Hours

Materials Needed for Mini Dragon Amigurumi Pattern

β€” Main Fabric

  • 01
    Worsted weight yarn (#4), Color A: Green (as main body color)
  • 02
    Worsted weight yarn (#4), Color B: Cream (for snout, belly, ear inner and details)
  • 03
    Worsted weight yarn (#4), Color C: Pink (for spikes and accent details)

β€” Tools Required

  • 01
    Crochet hook size D / 3.25 mm
  • 02
    12 mm safety eyes (2 pieces)
  • 03
    Scissors
  • 04
    Sewing needle / yarn needle for sewing parts
  • 05
    Stitch markers
  • 06
    Polyester fiberfill stuffing
  • 07
    Pins for assembly

Progress Tracker

0% Complete

β€” Head :

Info :

Crocheted from front of nose to back of head

Info :

Starting with Color B

Round 1 :

Make 6 sc into a magic ring = 6

Round 2 :

Increase in each st around = 12

Round 3 :

(sc, inc) x 6 = 18

Round 4 :

(2 sc, inc) x 6 = 24

Round 5 :

(3 sc, inc) x 6 = 30

Round 6 :

FLO 4 sc, bob st, 8 sc, bob st, 16 sc = 30

Round 7-9 :

sc in each st around

Info :

Change to Color A

Round 10 :

sc in each st around

Round 11 :

(4 sc, inc) x 6 = 36

Round 12 :

(5 sc, inc) x 6 = 42

Round 13 :

(6 sc, inc) x 6 = 48

Info :

Place eyes between rows 12 and 13, leaving 10 holes between them.

Round 14-19 :

sc in each st around

Round 20 :

(6 sc, dec) x 6 = 42

Round 21 :

sc in each st around

Round 22 :

(5 sc, dec) x 6 = 36

Info :

Start stuffing the head

Round 23 :

(4 sc, dec) x 6 = 30

Round 24 :

(3 sc, dec) x 6 = 24

Round 25 :

(2 sc, dec) x 6 = 18

Round 26 :

(sc, dec) x 6 = 12

Round 27 :

dec x 6 = 6

Info :

F/O and sew the hole closed

β€” Body :

Info :

With Color A

Round 1 :

Make 6 sc into a magic ring = 6

Round 2 :

Increase in each st around = 12

Round 3 :

(sc, inc) x 6 = 18

Round 4 :

(2 sc, inc) x 6 = 24

Round 5 :

(3 sc, inc) x 6 = 30

Round 6 :

(4 sc, inc) x 6 = 36

Round 7 :

(5 sc, inc) x 6 = 42

Round 8 :

(6 sc, inc) x 6 = 48

Round 9-12 :

sc in each st around

Round 13 :

(6 sc, dec) x 6 = 42

Round 14-15 :

sc in each st around

Round 16 :

(5 sc, dec) x 6 = 36

Round 17-18 :

sc in each st around

Info :

Start stuffing the body

Round 19 :

(4 sc, dec) x 6 = 30

Round 20-22 :

sc in each st around

Round 23 :

(3 sc, dec) x 6 = 24

Round 24-25 :

sc in each st around

Round 26 :

(2 sc, dec) x 6 = 18

Info :

F/O and leave a long tail for sewing

β€” Arms (Make 2) :

Info :

With Color A

Round 1 :

Make 6 sc into a magic ring = 6

Round 2 :

Increase in each st around = 12

Round 3 :

(sc, inc) x 6 = 18

Round 4 :

2 sc, change to Color B: bob st, change to color A: 2 sc, change to color B: bob st, change to color A: 2 sc, change to color B: bob st, Change to color A: 9 sc = 18

Round 5-6 :

Sc in each st around

Round 7 :

Dec, 16 sc = 17

Round 8-9 :

Sc in each st around

Round 10 :

Dec, 15 sc = 16

Info :

Start stuffing the legs

Round 11 :

Dec, 14 sc = 15

Round 12-13 :

Sc in each st around

Round 14 :

Dec, 13 sc = 14

Round 15-16 :

Sc in each st around

Info :

Stop stuffing the arms

Round 17 :

Dec, 12 sc = 13

Round 18-19 :

Sc in each st around

Round 20 :

Dec, 11 sc = 12

Round 21 :

sc in each st around

Info :

F/O and leave a long tail for sewing

β€” Ears (Make 2 of each color) :

Info :

Starting with Color B

Round 1 :

Make 6 sc into a magic ring = 6

Round 2 :

Increase in each st around = 12

Round 3 :

(sc, inc) x 6 = 18

Info :

Do not fasten off green ears. Continue by single crocheting the edges of the ears together.

Info :

Place the back sides of each ear together and single crochet around the edges with green yarn.

β€” Legs (Make 2) :

Info :

With Color A

Round 1 :

Make 6 sc into a magic ring = 6

Round 2 :

Increase in each st around = 12

Round 3 :

(sc, inc) x 6 = 18

Round 4 :

(2 sc, inc) x 6 = 24

Round 5 :

2 sc, Change to Color B: bob st, Change to color A: 2 sc, Change to color B: bob st, Change to Color A: 2 sc, Change to Color B: bob st, Change to Color A: 15 sc

Round 6 :

sc in each st around

Round 7 :

(6 sc, dec) x 3 = 21

Round 8 :

sc in each st around

Round 9 :

(5 sc, dec) x 3 = 18

Round 10-11 :

sc in each st around

Info :

Start stuffing the legs

Round 12 :

Dec, 16 sc = 17

Round 13-14 :

sc in each st around

Round 15 :

Dec, 15 sc = 16

Round 16-17 :

sc in each st around

Info :

Stop stuffing the legs

Round 18 :

(2 sc, dec) x 4 = 12

Round 19 :

sc in each st around

Info :

F/O and leave a long tail for sewing

β€” Tail :

Info :

With Color A

Round 1 :

Make 6 sc into a magic ring = 6

Round 2 :

(inc, 2 sc) x 2 = 8

Round 3 :

sc in each st around

Round 4 :

(inc, 3 sc) x 2 = 10

Round 5 :

sc in each st around

Round 6 :

(inc, 4 sc) x 2 = 12

Round 7 :

Sc in each st around

Round 8 :

(inc, 5 sc) x 2 = 14

Round 9 :

Sc in each st around

Round 10 :

(inc, 6 sc) x 2 = 16

Round 11 :

Sc in each st around

Info :

Stuff the tail as you work

Round 12 :

(inc, 7 sc) x 2 = 18

Round 13 :

sc in each st around

Round 14 :

(inc, 8 sc) x 2 = 20

Round 15 :

sc in each st around

Info :

F/O and leave a long tail for sewing

β€” Spikes (Make 5) :

Info :

With color C

Round 1 :

Make 4 sc into a magic ring = 4

Round 2 :

(inc, sc) x 2 = 6

Round 3 :

(inc, 2 sc) x 2 = 9

Round 4-5 :

sc in each st around

Info :

Do not stuff the spikes. Sew the spike closed, F/O and leave a long tail for sewing

β€” Horns (Make 2) :

Info :

with Color B

Round 1 :

Make 4 sc into a magic ring = 4

Round 2 :

(inc, sc) x 2 = 6

Round 3 :

(inc, 2 sc) x 2 = 9

Round 4 :

Sc in each st around

Info :

F/O and leave a long tail for sewing

β€” Belly :

Info :

With Color B: Ch 6

Round 1 :

sc in 2nd chain from hook, 3 sc, inc3 in last chain, working on the opposite side of the chain, 3 sc, inc = 12

Round 2 :

inc, 3 sc, inc x 3, 3 sc, inc x 2 = 18

Round 3 :

sc, inc, 4 sc, inc, sc, inc, sc, inc, 4 sc, inc, sc, inc = 24

Round 4 :

2 sc, inc, 5 sc, inc, 2 sc, inc, 2 sc, inc, 5 sc, inc, 2 sc, inc = 30

Info :

F/O and leave a long tail for sewing

β€” Wings (Make 2) :

Info :

Ch 5

Round 1 :

sc in 2nd chain from hook, 2 sc, sl st, ch 1, turn = 4

Round 2 :

sc, inc, 2 sc, ch 2, turn

Round 3 :

sc in 2nd chain from hook, 3 sc, inc, sl st, ch 1, turn

Round 4 :

3 sc, inc, 3 sc, ch 3, turn

Round 5 :

sc in 2nd chain from hook, sc in next chain, 5 sc, inc, sc, sl st, ch 1, turn

Round 6 :

4 sc, inc, 6 sc, ch 3, turn

Round 7 :

sc in 2nd chain from hook, sc in next ch, 7 sc, inc, 3 sc, sl st

Info :

F/O and leave a long tail for sewing

Assembly Instructions

  • Pin the head onto the body for extra support. You may need to add more stuffing as you sew, then sew the head onto the body.
  • Pin the belly onto the front of the body and sew into place using the long tail left from finishing the belly.
  • Pin the arm in a forward facing angle, judge placement by eye and how you have stuffed the arm, then sew the arm onto the body securely.
  • Turn the body upside down with the nose facing away, pin the legs onto the bottom of the body in a balanced position, and sew the legs onto the body.
  • Pin the tail onto the back of the body, judge placement visually, and sew the tail into place.
  • Pin the ears onto the head, pinch the ears at the bottom and sew about 3 stitches to close, then sew the ears onto the head where they look best.
  • Pin the wings and spikes onto the back of the body in desired positions and sew them into place for a secure finish.

Important Notes

  • πŸ’‘Do not join rounds unless stated; work in a continuous spiral for smooth amigurumi fabric.
  • πŸ’‘Use a stitch marker to mark the beginning of each round to keep track of rounds and changes.
  • πŸ’‘All stitches are worked in both loops unless stated otherwise in the pattern (BLO or FLO will be noted).
  • πŸ’‘Place safety eyes between rounds 12 and 13 of the head, leaving 10 holes between them before fully stuffing the head.
  • πŸ’‘Stuff pieces gradually and evenly to maintain shape; stop stuffing at the indicated rounds and finish sewing before overstuffing.

This charming Mini Dragon pattern brings a whimsical friend to life with simple rounds and playful details. Perfect for gifting or keeping, it combines easy shaping with creative accents to make a lovable companion. Happy crocheting and enjoy every stitch! πŸ‰πŸ§Ά

You ask,

we answer.

FAQs

What size will the finished piece be?

The finished amigurumi measures approximately 11 inches from the bottom of the foot to the top of the head when using worsted weight #4 yarn and a 3.25 mm hook.

Can I use different yarn weights for this pattern?

Yes, but changing yarn weight will affect the final size; use an appropriate hook for your yarn and be aware the proportions may change slightly.

Do I need prior crochet experience for this pattern?

This pattern is rated intermediate, so basic knowledge of crochet stitches and amigurumi techniques like magic ring, increases and decreases is recommended.

How long does this project typically take to complete?

Most crocheters complete this project in 5-7 hours, though time may vary based on experience level, yarn choice, and how much time you spend on assembly.