🧢 Beautiful ✨ Detailed πŸ’ Adorable

Mini crossbody bag Pattern

Mini crossbody bag Pattern
4.4β˜… Rating
5-7 Hours Time Needed
1.5K Made This
βœ‚οΈ

Beginner Friendly Level

Perfect for those just starting their crochet journey, with clear instructions and simple techniques

⏱️

Weekend Treat

Takes 5-7 hours, making it an enjoyable project to finish over a couple of days.

✨

Stylish Touch

An elegant detail to elevate any look, combining traditional techniques with contemporary design sensibilities.

About This Mini crossbody bag Pattern

This pattern teaches you how to crochet a compact, structured mini crossbody bag using 2 mm macrame cord. It includes clear row-by-row instructions, photo references and guidance for joining, finishing and attaching hardware. You will learn a back-loop single crochet texture that gives the bag a neat, uniform surface. The finished bag features a flap closure, sewn-in d-rings and an optional crocheted handle.

Mini crossbody bag Pattern crochet pattern - detailed view of completed project

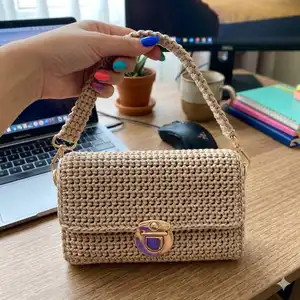
Step-by-step photos and QR-linked video instructions are provided for tricky steps like joining and attaching the lock. Suitable for those comfortable with single crochet who want a small wearable accessory.

Why You'll Love This Mini crossbody bag Pattern

I absolutely love this pattern because it turns simple materials into a refined, everyday accessory that feels special. I enjoy the clean texture created by working into the back loops β€” it makes the finished bag look professional. The pattern is flexible: you can change hardware or cord color to make a unique version every time. I also appreciate how straightforward the assembly is when you follow the step-by-step photos and the joining technique.

Mini crossbody bag Pattern step 1 - construction progress Mini crossbody bag Pattern step 2 - assembly progress Mini crossbody bag Pattern step 3 - details and accessories Mini crossbody bag Pattern step 4 - final assembly and finishing

Switch Things Up

I love how easy it is to customize this pattern with different cord colors; try a two-tone body and flap for a modern twist.

You can make the bag larger by adding more foundation chains and more rows; use thicker cord and a larger hook for a chunkier, oversized version.

For a mini keychain or coin pouch, use thinner cord or embroidery thread and reduce the number of chains and rows.

I often swap the metal lock for a magnetic snap for an easier, sleeker closure option depending on the hardware I have on hand.

Try different strap styles: a flat crocheted strap for a casual look, or a thin leather strap for a dressier finish.

I sometimes add a fabric lining for extra structure and to hide interior stitching β€” simply cut lining to the inner measurements and sew in place before attaching the lock.

Embellish with a small crocheted flower or embroidered initials to personalize a gift; these small touches make each bag unique.

Use a metallic or contrasting cord for the top edge or flap trim to create a subtle highlight that frames your hardware.

To make the bag more structured, insert a thin piece of interfacing or lightweight foam into the bottom before finishing assembly.

I recommend experimenting with different hardware finishes like antique brass, matte black, or rose gold to match your wardrobe and give each bag its own personality.

Common Mistakes & How to Fix Them

βœ— Skipping the long starting tail and not weaving it in as you go; leave the long tail (approx 25 cm) and crochet it into the second row to avoid a loose beginning. βœ— Crocheting into both loops instead of the back loop only for the main pattern; always insert the hook into the back loop of the current row and the back loop of the previous row to achieve the correct texture. βœ— Not straightening and steaming the fabric before measuring; steam and shape the rectangle after finishing rows to ensure accurate folds and assembly. βœ— Cutting the working yarn too early when joining side pieces; do not cut the working yarnβ€”continue slip stitching around to the flap middle and only cut when instructed to keep joins neat. βœ— Failing to mark stitch markers for bottom and sides; mark the bottom and sides clearly with stitch markers so you place side pieces and corners symmetrically.

Mini crossbody bag Pattern

Create a stylish, compact crossbody bag using 2 mm macrame cord and a simple back-loop single crochet texture. This pattern guides you step-by-step from the foundation chain to assembly and handle attachment so you can make a polished, wearable bag. Perfect for gifting or adding a handmade staple to your wardrobe. Follow the clear photos and optional video tutorial for extra help.

Beginner Friendly 5-7 Hours

Materials Needed for Mini crossbody bag Pattern

β€” Main Fabric

  • 01
    Sensy 2 mm macrame cord (100% polypropylene), approx. 230 m per 200 g skein (approx. 251 yards total used)
  • 02
    Substitute yarn: macrame cord 2 mm (similar thickness and composition)
  • 03
    Color shown: Latte (as pictured)

β€” Tools Required

  • 01
    Crochet hook size 3.50 mm (E/4)
  • 02
    Measuring tape
  • 03
    Scissors
  • 04
    Stitch markers
  • 05
    Tapestry/yarn needle for weaving ends and sewing hardware
  • 06
    Bag accessories: 16 mm (5/8") inner metal D-ring (2 pieces)
  • 07
    25 mm / 1" inner metal swivel clasp (2 pieces)
  • 08
    46 mm x 44 mm bag lock (1 set)
  • 09
    2.5 cm / 1-inch wide carabiner for handle attachment (optional)

Progress Tracker

0% Complete

β€” Main Part :

Info :

Leave a long tail of yarn approximately 25 cm / 10 inches and make a chain of foundation chain stitches. Note: You can make more or fewer stitches depending on the desired width of the bag. I made 31 chains [Fig 1].

Round 1 :

30 sc, 1 ch, turn [Fig 2].

Info :

Next, lay the long tail of yarn on top, and will crochet it into the second row. Work single crochet stitches, inserting the hook into the back loop of the current row and the loop of the foundation chain [Fig 3-6].

Round 2 :

30 sc, 1 ch, turn [fig 7].

Info :

Straighten the beginning of the crocheted fabric and use the long tail to adjust so that the first rows are not overstretched.

Info :

MAIN PATTERN: Work single crochet stitches, inserting the hook into the back loop of the current row and the back loop of the previous row [Fig 8-10]. Detailed instructions for crocheting this pattern are shown in the video.

Round 3 :

30 sc, 1 ch, turn [Fig 11].

Info :

Repeat Row 3 until the desired length is reached, 35-36 cm / 13.8 - 14 inches. I ended up with 90 rows [Fig 12]. Straighten the fabric, steam it, and shape it into a clear rectangular form. Measure the length and width.

Info :

Mark the bottom and sides of the bag with stitch markers. Note: You can fold the fabric along these markers to estimate the size of the finished bag.

β€” Bag Sides (Make 2) :

Info :

Make a chain of 5 foundation chain stitches.

Round 1 :

4 sc, 1 ch, turn. Continue with the main pattern.

Round 2 :

4 sc, 1 ch, turn.

Round 3-25 :

4 sc, 1 ch, turn.

Round 26 :

4 sl-sts [Fig 13].

Info :

Cut the working yarn. Straighten and steam the side piece.

β€” Assembly :

Info :

Attach the side pieces to the main part using sl-sts. Start with the left side piece. Place the side piece onto the main part and connect the corner parts [Fig 14].

Info :

Insert the hook into the back loop of the main part and the front loop of the side piece (3 loops on the hook) and pull the working yarn through all 3 loops [Fig 15]. In this way, work slip stitches along the three sides of the bag side piece [Fig 16-17]. A video of the joining process can be found here.

Info :

Do not cut the working yarn! Continue to crochet slip stitches along the main part to the corner and then to the middle of the closing flap. Cut the yarn [Fig 18-19]. Attach the right bag side in the same way [Fig 20-21].

Info :

Weave in the ends of the working yarn into the fabric. Mark the center of the flap [Fig 22].

Info :

Attach the clasp to the flap. First, attach the lock to the upper flap [Fig 23], and then the corresponding part of the lock to the main part of the bag [Fig 24-25]. Sew D-rings to the bag side for attaching the handle [Fig 26].

β€” Handle :

Info :

You can use a ready-made handle or crochet one. For easy attachment of the handle to the bag, a 2.5 cm / 1-inch wide carabiner is used.

Info :

Leave a long tail of yarn approximately 15 cm / 6 inches. Make a chain of 4 foundation chain stitches.

Round 1 :

3 sc, 1 ch, turn. Continue with the main pattern of the bag.

Round 2 :

3 sc, 1 ch, turn.

Round 3 :

3 sc, 1 ch, turn. Crochet rows until the desired length of the handle is reached.

Info :

I made a medium-length handle, 67 cm / 26 inches long. I ended up with 146 rows. Attach the handle to the carabiners [Fig 27]. Weave in the yarn ends.

Info :

Attach the handle, and the bag is ready!

Assembly Instructions

  • Attach the side pieces to the main part using slip stitches, starting with the left side piece and aligning the corner parts before connecting.
  • Insert the hook into the back loop of the main part and the front loop of the side piece (3 loops on the hook), pull through and work slip stitches along the three sides of each side piece to join securely.
  • Continue slip stitching along the main part to the corner and then to the middle of the closing flap without cutting the working yarn, then cut the yarn when instructed.
  • Attach the bag lock by first sewing the lock plate to the upper flap, then attaching the corresponding lock plate to the main body so the clasp aligns correctly when closed.
  • Sew D-rings to each bag side at the marked positions for attaching the handle, then attach the handle carabiners and weave in all yarn ends for a neat finish.

Important Notes

  • πŸ’‘Gauge: 17 sc* 13 rows = 4" (10cm); always use a crochet hook size that will result in the correct gauge after blocking.
  • πŸ’‘Work the main texture by inserting the hook into the back loop of the current row and the back loop of the previous row for the neatest surface.
  • πŸ’‘Steam and shape your fabric after crocheting to straighten edges before marking and folding to ensure accurate assembly.
  • πŸ’‘Mark the bottom and sides of the bag with stitch markers to align the side pieces and corners symmetrically during joining.

This mini crossbody bag pattern makes a refined, everyday accessory you can be proud of. The back-loop texture and simple assembly produce a clean, modern finish. Perfect for gifting or making a stylish staple for your own wardrobe. 🧢✨

You ask,

we answer.

FAQs

What size will the finished piece be?

When using similar materials the finished bag will be approximately width = 18.5 cm / 7.3", height = 11 cm / 4.5", depth = 4 cm / 1.5" and handle length = 70 cm / 27.5".

Can I use different yarn weights for this pattern?

Yes, but changing yarn weight will alter the finished size and texture; if you use thicker or thinner cord, adjust the hook size and check your gauge before proceeding.

Do I need prior crochet experience for this pattern?

This pattern is beginner friendly for crocheters comfortable with single crochet and working into back loops; basic experience with turning rows and slip stitching will help.

How long does this project typically take to complete?

Most crocheters complete this project in 5-7 hours, depending on experience and how much time is spent on blocking and assembly.