๐Ÿงถ Beautiful โœจ Detailed ๐Ÿ’ Adorable

Mini Batman Amigurumi Pattern

Mini Batman Amigurumi Pattern
4.7โ˜… Rating
5-7 Hours Time Needed
3.4K Made This
โœ‚๏ธ

Intermediate Level

Ideal for those with basic crochet experience, featuring slightly more advanced stitches and techniques to expand your skills.

โฑ๏ธ

Weekend Treat

Takes 5-7 hours, making it an enjoyable project to finish over a couple of days.

๐Ÿงธ

Cute Companion

An adorable friend to cherish, handcrafted with love to bring comfort and joy for years to come.

About This Mini Batman Amigurumi Pattern

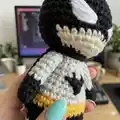
This pattern creates a mini Batman-inspired amigurumi about 12 cm tall using YarnArt Jeans yarn. The design includes separate legs, body, arms, ears, a removable raincoat, and embroidered eyes and logo for charming detail. You will work in continuous rounds with color changes and shaping to form the head and body.

Mini Batman Amigurumi Pattern crochet pattern - detailed view of completed project

Clear round-by-round instructions and photos guide assembly and finishing. Suitable for crocheters comfortable with increases, decreases and basic shaping techniques.

Why You'll Love This Mini Batman Amigurumi Pattern

I absolutely love this pattern because it combines a classic amigurumi silhouette with playful superhero details like a tiny embroidered logo and a removable raincoat. I enjoy how the simple color changes create a lot of character without complicated techniques. The piece is quick to crochet yet rewarding, giving you a finished toy that looks professionally shaped. Sewing and finishing let me personalize each copy, and that process is my favorite part.

Mini Batman Amigurumi Pattern step 1 - construction progress Mini Batman Amigurumi Pattern step 2 - assembly progress Mini Batman Amigurumi Pattern step 3 - details and accessories Mini Batman Amigurumi Pattern step 4 - final assembly and finishing

Switch Things Up

I love changing the color palette to create different character moods: try pastel shades for a softer, friendlier look or bright primary colors for a playful superhero.

I often switch yarn weight and hook size to create mini keychain versions or larger cuddle-sized versions; adjust stuffing and details accordingly.

I sometimes add tiny safety eyes for a different expression, or embroider the eyes as shown for a more stylized lookโ€”you can experiment to see which you prefer.

I like to replace the embroidered logo with felt applique for a crisp look, or use contrasting embroidery thread for a textured emblem.

You can make the raincoat removable or permanent โ€” making it removable adds play value, while stitching it on creates a sleeker silhouette.

I sometimes add a tiny cape instead of a raincoat or create a whole wardrobe of outfits for a series of small characters.

For posability, I add thin wire into the arms before sewing them in, then cover with stuffing and stitch securely so the arms can be posed.

I experiment with facial placement; moving the eyes up or down or changing their angle changes the character from fierce to friendly.

I also swap yarn types for texture: a fluffy yarn gives a cuddly toy, while a smooth cotton yarn creates neat stitch definition for detailed embroidery.

I encourage you to personalize by adding a small accessory like a crocheted utility belt, tiny felt mask, or miniature emblem to make each piece unique.

Common Mistakes & How to Fix Them

โœ— Skipping stitch markers during rounds will make it difficult to track the beginning of rounds; place a marker and move it each round to avoid counting errors. โœ— Not stuffing as you go will result in awkward shaping and lumps; stuff gradually and firmly, especially in legs and head, to maintain smooth curves. โœ— Changing colors without securing yarn tails can cause gaps or loose stitches; carry or weave in the new color securely and crochet the new color through the two loops when changing. โœ— Ignoring stitch counts during increases and decreases will distort the shape of the head and body; count stitches at the end of each round, and use stitch markers to remind you of repeat boundaries. โœ— Pulling stitches too tightly when working BLO or FLO may make edges stiff and hard to join; keep an even, relaxed tension for neat joins and sculpted shaping.

Mini Batman Amigurumi Pattern

Make a tiny, charming Batman-inspired amigurumi you can finish in a few sittings. This pattern guides you step-by-step through all rounds and assembly so you can crochet a neat, collectible little hero with a detachable raincoat and embroidered logo. Perfect for gifting or keeping on display, the pattern uses common stitches and clear shaping instructions to produce a 12 cm (approx) finished toy.

Intermediate 5-7 Hours

Materials Needed for Mini Batman Amigurumi Pattern

โ€” Main Fabric

  • 01
    YarnArt Jeans yarn (160 m in 50 g, 55% cotton/45% polyacryl) - colors used: gray, yellow, beige, black and white.
  • 02
    Gray yarn - small amount (use same yarn brand as main if possible, 50 g skein typical).
  • 03
    Yellow yarn - small amount for belt detail (approx 10-20 g).
  • 04
    Beige yarn - small amount for muzzle/face (approx 10-20 g).
  • 05
    Black yarn - small amount for head, ears, hands, boots and detailing (50 g skein recommended).
  • 06
    White yarn - small amount for embroidered eyes (approx 5-10 g).
  • 07
    Toys filler (polyester stuffing) - small amount to fill head, body and legs.

โ€” Tools Required

  • 01
    Crochet hook suitable for your yarn; author uses Clover Soft Touch 2.00 mm.
  • 02
    Scissors.
  • 03
    Tapestry needle for sewing and weaving ends.
  • 04
    Pins for positioning parts.
  • 05
    Stitch marker to mark beginning of rounds.
  • 06
    Polyester stuffing (toy filler).

Progress Tracker

0% Complete

โ€” Notes :

Infos :

Crochet continuously in a spiral, unless otherwise specified. In order to not lose track of the number of worked stitches in each round, use a stitch marker to mark the beginning of each round โ€” a thin thread of contrasting color.

Infos :

Crochet tightly enough so the filler is not visible through the holes between loops. Tightly and gradually fill all the details of the toy in the process of crocheting. Size of the finished toy can vary depending on the materials used, the density of crocheting and filling, etc.

โ€” Legs and Body :

Info :

*Stuff legs and body firmly, stuffing as you go.

Leg 1 :

Start working with black yarn. R1. 5 sc MR (5) R2. 5 inc (10) R3. โ€“ R5. 10 sc (10) Continue on with gray. R6. โ€“ R8. 10 sc (10) Close and break the yarn.

Leg 2 + body :

Start working with black yarn. R1. 5 sc MR (5) R2. 5 inc (10) R3. โ€“ R5. 10 sc (10) Continue on with gray. R6. โ€“ R8. 10 sc (10) Continue on with black. Crochet 2 sc. Move the marker to the last loop. Stuff the legs. Now we will start with the body. R9. 2 ch, 10 sc, 2 sc, 10 sc (24) *it means that we sew 2 ch and attach sc to the second leg, then crochet 9 sc in a circle, 2 sc into the loops of those 2 air loops and 10 sc along the circle of the second leg, total24 loops. R10. โ€“ R11. 24 sc (24) Continue on with yellow. R12. โ€“ R13. 24 sc (24) Continue on with gray. R14. โ€“ R15. 24 sc (24) Stuff the body. R16. (2 sc, dec)x6 (18) R17. โ€“ R19. 18 sc (18) R20. (1 sc, dec)x6 (12)

Round 21 :

R21. 12 sc (12) Stuff the body firmly. Close and break the yarn.

โ€” Head :

Info :

Crochet with black yarn.

Round 1 :

R1. 6 sc MR (6)

Round 2 :

R2. 6 inc (12)

Round 3 :

R3. (1 sc, inc)x6 (18)

Round 4 :

R4. (2 sc, inc)x6 (24)

Round 5 :

R5. (3 sc, inc)x6 (30)

Round 6 :

R6. (4 sc, inc)x6 (36)

Round 7 :

R7. (5 sc, inc)x6 (42)

Round 8-13 :

R8. โ€“ R13. 42 sc (42)

Round 14 :

R14. (5 sc, dec)x2, 2 sc, BEIGE 3 sc, dec, 5 sc, dec, 4 sc, BLACK 1 sc, dec, 5 sc, dec (36)

Round 15 :

R15. (4 sc, dec)x2, 2 sc, BEIGE 2 sc, dec, 4 sc, dec,4 sc BLACK dec 4 sc, dec (30)

Round 16 :

R16. (3 sc, dec)x2, 2 sc, BEIGE 1 sc, dec, 3 sc, dec,3 sc, BLACK dec, 3 sc, dec (24)

Round 17 :

R17. (2 sc, dec)x2, 2 sc, BEIGE dec, 2 sc, dec, 2 sc, BLACK dec, 2 sc, dec (18)

Info :

Continue on with gray.

Round 18 :

R18. (sc, dec)x6 (12) Add stuffing. Leave the thread for sewing.

โ€” Arms :

Arm x 2 :

Crochet with black yarn. R1. 6 sc MR (6) R2. โ€“ R4. 6 sc (6) Continue on with gray. R5. โ€“ R11. 6 sc (6) Do not stuff of the arm. Close. Break the yarn and leave a long tail to sew arms to body.

โ€” Ears :

Ear x2 :

Crochet with black yarn. R1. 4 sc MR (4) R2. 4 inc (8) R3. โ€“ R4. 8 sc (8) R5. (1 sc, inc)x4 (12) R6. 12 sc (12) R7. 6 sc (12) Leave the thread for sewing.

โ€” Raincoat :

Raincoat :

Crochet with black yarn. R1. 16 ch, starting from second ch from hook, 15 sc (15) R2. โ€“ R6. ch, turn, 15 hdc (15) R7. ch, turn, dec, 11 hdc, dec (13) R8. ch, turn, dec, 9 hdc, dec (11)

Round 9 :

R9. ch, turn, dec, 7 hdc, dec (9)

Round 10 :

R10. ch, turn, dec, 5 hdc, dec (7) Using black, SC evenly around the raincoat. Crochet 12 ch to fix a raincoat on a neck. Close and break the yarn, leaving a little tail.

โ€” Finishing :

Finishing Steps :

1. Sew the head to the body. 2. Sew the arms to the body symmetrically. 3. Embroider the eyes with white thread. 4. Sew the ears to the head. 5. Embroider the Batman logo onto the chest with black thread or embroider the logo in yellow and black felt. 6. Sew the raincoat onto the back.

Assembly Instructions

  • Sew the head to the body using the long tail left from the head, align center back to front and use a whipstitch to secure evenly.
  • Sew the arms to the body symmetrically between rounds indicated on the body, positioning slightly forward for a natural pose and secure with several stitches.
  • Sew the legs firmly to the base of the body during assembly so the doll can stand, matching the leg openings and closing the seam evenly.
  • Position and sew the ears on top of the head, spacing them evenly and using pins to hold in place before final sewing.
  • Embroider the eyes with white thread following the pinned placement photos and embroider the small Batman logo onto the chest with black thread, or use yellow and black felt for a bold applique.
  • Attach the raincoat to the back by sewing the 12-ch fixing loop to the neck area and secure the edges with small invisible stitches.

Important Notes

  • ๐Ÿ’กCrochet continuously in a spiral unless otherwise specified and use a stitch marker to track round beginnings.
  • ๐Ÿ’กStuff firmly but gradually so the shape forms smoothly and stuffing is not visible through stitches.
  • ๐Ÿ’กWork with consistent tension to ensure uniform stitch size and smooth shaping across parts.
  • ๐Ÿ’กPin parts to the body before sewing to verify placement and symmetry and adjust as needed.
  • ๐Ÿ’กWeave in ends as you go to reduce finishing work and secure color changes to prevent unraveling.

This cute mini Batman amigurumi pattern makes a small, handmade hero perfect for gifting or displaying. ๐Ÿงถ Follow the step-by-step rounds and assembly sections to create a polished finished toy you will be proud of. ๐Ÿงตโœจ

You ask,

we answer.

FAQs

What size will the finished piece be?

The finished amigurumi measures approximately 12 cm (4.7 inches) tall when using the recommended yarn and 2.00 mm hook.

Can I use different yarn weights for this pattern?

Yes, you can use different yarn weights, but this will change the finished size; use an appropriate hook for your yarn and expect the toy to be larger or smaller accordingly.

Do I need prior crochet experience for this pattern?

This pattern is rated intermediate, so basic knowledge of single crochet, increases and decreases is recommended for best results.

How long does this project typically take to complete?

Most crocheters complete this project in about 5-7 hours, though time may vary depending on experience level and how careful you are with finishing and embroidery.