This collection of Minecraft-inspired crochet patterns gives you step-by-step instructions to create beloved characters like Alex, Creeper, Enderman, Ghast and Guardian. Youll get clear round-by-round directions, materials lists, and finishing notes so you can make accurate, adorable amigurumi. Perfect for crocheters who love gaming-themed handmade gifts and collectible toys.
Progress Tracker
0% Complete
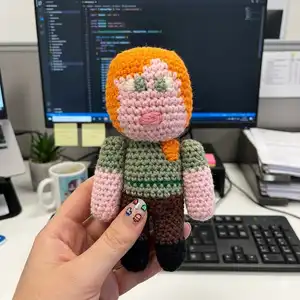
— Alex :
Round 1 :
4SC into a magic loop {4}
Round 2 :
3SC into each ST around {12}
Round 3-5 :
SC around {12}
Info :
Change to brown yarn.
Round 6-10 :
SC around {12}
Info :
Repeat rows 1 – 10 to make second leg, do not fasten off. CH1 and SL ST into the first leg you made. This is to join the two legs; we will now continue to crochet around both legs and the CH1 to make the body.
Round 11 :
SC11 (around the leg not including the stitch we SL ST into) SC1 into the chain we made, SC11 (around second leg not including the stitch we CH1 from, SC1 into the opposite side of the chain space we made. {24}
Round 12-14 :
SC around {24}
Info :
Change to light green.
Round 15-17 :
SC around {24}
Info :
Change to dark green.
Info :
Change to light green.
Round 19-25 :
SC around {24}
Info :
You now want to decrease and close the top of Alex's body in a rectangular shape. To do this press your work flat front to back and find the front 8 stitches, place a marker either side of these stitches. Now count 2 stitches away from the marker and put another clip into the next stitch. You now have 4 clip markers to help us identify where we are going to do our decrease stitches.
Round 26 :
(SC to stitch before marker SC3TOG) repeat 4 times, SC to end.
Info :
Using mattress stitch sew the top of Alex closed.
Info :
With orange yarn sew hair detail onto Alex's left shoulder.
Round 1 :
4SC into a magic loop {4}
Round 2 :
3SC into each ST around {12}
Round 3-11 :
SC around {12}
Info :
Change to light green yarn.
Round 12-15 :
SC around {12}
Info :
With yarn tail pick up the back loop only of the remaining 12 stitches in order, then pull tight to close.
Info :
Pin and sew arms into place on either side of Alex.
Info :
Begin with orange yarn. If you need to compensate for moving seams add an extra SC to rounds when needed.
Round 1 :
8SC into a magic loop {8}
Round 2 :
(SC1, 3SC into the next ST) 4 times {16}
Round 3 :
SC2, 3SC into the next ST, (SC3, 3SC into the next ST) 3 times, SC1 {24}
Round 4 :
SC3, 3SC into the next ST, (SC5, 3SC into the next ST) 3 times, SC2 {32}
Round 5 :
SC4, 3SC into the next ST, (SC7, 3SC into the next ST) 3 times, SC3 {40}
Round 6-7 :
SC around {40}
Info :
With clip markers you are now going to identify the 10 stitches where you want Alex's face to be. Put a marker in the 1st and 10th stitch. Move the markers up into the same stitches on each round.
Round 8 :
SC to first marker in orange, including the stitch with the marker in, in pink SC8, in orange SC to end. {40}
Round 9 :
SC to first marker in orange, including the stitch with the marker in, SC3, in pink SC4, in orange SC to end. {40}
Round 10-13 :
SC to stitch before marker in orange, in pink SC10, in orange SC to end. {40}
Round 14-16 :
SC to 2 stitches before marker in orange, in pink SC12, in orange SC to end. {40}
Info :
Continue the rest of head with pink yarn only. You now want to decrease and close the bottom of Alex's head in a square shape. To do this add a clip marker into the 4 corners of his head where you want the decreases to be. There should be 9 stitches between every 2 stitches. To make this easier identify the front 9 stitches of his face first and put a marker either side of these stitches. Move markers into decreased stitches after each row.
Round 17 :
(SC to stitch before marker SC3TOG) 4 times, SC to end {32}
Round 18 :
(SC to stitch before marker SC3TOG) 4 times, SC to end {24}
Round 19 :
(SC to stitch before marker SC3TOG) 4 times, SC to end {16}
Round 20 :
(SC to stitch before marker SC3TOG) 4 times, SC to end {8} - Remove markers
Info :
With yarn tail pick up the front loop only of the remaining 8 stitches in order, then pull tight to close.
Info :
Sew head onto body.
Info :
Face Detail. With different colour yarns sew on Alex's face details. I found the easiest way to do this was to sew the shape first, and then fill in with colour.
— Creeper :
Round 1 :
8SC into a magic loop {8}
Round 2 :
(SC1, 3SC into the next ST) 4 times {16}
Round 3 :
SC2, 3SC into the next ST, (SC3, 3SC into the next ST) 3 times, SC1 {24}
Round 4-18 :
SC around {24}
Info :
You now want to decrease and close the top of body in a square shape. To do this add a clip marker into the 4 corners of the body where you want the decreases to be. There should be 5 stitches between every 2 stitches. Replace markers after each row.
Round 19 :
(SC to stitch before marker SC3TOG) 4 times, SC to end {16}
Round 20 :
(SC to stitch before marker SC3TOG) 4 times, SC to end {8} - Remove markers
Info :
With yarn tail pick up the front loop only of the remaining 8 stitches in order, then pull tight to close. Sew feet onto the bottom of Creeper two at the front and two at the back.
Round 1 :
8SC into a magic loop {8}
Round 2 :
(SC1, 3SC into the next ST) 4 times {16}
Round 3-7 :
SC around {16}
Round 8 :
(SC1, SC3TOG) 4 times {8}
Info :
Join and FO. Stuff Legs. With yarn tail pick up the front loop only of the remaining 8 stitches in order, then pull tight to close.
Info :
Face and Body Detail. With dark green yarn sew eyes nose and mouth onto Creepers head. I found the easiest way to do this was to sew the square shape's first and then fill in with colour.
— Enderman :
Round 1 :
CH2, 5SC into the 2nd CH from hook {5}
Round 2 :
2SC into every ST around {10}
Round 3-27 :
SC around {10}
Info :
Join and FO. Stuff Leg. Repeat rows 1 – 27 to make second leg, do not fasten off. CH3 and SL ST into the first leg you made. This is to join the two legs; we will now continue to crochet around both legs and the CH3 to make the body.
Round 28 :
SC9 (around the leg not including the stitch we SL ST into) SC into one side of each of the CH3 we made, SC9 (around second leg not including the stitch we CH1 from, SC into the opposite side of the CH3 space's we made. {24}
Round 29-43 :
SC around {24}
Info :
You now want to decrease and close the top of Enderman's body in a rectangular shape. To do this press your work flat front to back and find the front 8 stitches, place a marker either side of these stitches. Now count 2 stitches away from the marker and put another clip into the next stitch. You now have 4 clip markers to help us identify where we are going to do our decrease stitches.
Round 44 :
(SC to stitch before marker SC3TOG) repeat 4 times, SC to end.
Info :
Stuff body. Join and FO. Using mattress stitch sew the top of body closed.
Round 1 :
8SC into a magic loop {8}
Round 2 :
(SC1, 3SC into the next ST) 4 times {16}
Round 3 :
SC2, 3SC into the next ST, (SC3, 3SC into the next ST) 3 times, SC1 {24}
Round 4 :
SC3, 3SC into the next ST, (SC5, 3SC into the next ST) 3 times, SC2 {32}
Round 5 :
SC4, 3SC into the next ST, (SC6, 3SC into the next ST) 3 times, SC2 {40}
Round 6-13 :
SC around {40}
Round 14 :
(SC to stitch before marker SC3TOG) 4 times, SC to end {32}
Round 15 :
(SC to stitch before marker SC3TOG) 4 times, SC to end {24}
Round 16 :
(SC to stitch before marker SC3TOG) 4 times, SC to end {16}
Round 17 :
(SC to stitch before marker SC3TOG) 4 times, SC to end {8} - Remove markers
Info :
Join and FO. With yarn tail pick up the front loop only of the remaining 8 stitches in order, then pull tight to close. Sew head onto body.
Round 1 :
CH2, 6SC into the 2nd CH from hook {6}
Round 2 :
(SC1, 2SC into the next ST) 3 times {9}
Round 3-29 :
SC around {9}
Info :
Join and FO. Stuff Arms. Pin and sew into place on either side of Enderman.
Info :
Face Detail. With white yarn sew on Enderman's eyes. I found the easiest way to do this was to sew the shape first, and then fill in with colour.
— Ghast :
Round 1 :
8SC into a magic loop {8}
Round 2 :
(SC1, 3SC into the next ST) 4 times {16}
Round 3 :
SC2, 3SC into the next ST, (SC3, 3SC into the next ST) 3 times, SC1 {24}
Round 4 :
SC3, 3SC into the next ST, (SC5, 3SC into the next ST) 3 times, SC2 {32}
Round 5 :
SC4, 3SC into the next ST, (SC7, 3SC into the next ST) 3 times, SC3 {40}
Round 6-18 :
SC around {40}
Round 19 :
(SC to stitch before marker SC3TOG) 4 times, SC to end {32}
Round 20 :
(SC to stitch before marker SC3TOG) 4 times, SC to end {24}
Round 21 :
(SC to stitch before marker SC3TOG) 4 times, SC to end {16}
Round 22 :
(SC to stitch before marker SC3TOG) 4 times, SC to end {8} - Remove markers
Info :
Join and FO. With yarn tail pick up the front loop only of the remaining 8 stitches in order, then pull tight to close.
Round 1 :
CH2, 6SC into the 2nd CH from hook {6}
Round 2 :
(SC1, 2SC into the next ST) 3 times {9}
Info :
Join and FO. Sew legs onto bottom of Ghast evenly.
Info :
Face Detail. With white, red, black, and grey yarn sew on Ghast's face detail. I found the easiest way to do this was to sew the shape first, and then fill in with colour.
This Minecraft amigurumi set is a fun collection of characters to make and share — perfect for gamers and crafters alike. Each pattern includes clear round-by-round instructions, materials lists, and finishing tips to help you achieve a polished look. Make a whole crew to display or gift to a friend — happy crocheting! 🧶✨