๐Ÿงถ Beautiful โœจ Detailed ๐Ÿ’ Adorable

Marsupilami Amigurumi Pattern

Marsupilami Amigurumi Pattern
4.1โ˜… Rating
5-7 Hours Time Needed
2.5K Made This
โœ‚๏ธ

Intermediate Level

Ideal for those with basic crochet experience, featuring slightly more advanced stitches and techniques to expand your skills.

โฑ๏ธ

Weekend Treat

Takes 5-7 hours, making it an enjoyable project to finish over a couple of days.

๐Ÿงธ

Cute Companion

An adorable friend to cherish, handcrafted with love to bring comfort and joy for years to come.

About This Marsupilami Amigurumi Pattern

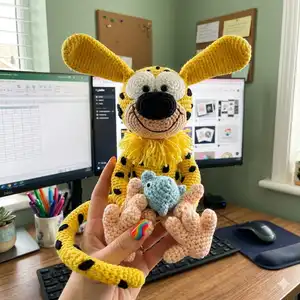
This pattern creates a full Marsupilami amigurumi complete with head, body, arms, legs, ears, long tail and a small fish accessory. It uses DK/medium weight cotton yarn and worked in continuous rounds to achieve smooth shaping. The design includes optional fur around the neck and embroidered spots for personality. You will sew multiple pieces together and add finishing details for a charming toy.

Marsupilami Amigurumi Pattern crochet pattern - detailed view of completed project

The pattern contains explicit round-by-round instructions for every piece and helpful assembly notes for correct placement. Techniques used include increases, decreases, cluster stitches for knees/elbows and optional front-loop hair for a fluffy neck.

Why You'll Love This Marsupilami Amigurumi Pattern

I absolutely love this pattern because it brings a playful, animated character to life with relatively simple stitches and clever shaping. I enjoy how the long tail and expressive face give it so much personality โ€” they are fun details to crochet and position. The pattern balances structured rounds with opportunities to add creative touches like embroidered spots and optional fur. Sewing the pieces together is satisfying because you see the character assemble gradually into a lifelike toy.

Marsupilami Amigurumi Pattern step 1 - construction progress Marsupilami Amigurumi Pattern step 2 - assembly progress Marsupilami Amigurumi Pattern step 3 - details and accessories Marsupilami Amigurumi Pattern step 4 - final assembly and finishing

Switch Things Up

I love customizing this pattern by changing the color palette to make a family of characters; try pastel shades for a softer look or neon accents for a bold twist.

I often make a mini version by using fingering weight yarn and a smaller hook for keychain-friendly sizes, or a chunky version with bulky yarn for a cuddly, larger toy.

I like to add embroidered eyebrows or mouth variations to alter the expression; small shifts in eye placement can create very different personalities.

For a posable toy, I sometimes insert thin wire into the tail or limbs before stuffing so the pose can be adjusted and kept in place.

If you want a fluffier neck, use eyelash yarn or loop-and-cut faux fur techniques through the front loops to build a textured mane.

Try different eye treatments: painted pupils, safety eyes, or French knots each give unique looks and levels of safety for gifting to children.

Change the fish accessory to other tiny propsโ€”like a tiny heart, star, or yarn carrotโ€”to match seasons or holidays when gifting.

I sometimes add small felt accessories like a bow tie or scarf sewn to the neck for extra charm and personality.

Adjust the tail length and thickness to create dynamic silhouettesโ€”thinner tails read more delicate while thicker tails feel more playful and sturdy.

Finally, I recommend experimenting with embroidered spots placement; move them slightly and stitch them densely or sparsely to create different coat patterns and visual interest.

Common Mistakes & How to Fix Them

โœ— Skipping stitch markers when working in spiral rounds can cause lost stitch counts; place a marker at the start of each round and move it as you progress to maintain accuracy. โœ— Forgetting to stuff as you go will make shaping difficult and lumpy; stuff the head, feet and legs gradually and firmly where indicated to preserve the intended silhouette. โœ— Not counting stitches after increases or decreases leads to uneven shaping; always count stitches at the end of rounds where shaping occurs to ensure correct stitch totals. โœ— Cutting threads or tying off fingers too early prevents correct assembly; follow the instructions about which fingers to leave uncut and where to join pieces to form hands and feet properly.

Marsupilami Amigurumi Pattern

Make a playful Marsupilami amigurumi with clear, complete step-by-step instructions you can follow at your own pace. This pattern includes detailed rounds for the head, body, legs, arms, ears, tail and a tiny fish accessory. Perfect for crocheters who enjoy character toys and a little assembly work to bring personality to your handmade companion.

Intermediate 5-7 Hours

Materials Needed for Marsupilami Amigurumi Pattern

โ€” Main Fabric

  • 01
    DK/medium weight cotton yarn (recommended) - yellow for body and tail, amount as needed
  • 02
    Light peach/beige yarn - for hands, feet, mouth and belly, amount as needed
  • 03
    White yarn - small amount for eye whites
  • 04
    Black yarn - small amount for nose and pupils and embroidered spots
  • 05
    Optional accent yarn for fish (any color) - small amount

โ€” Tools Required

  • 01
    Crochet hook 2.5mm (recommended)
  • 02
    Embroidery and darning needles
  • 03
    Scissors
  • 04
    Stitch markers
  • 05
    Polyester stuffing
  • 06
    Yarn needle for sewing
  • 07
    Optional: safety eyes or beads for pupils
  • 08
    Optional: wire for posable tail or limbs

Progress Tracker

0% Complete

โ€” Head :

Round 1 :

Using yellow yarn Ch6 R1 sc4 3sc in one st, work around chain, sc3, 2sc in one st (12 sts)

Round 2 :

*inc1, sc1* x6 (18 sts)

Round 3 :

*inc1, sc2* x6 (24 sts)

Round 4 :

*inc1, sc3* x6 (30 sts)

Round 5 :

*inc1, sc4* x6 (36 sts)

Round 6 :

*inc1, sc5* x6 (42 sts)

Round 7 :

*inc1, sc6* x6 (48 sts)

Round 8 :

*inc1, sc7* x6 (54 sts)

Round 9 :

sc54

Round 10 :

*inc1, sc8* x6 (60 sts)

Round 11-14 :

sc60

Round 15 :

*dec1, sc8* x6 (54 sts)

Round 16 :

sc54

Round 17 :

*dec1, sc7* x6 (48 sts)

Round 18 :

*dec1, sc6* x6 (42 sts)

Round 19 :

*dec1, sc5* x6 (36 sts)

Round 20 :

*dec1, sc4* x6 (30 sts)

Round 21 :

*dec1, sc3* x6 (24 sts)

Round 22 :

*dec1, sc2* x6 (18 sts)

Info :

Stuff the head nice and firm.

Round 23 :

*dec1 sc1* x6 (12 sts)

Info :

Tie off. Stuff the head some more if needed.

โ€” Feet-legs-body :

Info :

Feet and hands are done with light peach or beige color yarn, while the rest is crocheted with yellow.

Item Name (leg fingers P1) :

First make leg fingers. Start working with light peach color yarn or beige. Make 2. Sc4 in magic ring R1 *inc1, sc1* x2 (6 sts) R2-R4 sc6. Tie off.

Item Name (middle finger P1) :

Sc4 in magic ring R1 *inc1, sc1* x2 (6 sts) R2-R5 sc6. Tie off.

Item Name (last finger P1) :

Sc4 in magic ring R1 *inc1, sc1* x2 (6 sts) R2-R4 sc6 R5 bring middle finger (longer one) and continue with 3sc over middle finger, bring the next finger. You will make 6sc over this finger, working around the finger pointing to back side of middle finger direction; continue stitching 3sc of middle finger; now back to finger we have started from, making 6sc. Round is finished with total of 18 sts (18 sts) R6-R7 sc18. Stuff the fingers at this point.

Round 8 (connecting thumb) :

At this round we will connect thumb sc3, now sc3 through thumb and working piece (in order to connect them), sc12 (18 sts)

Round 9 :

sc3, sc3 just over thumb stitches (three that were left unstitched), sc12 (18 sts)

Round 10 :

sc10, ch1, turn

Round 11 :

sc14, ch1, turn

Round 12 :

sc7, ch1 fold the last row in half and slip stitch through 7 stitches (this can be difficult as the piece is small, if you find it easier, you can sew the back instead). What we have done here, is closed the foot. Now it is round, opened only on top side, where we'll continue with crocheting the leg. Reaching the end - closing the back of the foot (after 7 sts made) change color to yellow. Add more stuffing to the foot and continue stuffing the leg as you go.

Round 13 :

make 12sc around the top edge of the foot made (continue working in continuous rounds)

Round 14 :

sc12 back loops only (this is in case you want to add fringes to add more fur looking body. It is optional. I have made back loops on all, legs, arms and neck, but added fringes only around neck area.)

Round 15-28 :

sc12

Info :

Note: to add knees make 3 cluster stitches (each with 2dc) in the front area of the round 19. At the end of R28 tie off and cut ends. This leg we have just made was right side one.

โ€” Left foot :

Round 8 :

Start making leg as written above. Changes on the pattern will start at R8. R8 sc7, sc3 through both -thumb and working piece stitches, sc8 (18 sts)

Round 9 :

sc7, sc3 just through thumb stitches (three that were left unstitched), sc8 (18 sts)

Round 10 :

sc1, ch1, turn

Round 11 :

sc14, ch1, turn

Round 12 :

sc7, ch1 fold these two rows you worked at in half (right sides facing each other). Continue with the pattern as written above, but don't cut the thread and tie off.

โ€” Connect legs (making body) :

Round 1 :

Ch3, continue making sc on right leg; sc12, sc3 (over the back side of chain made at start) sc12 (left leg) (30 sts)

Round 2 :

*inc1, sc4* x6 (36 sts)

Round 3-12 :

sc36

Round 13 :

*dec1, sc4* x6 (30 sts)

Round 14-15 :

sc30

Round 16 :

*dec1, sc3* x6 (24 sts)

Round 17-21 :

sc24

Round 22 :

*dec1, sc2* x6 (18 sts)

Round 23 :

sc18. Stuff the body nice and firm.

Round 24 :

*dec1, sc1* x6 (12 sts)

Round 25 :

sc12 back loops only

Round 26 :

sc12. Finish stuffing the body. Add some more stuffing at the time when sewing head and body together to make the neck part nice and firm.

โ€” Arms x2 :

Info :

First make fingers. Each hand will have four fingers. Middle finger is one round longer. Make 2 (for each hand).

Round 1 (finger) :

Sc4 in magic ring R1 *inc1, sc1* x2 (6 sts) R2-R4 sc6

Middle finger :

Sc4 in magic ring R1 *inc1, sc1* x2 (6 sts) R2-R5 sc6

Third finger :

Sc4 in magic ring R1 *inc1, sc1* x2 (6 sts) R2-R4 sc6

Round 5 :

bring middle finger and stitch over it 3sc, bring next finger and sc6, (continue working around the fingers as you go), sc3 over middle finger previously added, sc6 over starting finger (18 sts)

Round 6-7 :

sc18. Stuff fingers.

Round 8 :

connecting thumb round (both arms are the same) โ€“ sc5, sc3 through double stitches (thumb and working piece), sc10 (18 sts)

Round 9 :

sc5, sc3 (thumb only) sc10 (18 sts). Change color to yellow. Stuff the hand and continue stuffing the arm as you go.

Round 10 :

*dec1, sc1* x6 (12 sts)

Round 11 :

work in back loops only if wish to add fringes on hands *dec1, sc4* x2 (10 sts)

Round 12-31 :

sc10. To add elbows, make 3 cluster stitches with 2dc each. Add them around rounds17-18. Tie off leaving long end for sewing.

โ€” Eyes x2 :

Round 1 :

With white yarn Sc5 in magic ring R1 inc5 (10)

Round 2 :

*inc1, sc1* x5 (15 sts)

Round 3 :

*inc1, sc2* x5 (20 sts)

Info :

Tie off leaving long end for sewing. Black pupils are placed in the inner sides of eyes, between rows 2-3. White eye parts are placed next to each other on the upper half side of the head. Eyes and mouth piece will meet on the middle of the head. The nose will be placed to touch the outer eye line and will go through 4-5 rounds over the mouth piece.

โ€” Nose :

Round 1 :

With black yarn Ch8 R1 sc6, 3 sc in one st, sc5, 2 sc in one st (16 sts)

Round 2 :

*inc1, sc1* x8 (24 sts)

Round 3 :

sc24

Round 4 :

*dec1, sc1* x8 (16 sts)

Info :

Tie off leaving long end for sewing the nose on the head. Stuff the nose well. Place and sew the nose as described above.

โ€” Mouth facial piece :

Round 1 :

With light peach or beige Ch6 R1 sc4, 3sc in one st, sc3, 2 sc in one st (12)

Round 2 :

*inc1, sc1* x6 (18 sts)

Round 3 :

*inc1, sc2* x6 (24 sts)

Round 4 :

*inc1, sc3* x6 (30 sts)

Round 5 :

*inc1, sc4* x6 (36 sts)

Round 6 :

*inc1 sc5* x6 (42 sts)

Info :

Tie off leaving long end for sewing.

โ€” Ears :

Round 1 :

Sc6 in magic ring R1 inc6 (12 sts)

Round 2 :

*inc1, sc1* x6 (18 sts)

Round 3 :

*inc1, sc2* x6 (24 sts)

Round 4-8 :

sc24

Round 9 :

*dec1, sc10* x2 (22 sts)

Round 10 :

sc22

Round 11 :

*dec1, sc9* x2 (20 sts)

Round 12 :

sc20

Round 13 :

*dec1, sc8* x2 (18 sts)

Round 14 :

sc18

Round 15 :

*dec1, sc7* x2 (16 sts)

Round 16 :

sc16

Round 17 :

*dec1, sc6* x2 (14 sts)

Round 18 :

sc14

Round 19 :

*dec1, sc5* x2 (12 sts)

Round 10-17 :

sc12 (as printed)

Info :

Flatten the ears, tie off leaving long end for sewing them on the head later.

โ€” Belly :

Round 1 :

Sc6 in magic ring R1 Inc6 (12 sts)

Round 2 :

*inc1, sc1* x6 (18 sts)

Info :

Tie off leaving long end for sewing. Position the belly on the lower side of the body and sew it nicely.

โ€” Tail :

Round 1 :

Sc6 in magic ring. R1-... make tail as long as you like using 6sc. Marsupilami has very long tail. I suggest making it 26 cm (12โ€). That size won't make it too long and will still be nice and long.

Rounds (last shaping) :

Last 5 rounds *inc1, sc2* x2 (8 sts), next 4 rounds stitch 8sc for firmer tail body connection. Tie off leaving long end for sewing.

โ€” Time to sew all body parts together. :

Info :

Connect head and body. Sew on the arms. Place them around rounds 24-25. Round 25 needs to be left free as you will put additional hairs here to create fur around neck. At the end place on and sew the ears. Sew them on top sides of the head, rounds 5-6. When sewing use one round stitches on the head and sew through both loops of the ears. Try to make them point upwards so ears can appear fluffy and in motion. At the end sew the tail on. Position it centered on the lower back side of the body, 5-6 rounds upwards from feet connected round. What is left is to embroider black spots on it's body. Making fur around neck (arms and legs) is optional. As you could see, I left front loops on arms, legs and around neck area. I have put on these extra hairs around neck only. It is done as making hair. You will hook and knot yarn pieces through front loops, and when all done, trim it in V shape (longer points in front and back). I have also added a fish Marsupilami holds in his hand. You can add it as well if you wish.

โ€” Fish :

Info :

With same size hook and yarn of your choice. Make 2 (tail fins).

Round 1 :

Sc4 in magic ring R1 *inc1, sc1* x2 (6 sts)

Round 2 :

*inc1, sc2* x2 (8 sts)

Round 3 :

dec4 (4 sts)

Round 4 :

connect both fin pieces, making 8sc around

Round 5 :

*inc1, sc3* x2 (10 sts)

Round 6 :

*inc1, sc4* x2 (12 sts)

Round 7 :

*inc1, sc5* x2 (14 sts)

Round 8 :

*inc1, sc6* x2 (16 sts)

Round 9 :

*inc1, sc3* x4 (20 sts)

Round 10-12 :

sc20. From next round we'll start decreasing so start stuffing the body as you go.

Round 13 :

*dec1, sc3* x4 (16 sts)

Round 14 :

*dec1, sc2* x4 (12 sts)

Round 15 :

*dec1, sc1* x4 (8 sts)

Round 16 :

dec4 (4 sts)

Info :

By now fish should be stuffed well. Tie off leaving long end for sewing. Thread the needle with excess yarn and close the last round nicely. Upper fin, slip stitch to 8th round top stitch on the body (work through top stitches of rounds8-5) ch1, hdc in same st, 2dc in next two sts, hdc in 4th st and sc in same (continue as pattern indicates).

Info :

Cluster stitch โ€“ for help please follow the link http://crochet.about.com/library/blcluster2.htm

Info :

Work is done in continuous rounds (spiral work). Use marker for easier round following.

Assembly Instructions

  • Connect head and body by aligning the neck opening to the top of the body, then sew securely with a yarn needle through one round of stitches on the head and through both loops of the body for a neat join.
  • Sew the arms onto the body around rounds 24-25, positioning them symmetrically and leaving round 25 free for adding additional hairs around the neck if you wish to add fur.
  • Attach ears to the top sides of the head at rounds 5-6, sewing through both loops of the ears and using one-round stitches on the head so ears will point upwards and look fluffy.
  • Position and sew the tail centered on the lower back of the body about 5-6 rounds upwards from the feet-joined round so it balances the figure.
  • Embroider black spots across the body after all pieces are sewn; use photos as a reference for placement and stitch securely.
  • Sew the belly onto the lower front of the body using the long tail left from the belly piece, centering it and stitching neatly around the edge.

Important Notes

  • ๐Ÿ’กWork in continuous rounds (spiral work) and use a stitch marker to mark the start of each round for accurate stitch counting.
  • ๐Ÿ’กStuff parts as you go so shaping is controlledโ€”stuff firmly but not so much that stitches are distorted.
  • ๐Ÿ’กLeave long ends when tying off pieces that will be sewn in place; these long tails make assembly easier and more secure.

This Marsupilami amigurumi pattern gives you a playful character full of personality and charm. Handmade details like a long tail, embroidered spots, and optional neck fur make every piece unique. Perfect as a gift or a cheerful addition to your handmade toy collection. ๐Ÿงถโœจ

You ask,

we answer.

FAQs

What size will the finished piece be?

The finished amigurumi measures approximately 26 cm (about 10-12 inches) tall when using DK weight yarn and the recommended 2.5 mm hook, depending on stuffing and yarn tension.

Can I use different yarn weights for this pattern?

Yes, you can use different yarn weights, but this will affect the final size; use a hook that matches your yarn and expect changes in dimensions and stitch counts when substituting yarns.

Do I need prior crochet experience for this pattern?

This pattern is rated intermediate; basic knowledge of single crochet, increases, decreases and working in the round is required, along with some sewing and shaping experience for assembly.

How long does this project typically take to complete?

Most crocheters finish this project in about 5-7 hours total, though exact time varies by experience level and whether you add optional details such as fur and embroidery.