🧶 Beautiful ✨ Detailed 💝 Adorable

Marshmallow Kittie Amigurumi Pattern

Marshmallow Kittie Amigurumi Pattern
4.1★ Rating
5-7 Hours Time Needed
3.8K Made This
✂️

Intermediate Level

Ideal for those with basic crochet experience, featuring slightly more advanced stitches and techniques to expand your skills.

⏱️

Weekend Treat

Takes 5-7 hours, making it an enjoyable project to finish over a couple of days.

🧸

Cute Companion

An adorable friend to cherish, handcrafted with love to bring comfort and joy for years to come.

About This Marshmallow Kittie Amigurumi Pattern

This pattern teaches you how to crochet a soft, plush Marshmallow Kittie using velvet-style yarn and simple amigurumi techniques. You will work the head, body, tail and ears in rounds, then embroider the face for a sweet expression. The finished toy measures approximately 35 cm and makes a lovely gift or nursery companion.

Marshmallow Kittie Amigurumi Pattern crochet pattern - detailed view of completed project

Detailed round-by-round instructions and clear photos guide you through shaping and color changes. Perfect for crocheters looking to make a soft, tactile plush with charming embroidered features.

Why You'll Love This Marshmallow Kittie Amigurumi Pattern

I absolutely love this pattern because it combines ultra-soft velvet yarn with simple shaping to create an irresistibly cuddly cat. I designed the facial embroidery to be quick yet expressive, so you get maximum personality with minimal extra work. The pattern balances straightforward rounds with a few color-change moments that keep crocheting fun and interesting. Every time I finish one, I find it hard to give it away because the texture and shape are so comforting.

Marshmallow Kittie Amigurumi Pattern step 1 - construction progress Marshmallow Kittie Amigurumi Pattern step 2 - assembly progress Marshmallow Kittie Amigurumi Pattern step 3 - details and accessories Marshmallow Kittie Amigurumi Pattern step 4 - final assembly and finishing

Switch Things Up

I love to customize this pattern by changing the accent color for the ears and spots; try pastel peach, mint, or lavender for a different mood.

I sometimes swap the Himalaya Velvet for a bulky chenille to make an extra fluffy, oversized version—use a larger hook and expect a much larger finished toy.

I like to embroider different facial expressions: move the eye placement or adjust the length of the mouth embroidery to create sleepy, surprised, or smiling personalities.

I often add tiny crocheted accessories like a bow, scarf, or little blanket to create a themed gift—these small props add a special touch.

For a mini keychain version, I use thinner yarn and a smaller hook to make a palm-sized kittie perfect for bags or gifts.

I sometimes insert a small bell or bean bag pellet into the base to make a weighted plush that sits more stably on shelves.

I recommend trying embroidered freckles or blush with pink paint or makeup powder for a soft, handmade finish that photographs beautifully.

I also experiment with placement of the spots and the tail angle—moving the tail slightly to one side changes the overall silhouette.

If you want posable limbs, you can add a short length of thin wire inside the tail before closing, but test carefully to keep it safe for the intended recipient.

I enjoy making matching sibling kitties by changing yarn colors and sizes—one large and one mini makes a charming set of toys to gift together.

Common Mistakes & How to Fix Them

✗ Skipping a stitch marker during continuous spiral work causes lost stitch counts; place a marker at the start of each round and move it as you go. ✗ Overstuffing the head or body makes shaping uneven and stiff; stuff gradually, using small amounts and shaping with your hands to maintain a smooth silhouette. ✗ Changing color without securing loose ends can create messy joins; carry the yarn neatly or tie and weave tails inside as instructed to hide ends. ✗ Not counting stitches after increases or decreases can throw off shaping quickly; recount after each shaping round to ensure the correct stitch totals. ✗ Pulling decreases too tightly will distort the round shape; work invisible decreases gently and keep tension consistent to maintain a smooth curve.

Marshmallow Kittie Amigurumi Pattern

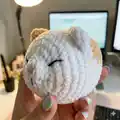
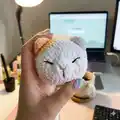
Create a cuddly Marshmallow Kittie with this step-by-step crochet pattern. You will make a soft, rounded cat plush worked in velvet yarn with simple shaping and charming embroidered details. The pattern includes full round-by-round instructions, color change guidance, and clear assembly notes so you can finish a huggable companion you will adore.

Intermediate 5-7 Hours

Materials Needed for Marshmallow Kittie Amigurumi Pattern

— Main Fabric

  • 01
    Himalaya Velvet #90001 - approximately one skein (main white color)
  • 02
    Himalaya Velvet #90033 - approximately a quarter skein (accent/peach color)
  • 03
    Optional semi-cotton yarn (YarnArt Jeans) for embroidery details (small amounts of dark brown and pink)

— Tools Required

  • 01
    Crochet hook 4.00mm or 4.50mm
  • 02
    Polyester stuffing (fiber fill)
  • 03
    Tapestry needle
  • 04
    Scissors
  • 05
    Pins
  • 06
    Stitch marker or a piece of contrast yarn
  • 07
    Pink blush makeup powder or pink acrylic paint for blush (optional)

Progress Tracker

0% Complete

— Head :

Info :

Begin with white yarn. Ch 4, start in second chain from the hook. Working in both sides of a chain (3 first rounds)

Round 1 :

1 inc, 1 sc, 3 sc into the last stitch, continue the other side of the foundation chain: 2sc. (8)

Round 2 :

2 inc, 1 sc, 3 inc, 1 sc, 1 inc. (14)

Round 3 :

14 sc. (14)

Round 4 :

2 sc, 8 inc, 4 sc. (22)

Round 5 :

1 sc, 3 inc, (1 sc, inc) x 6 times, 3 inc, 3 sc. (34)

Round 6 :

1 sc, (1 sc, inc) x 4 times, (2 sc, inc) x 4 times, 2 sc, (inc, 1 sc) x 4 times, 3 sc. (46)

Round 7 :

46 sc. (46)

Round 8 :

white (W) 24 sc, yellow (Y) 5 sc, (W) 13 sc, 2 dec. (44)

Round 9 :

(W) 23 sc, (Y) 8 sc, (W) 6 sc, dec, 5 sc. (43)

Round 10 :

(W) 5 sc, dec, 16 sc, (Y) 9 sc, (W) 11 sc. (42)

Round 11 :

(W) 22 sc, (Y) 9 sc, (W) 11 sc. (42)

Round 12 :

(W) 22 sc, (Y) 9 sc, (W) 5 sc, dec, 4 sc. (41)

Round 13 :

(W) 4 sc, dec, 17 sc, (Y) 7 sc, (W) 11 sc. (40)

Round 14 :

(W) 3 sc, (dec, 6sc) x 2 times, dec, 2 sc, (Y) 4 sc, dec, (W) 6 sc, dec, 3 sc (35) --> cut yellow yarn.

Round 15-16 :

35 sc (2 rounds) (35)

Info :

Stuff the head firmly with fiberfill.

Info :

TIPS: For the nose part, after being crocheted, it will be pretty point. However, we can make it sink by embroidering the nose after stuffed it

Info :

You can use semi-cotton yarn (Yarnart Jeans) for embroider the nose and the eyes: Embroider the nose with dark brown yarn (Rnd 1-2), 2 stitches wide. Embroider the eyes with dark brown yarn between Rnd 4-6, 3 stitches wide, the distance between 2 eyes is 8 sts. Use pink yarn to embroider the interior of the nose.

— Body :

Info :

Continue to crochet the body after finishing Round 16 of the head.

Round 17 :

8 sc, (inc, 4 sc) x 4 times, inc, 6 sc (40)

Round 18 :

7 sc, (inc, 5 sc) x 4 times, inc, 8 sc (45)

Round 19 :

9 sc, (inc, 6 sc) x 4 times, inc, 7 sc (50)

Round 20 :

50 sc. (50)

Round 21 :

12 sc, (inc, 7 sc) x 4 times, inc, 5 sc. (55)

Round 22-23 :

55 sc. (2 rounds) (55)

Round 24 :

5 sc, (8 sc, inc) x 5 times, 5 sc. (60)

Round 25 :

60 sc. (60)

Round 26 :

(W) 28 sc, (Y) 6 sc, (W) 26 sc. (60)

Round 27 :

(W) 26 sc, (Y) 10 sc, (W) 24 sc. (60)

Round 28-30 :

(W) 26 sc, (Y) 11 sc, (W) 23 sc. (3 rounds) (60)

Round 31 :

(W) 27 sc, (Y) 9 sc, (W) 24 sc. (60)

Round 32 :

(W) 28 sc, (Y) 8 sc, (W) 24 sc. (60) --> cut yellow yarn

Round 33-34 :

(W) 60 sc. (2 rounds) (60)

Round 35 :

12 sc, (dec, 6 sc) x 6 times. (54)

Round 36 :

12 sc, (dec, 5 sc) x 6 times. (48)

Round 37 :

10 sc, (dec, 4 sc) x 6 times, 2 sc. (42)

Info :

Start stuffing the body.

Round 38 :

10 sc, (dec, 3 sc) x 6 times, 2 sc. (36)

Round 39 :

(4 sc, dec) x 6 times. (30)

Round 40 :

(3 sc, dec) x 6 times. (24) --> cut white yarn.

Info :

Stuff the body firmly with fiberfill.

— Tail :

Info :

Continue with yellow yarn.

Round 41 :

24 sc. (24)

Round 42 :

(2 sc, dec) x 6 times. (18)

Round 43-47 :

18 sc. (5 rounds) (18)

Round 48 :

2 dec, 10 sc, 2dec. (14)

Round 49 :

dec, 10 sc, dec. (12)

Info :

Stuff the tail firmly with fiberfill.

Round 50 :

dec, 8 sc, dec. (10)

Round 51 :

dec, 6 sc, dec. (8)

Round 52 :

dec, 4 sc, dec. (6)

Info :

Fasten off and leave a long tail. Weave the yarn tail through the front loops of the last round and pull it tight to close the hole. Hide the yarn tail inside the body.

— Ears :

Info :

We need to make two ears, one is yellow and the other is white.

Round 1 :

6 sc into a MR. (6)

Round 2 :

6 inc. (12)

Round 3 :

(1 sc, inc, 1 sc) x 4 times. (16)

Info :

Fasten off and leave a long tail for sewing. Bring the ending yarn to sew the open side of the ear together.

Info :

Sew the ears on the head between Rnd 11-12, the distance between 2 ears is 5 sts.

Assembly Instructions

  • Sew the ears onto the head between rounds 11-12, spacing the two ears 5 stitches apart and use the long tail to close the open side of each ear before securing.
  • Embroider the nose using dark brown yarn over rounds 1-2 (2 stitches wide) and embroider the eyes with dark brown yarn between rounds 4-6 (3 stitches wide), keeping about 8 sts between the eyes.
  • Stuff the head, body and tail firmly but evenly with fiberfill while shaping; stuff gradually through the larger openings and add more where needed for a rounded shape.
  • Attach the tail to the back end of the body after closing the tail base and hide the tail yarn inside the body for a neat finish.
  • Weave in and hide all yarn tails inside the body, and use pins to position parts before sewing to ensure symmetrical placement.

Important Notes

  • 💡Work in a continuous spiral unless otherwise stated; do not join rounds.
  • 💡Use a stitch marker or a piece of yarn to mark the beginning of each round for accurate counting.
  • 💡Proper stuffing is important—stuff gradually, shape as you go, and add fiberfill in small amounts to achieve the desired form.
  • 💡Cut the yellow accent yarn where indicated and weave in ends as you change colors to keep joins tidy.
  • 💡Pin all parts in place before sewing to ensure correct placement and symmetry.

This Marshmallow Kittie pattern is designed to create a soft, huggable companion with a gentle sculpted face and plush velvet texture. It makes a wonderful handmade gift or a cozy addition to a nursery or couch. Follow the clear round-by-round instructions and enjoy creating a cuddly friend that will be loved for years. 🧶🐱✨

You ask,

we answer.

FAQs

What size will the finished piece be?

The finished amigurumi measures approximately 35 cm (~14") when made with the recommended Himalaya Velvet yarn and the suggested hook sizes.

Can I use different yarn weights for this pattern?

Yes, you can change yarn weight, but it will affect final size and texture; adjust your hook size accordingly and expect a different finished measurement.

Do I need prior crochet experience for this pattern?

This pattern is rated intermediate; basic crochet skills such as single crochet, increases, decreases, working in the round and simple embroidery are recommended.

How long does this project typically take to complete?

Most crocheters complete this project in 5-7 hours, though time may vary depending on experience, speed, and how much detail you add during finishing.

How do I finish the tail opening after shaping?

Weave the yarn tail through the front loops of the last round, pull tight to close the hole, and hide the yarn tail inside the body for a neat finish.