🧶 Beautiful ✨ Detailed 💝 Adorable

Magic of Autumn Pine Cone Amigurumi Pattern

Magic of Autumn Pine Cone Amigurumi Pattern
4.0★ Rating
5-7 Hours Time Needed
3.6K Made This
✂️

Intermediate Level

Ideal for those with basic crochet experience, featuring slightly more advanced stitches and techniques to expand your skills.

⏱️

Weekend Treat

Takes 5-7 hours, making it an enjoyable project to finish over a couple of days.

🎁

Tiny Treasure

Small, sweet, and gift-worthy creations that fit perfectly in the palm of your hand with detailed charm.

About This Magic of Autumn Pine Cone Amigurumi Pattern

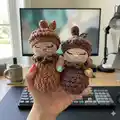
This pattern creates a sweet pine cone amigurumi with textured bobble-stitch body, a cozy hat and a little ruffled collar. It uses cotton yarn and a small 2.5mm hook to achieve tight stitches and fine detail. The instructions include a bobble stitch tutorial and clear round-by-round shaping to guide you.

Magic of Autumn Pine Cone Amigurumi Pattern crochet pattern - detailed view of completed project

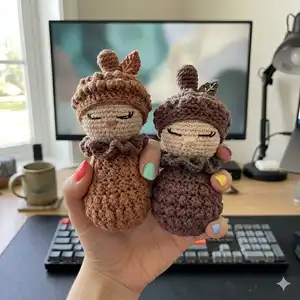
Finished size is about 14 cm when using the recommended yarn and hook. The pattern includes assembly and embroidery notes to bring the character to life.

Why You'll Love This Magic of Autumn Pine Cone Amigurumi Pattern

I absolutely love this pattern because it combines simple amigurumi shaping with the satisfying texture of bobble stitches. I enjoy the way the little hat and collar add personality without complicated sewing. The design is small and quick enough to finish in a weekend, making it perfect for gifts. I also love how embroidery and a tiny leaf let you customize the expression and colors.

Magic of Autumn Pine Cone Amigurumi Pattern step 1 - construction progress Magic of Autumn Pine Cone Amigurumi Pattern step 2 - assembly progress Magic of Autumn Pine Cone Amigurumi Pattern step 3 - details and accessories Magic of Autumn Pine Cone Amigurumi Pattern step 4 - final assembly and finishing

Switch Things Up

I love customizing this pattern by changing colors to match seasons; try pastels for spring or warm browns for autumn.

I sometimes use a slightly thicker yarn and a larger hook to create a chunkier, cuddlier version of the pine cone.

If you want a tiny keychain, use finer yarn and a 1.75–2.0mm hook to scale it down and add a keyring to the hat.

I often replace the embroidered lashes with small safety eyes for a different expression, remembering to use them before stuffing the head.

Try adding a tiny crocheted scarf or a miniature button to the collar for extra character and personalization.

To make the bobble texture more pronounced, repeat one extra loop when making the bobble stitch as described, creating larger bobbles.

I like to experiment with metallic embroidery thread for the leaf veins to add a subtle sparkle to holiday versions.

For a posable version, you can insert a short length of thin wire into the stalk before stuffing to help it stand slightly angled.

Make a matching pair in two complementary colors and display them together as a seasonal set or give them as a thoughtful gift pair.

You can also vary the collar style: make it taller, add a contrasting edging, or use a different stitch to create ruffles or frills for unique looks.

Common Mistakes & How to Fix Them

✗ Skipping the stitch marker when working continuous rounds leads to losing your place; place a marker at the first stitch of each round and move it every round. ✗ Overstuffing the head or body makes shaping uneven and distorts stitches; stuff gradually and adjust firmness as you work to maintain shape. ✗ Pulling bobble stitches too tightly reduces their relief and texture; maintain consistent tension and keep the loops loose enough to form the bobble. ✗ Ignoring back loop instructions will change the texture of the body rows; follow 'Sc in the back loop' notes carefully to get the correct ridge effect. ✗ Not counting stitches after increases or decreases can throw off shaping later on; count at the end of each round especially after inc/dec rounds. ✗ Finishing ends carelessly leaves visible tails on textured stitches; weave in ends neatly and hide tails inside the stuffing when possible.

Magic of Autumn Pine Cone Amigurumi Pattern

Create a tiny, charming pine cone amigurumi inspired by autumn tones. This pattern guides you through bobble stitches and simple shaping to make a 14 cm cuddly decoration. You will learn a textured body, a cosy hat, a ruffled collar and embroidered facial details for a sweet finish. Perfect for gift making and seasonal decor.

Intermediate 5-7 Hours

Materials Needed for Magic of Autumn Pine Cone Amigurumi Pattern

— Main Fabric

  • 01
    Scheepjes Catona n° 404 - 1 x 25 grams (cotton for face/details)
  • 02
    Scheepjes Catona n° 507 - 1 x 50 grams (main brown color)
  • 03
    Scheepjes Catona n° 387 - 1 x 25 grams (green for leaf)
  • 04
    Alternative variation: Scheepjes Stone Washed n° 804 - 1 x 50 grams
  • 05
    Alternative variation: Scheepjes Catona n° 157 - 1 x 50 grams
  • 06
    Alternative variation: Scheepjes Catona n° 504 - 1 x 25 grams
  • 07
    Small amounts of embroidery yarn or cotton for facial details and golden thread for leaf veins

— Tools Required

  • 01
    Crochet hook size 2.5mm
  • 02
    Yarn needle for sewing and weaving ends
  • 03
    Cotton yarn (Scheepjes Catona or similar)
  • 04
    Yarn for embroidering (contrast color and golden thread for leaf)
  • 05
    Fiberfill stuffing
  • 06
    Scissors
  • 07
    Stitch marker(s)

Progress Tracker

0% Complete

— Information :

Info :

Skill level: intermediate. Finished size: about 14cm. Attention, size will change if you use different yarn or hook.

Info :

Materials & tools: Hook 2.5mm; yarn needle; Cotton yarn; Yarn for embroidering; Fiberfill; Scissors; Stitch marker(s).

Info :

Abbreviations: inc: increase (2 sc in one stitch). dec: decrease (from 2 stitches to 1 only). ch: chain. st(s): stitch(es). sc: single crochet. BS: bobble stitch. (...) x Y: repeat instructions in brackets Y times. (...): total amount of stitches in the round/row. R: round or row. Dc: double crochet. Hdc: half double crochet.

— Notes :

Info :

Each part is worked in continuous rounds (do not join rounds with a slip stitch) unless instructed otherwise in the pattern.

Info :

Use a stitch marker to mark the beginning of each round. This will helps you when counting your stitches to compare it with the pattern.

Info :

The color of the round/row will be indicated with a square just before the round/row instructions.

— How to make a bobble stitch :

Info :

Yarn over, insert the hook into stitch, pull up a loop, yarn over and pull through 2 loops only (like the beginning of one double crochet stitch) : we have 2 loops on the hook;

Info :

Yarn over, insert the hook into the same stitch as before, pull up a loop, yarn over and pull through 2 loops only : we have 3 loops on the hook;

Info :

Yarn over, insert the hook into the same stitch as before, pull up a loop, yarn over and pull through 2 loops only : we have 4 loops on the hook;

Info :

Yarn over, insert the hook into the same stitch as before, pull up a loop, yarn over and pull through 2 loops only : we have 5 loops on the hook;

Info :

Yarn over, pull through all 5 loops at once;

Info :

Single crochet in next stitch;

Info :

Repeat the number of times indicated. It is possible to vary the thickness of the bobble stitch. For example, to obtain more relief, we can repeat the work 5 times instead of 4 to have 6 loops on the hook.

— Head :

Round 1 :

6sc in a magic ring (6)

Round 2 :

inc x 6 (12)

Round 3 :

(1sc, inc) x 6 (18)

Round 4 :

(2sc, inc) x 6 (24)

Round 5 :

(3sc, inc) x 6 (30)

Round 6 :

(4sc, inc) x 6 (36)

Round 7 :

(5sc, inc) x 6 (42)

Round 8 :

(6sc, inc) x 6 (48)

Round 9-15 :

Sc in all st [7 rounds] (48)

Round 16 :

(6sc, dec) x 6 (42)

Round 17 :

(5sc, dec) x 6 (36)

Round 18 :

(4sc, dec) x 6 (30)

Round 19 :

(3sc, dec) x 6 (24)

Info :

Fasten off and leaving enough yarn for sewing.

Info :

Stuff firmly.

— Leaf :

Info :

Work with green yarn:

Round 1 :

4sc in a magic ring (4)

Round 2 :

(1sc, inc) x 2 (6)

Round 3 :

(2sc, inc) x 2 (8)

Round 4 :

(3sc, inc) x 2 (10)

Round 5 :

(4sc, inc) x 2 (12)

Round 6-8 :

Sc in all st [3 rounds] (12)

Round 9 :

(2sc, dec) x 3 (9)

Round 10 :

(1sc, dec) x 3 (6)

Info :

Fasten off and leaving enough yarn for sewing. Do not stuff.

— Collar :

Info :

Work in rows with green yarn: Ch27, start in the 2nd ch from the hook.

Row 1 :

26sc, ch2, turn (26)

Row 2 :

3Dc in all st, ch1, turn (78)

Row 3 :

1Hdc in all st (78)

Info :

Fasten off and leaving enough yarn for sewing.

— Body :

Info :

Work with brown yarn:

Round 1 :

6sc in a magic ring (6)

Round 2 :

inc x 6 (12)

Round 3 :

inc x 12 (24)

Round 4 :

(BS, 1sc) x 12 (24)

Round 5 :

(1sc, inc) x 12 (36)

Round 6 :

(BS, 1sc) x 18 (36)

Round 7 :

(2sc, inc) x 12 (48)

Round 8 :

(BS, 1sc) x 24 (48)

Round 9 :

Sc in the back loop of all st (48)

Round 10 :

(BS, 1sc) x 24 (48)

Round 11 :

(2sc, dec) x 12 (36)

Round 12 :

(BS, 1sc) x 18 (36)

Round 13 :

Sc in all st (36)

Round 14 :

(BS, 1sc) x 18 (36)

Round 15 :

(4sc, dec) x 6 (30)

Round 16 :

(BS, 1sc) x 15 (30)

Round 17 :

(3sc, dec) x 6 (24)

Round 18 :

(BS, 1sc) x 12 (24)

Round 19 :

Sc in all st (24)

Info :

Fasten off and hide the yarn. Stuff firmly.

— Stalk :

Info :

Work with brown yarn :

Round 1 :

6sc in a magic ring (6)

Round 2 :

inc x 6 (12)

Round 3 :

(3sc, inc) x 3 (15)

Round 4 :

Sc in the back loop of all st (15)

Round 5 :

Sc in all st (15)

Round 6 :

(3sc, dec) x 3 (12)

Round 7 :

Sc in all st (12)

Round 8 :

(2sc, dec) x 3 (9)

Round 9-11 :

Sc in all st [3 rounds] (9)

Info :

Fasten off and leaving enough yarn for sewing. Stuff firmly.

— Hat :

Info :

Work with brown yarn:

Round 1 :

6sc in a magic ring (6)

Round 2 :

inc x 6 (12)

Round 3 :

inc x 12 (24)

Round 4 :

(BS, 1sc) x 12 (24)

Round 5 :

(1sc, inc) x 12 (36)

Round 6 :

(BS, 1sc) x 18 (36)

Round 7 :

(2sc, inc) x 12 (48)

Round 8 :

(BS, 1sc) x 24 (48)

Round 9 :

(3sc, inc) x 12 (60)

Round 10 :

(BS, 1sc) x 30 (60)

Round 11 :

(3sc, dec) x 12 (48)

Round 12 :

(6sc, dec) x 6 (42)

Round 13 :

(5sc, dec) x 6 (36)

Round 14 :

(4sc, dec) x 6 (30)

Info :

Fasten off and hide the yarn.

— Assembling :

Info :

With golden thread, embroider the veins of the leaf.

Info :

Sew the stalk to the top of the hat.

Info :

Sew the leaf between the stalk and the hat.

Info :

Sew the head and body together.

Info :

Embroider the nose between round 14 and round 15, 3 sts long. Embroider the base of the eyes between round 13 and round 14, 3 sts long. Embroider the lashes one row above.

Info :

You can use blush to color the cheeks. Attach the collar around the neck and put the hat on the head.

Assembly Instructions

  • With golden thread, embroider the veins of the leaf before sewing it to the hat.
  • Sew the stalk to the top center of the hat, then position and sew the leaf between the stalk and hat securely.
  • Sew the head to the body by inserting the neck portion into the opening at the top of the body and whipstitching around for a firm attachment.
  • Embroider the nose between round 14 and round 15 (3 sts long), embroider the base of the eyes between round 13 and round 14 (3 sts long) and place lashes one row above.
  • Attach the collar around the neck, hide all tails inside the collar or body, and place the hat on the head to finish the look.

Important Notes

  • 💡Work each part in continuous rounds and use a stitch marker to mark the beginning of each round for accurate stitch counts.
  • 💡Stuff firmly but evenly as indicated; avoid overstuffing textured bobble sections to preserve stitch definition.
  • 💡Fasten off leaving enough yarn for sewing and hide ends inside the pieces when assembling for a clean finish.

Congratulations on finishing your little pine cone friend — a tiny treasure with autumn charm! This sweet amigurumi is perfect as a thoughtful gift or a cozy seasonal accent for your home. Thank you for supporting small designs and happy crocheting! 🍂🧶

You ask,

we answer.

FAQs

What size will the finished piece be?

The finished amigurumi measures approximately 14 cm tall when using the recommended Scheepjes Catona yarn and a 2.5mm hook.

Can I use different yarn weights for this pattern?

Yes, you can use different yarn weights but the final size and stitch definition will change; choose an appropriate hook size and adjust stuffing accordingly.

Do I need prior crochet experience for this pattern?

This pattern is rated intermediate, so basic knowledge of single crochet, increases, decreases, and working in continuous rounds is recommended.

How long does this project typically take to complete?

Most crocheters complete this project in 5-7 hours, though time may vary based on experience level and how much detailing you add.