🧢 Beautiful ✨ Detailed πŸ’ Adorable

Low Sew Spider Amigurumi Pattern

Low Sew Spider Amigurumi Pattern
4.5β˜… Rating
5-7 Hours Time Needed
3.6K Made This
βœ‚οΈ

Intermediate Level

Ideal for those with basic crochet experience, featuring slightly more advanced stitches and techniques to expand your skills.

⏱️

Weekend Treat

Takes 5-7 hours, making it an enjoyable project to finish over a couple of days.

🧸

Cute Companion

An adorable friend to cherish, handcrafted with love to bring comfort and joy for years to come.

About This Low Sew Spider Amigurumi Pattern

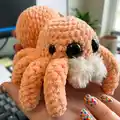
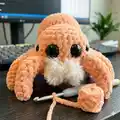
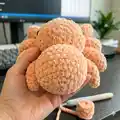
This pattern creates a plush, low-sew spider with eight stuffed legs, a rounded body, and fuzzy accent fangs. It uses plush/chenille yarn for an ultra-soft finished toy and includes clear round-by-round instructions. The low-sew construction reduces finishing time while keeping the piece sturdy and cuddly.

Low Sew Spider Amigurumi Pattern crochet pattern - detailed view of completed project

Perfect for using Parfait Chunky or Sweet Snuggles Lite, the pattern includes exact stitch counts and placement notes. Photos and tips help you attach legs, eyes, and fangs in the right positions for a charming result.

Why You'll Love This Low Sew Spider Amigurumi Pattern

I absolutely love this pattern because it turns simple materials into a characterful, squishy toy that everyone adores. I enjoy how quickly the spider takes shape with continuous rounds and minimal finishing β€” it feels rewarding after just a few hours. The use of plush yarn gives such a cozy, tactile result that is irresistible to hold. I also appreciate the low-sew approach because it reduces the fiddly finishing steps while keeping the piece secure and neat.

Low Sew Spider Amigurumi Pattern step 1 - construction progress Low Sew Spider Amigurumi Pattern step 2 - assembly progress Low Sew Spider Amigurumi Pattern step 3 - details and accessories Low Sew Spider Amigurumi Pattern step 4 - final assembly and finishing

Switch Things Up

I love customizing this pattern with different yarn colors β€” try ombre or two-tone bodies for extra personality.

I sometimes swap in a fuzzy eyelash yarn for the fangs to make them even fluffier and more pronounced.

If you want a larger spider, I use bulkier plush yarn and a bigger hook to scale up without changing any stitch counts.

To make a miniature version for keychains, I use thinner yarn and a smaller hook and reduce stuffing for a compact, portable result.

I like to experiment with eye sizes and positions to change expressions; moving eyes slightly closer or farther apart gives very different looks.

Adding a small wire inside each leg lets me pose them; I bend and wrap the wire before stuffing the leg to keep it secure.

Try adding embroidered spots or stripes on the body to create unique species or colorful patterns for seasonal themes.

I often use safety eyes for sturdiness, but embroidered eyes work great for baby-safe versions to avoid small parts.

For a different texture, I occasionally alternate rows of plush yarn with a smooth cotton to create subtle ridges on the body.

I recommend testing different stuffing levels β€” less stuffing makes a floppy, huggable toy while more stuffing gives structure and stability.

You can create outfits or tiny accessories like a little hat or scarf to make a themed gift set that tells a story.

Finally, I like to add a tiny loop of yarn at the top to hang the spider as an ornament or use it as a playful shelf companion.

Common Mistakes & How to Fix Them

βœ— Skipping stuffing as you go will cause legs and body to become misshapen; stuff the legs and body gradually while crocheting to maintain consistent shape and avoid lumps. βœ— Not securing leg tails properly will make legs come loose during play; stop and secure leg tails with knots and weave ends tightly into the body for durability. βœ— Placing eyes without measuring will lead to uneven facial placement; attach eyes between rows 7-8 above the legs in the 7 stitch space and check symmetry before securing. βœ— Forgetting to use a stitch marker can make you lose track of rounds and miscount stitches; place a stitch marker at the start of each round to ensure accurate stitch counts. βœ— Overstuffing the head or body will distort the finished silhouette and make assembly difficult; stuff firmly but in small amounts, checking the shape as you go. βœ— Closing legs too early or too tightly can prevent the desired pose; if you want floppy poseable legs, close the leg opening with 3 sc, otherwise leave the ends open for stiffer legs.

Low Sew Spider Amigurumi Pattern

Make a cuddly, low-sew plush spider using plush or chenille yarn β€” perfect for gifting or keeping as a quirky home accent. This pattern guides you through each round with clear step-by-step instructions and helpful photos so you can assemble with confidence. You will create a soft-bodied spider with eight stuffed legs, fuzzy fangs, and expressive safety eyes for a whimsical finish. Ideal for crocheters looking for a satisfying small project with minimal sewing.

Intermediate 5-7 Hours

Materials Needed for Low Sew Spider Amigurumi Pattern

β€” Main Fabric

  • 01
    Parfait chunky (main plush yarn) - 75 grams (recommended)
  • 02
    Sweet Snuggles Lite (alternative plush yarn) - use equivalent amount if substituting
  • 03
    Small amount of fuzzy or accent yarn for fangs (minimal quantity)
  • 04
    Polyfil stuffing - enough to firmly stuff head, body, and legs
  • 05
    Safety eyes: 20 mm (pair for main eyes) and 12 mm (pair for smaller outer eyes)

β€” Tools Required

  • 01
    Crochet hook size 5.0 mm (for Parfait chunky)
  • 02
    Crochet hook size 6.0 mm (for Sweet Snuggles Lite, if using)
  • 03
    Polyester stuffing (polyfil)
  • 04
    Darning/yarn needle for sewing and weaving ends
  • 05
    Safety eyes 20mm (2 pcs) and 12mm (2 pcs)
  • 06
    Scissors
  • 07
    Stitch markers (recommended)
  • 08
    Pins for assembly (optional)

Progress Tracker

0% Complete

β€” Supplies :

Info :

Plush yarn of choice. I recommend parfait chunky or sweet snuggles lite. Small amount of fuzzy yarn or accent yarn for fangs. 5 mm hook for parfait. 6 mm hook for sweet snuggles lite. polyfil. darning needle. safety eyes: 20mm & 12mm. scissors.

Infos :

Yarn Usage: Parfait chunky - 75 grams. Finished size: Approximately 8".

β€” Abbreviations :

Info :

mc - magic circle - or you can chain 2 and sc into second chain from hook if your yarn does not allow for a mc. sc - single crochet. inc - increase. dec - decrease. sts - stitches. sl st - slip stitch. () - indicates how many stitches per round. Please note this pattern is written in continuous rounds unless otherwise specified. A stitch marker is recommended.

β€” Legs :

Info :

Legs: Make 8. Be sure to stuff the leg as you go.

Round 1 :

4 sc in mc (4)

Round 2 :

sc, (inc x3) (7)

Round 3-7 :

sc around (7)

Info :

Start Stuffing and continue as you go.

Round 8 :

2 sc, inc, 2 sc, dec (7)

Round 9-10 :

repeat round 8 (7)

Round 11 :

sc around (7)

Round 12 :

2 sc. (5 sts left unworked) sl st, FO

Info :

*Note: if you would like floppy legs that can be easily posed. You can close the legs with 3 sc. This is an option and will make them move more. I like stiffer legs so I leave mine open.

β€” Fangs :

Item Name (P1) :

Make 2 using fuzzy yarn. Leave a yarn tail on both ends because we tie them on later. Chain 5, starting in second chain from hook sc 4.

β€” Head :

Info :

Head: we will be working from the top of the head down.

Round 1 :

9 sc in mc (9)

Round 2 :

inc x 9 (18)

Round 3 :

(2 sc, inc) x 6 (24)

Round 4 :

(3 sc, inc) x 6 (30)

Round 5 :

(4 sc, inc) x 6 (36)

Round 6 :

(5 sc, inc) x 6 (42)

Round 7-8 :

sc around (42)

Info :

The next round we will attach the legs. Refer to the photos to make sure they are attached correctly so when you flip it over they point down.

Round 9 :

3 sc with first leg, go through the front and back sts of the leg then through the body as shown (3 sts per leg). Repeat till you have attached 4 legs, 7 sc (this is the front where the eyes will be placed), 3 sc with leg x4, sc 11. (42)

Round 10 :

sc around (42)

Info :

Stop and secure the leg tails with knots. Attach eyes between row 7-8 above legs in the 7 st space. 3 sts between the center eyes. Smaller outer eyes are placed 2-3 sts back. Some testers liked to place the smaller eyes between rows 6-7.

Round 11 :

(5 sc, dec) x 6. (36)

Info :

Attach the fangs on row 8 below the eyes, 1-2 sts apart. Note they have a natural curve. Place them so they curve into the head. I just slip my yarn tail through and tie a knot on the inside.

Round 12 :

(4 sc, dec) x 6 (30)

Round 13 :

(3 sc, dec) x 6 (24)

Round 14 :

(2 sc, dec) x 6 (18)

Info :

STUFF

Round 15 :

dec x 9 (9)

Info :

sl st, FO close.

β€” Body :

Round 1 :

6 sc in mc (6)

Round 2 :

inc x 6 (12)

Round 3 :

sc around (12)

Round 4 :

(sc, inc) x 6 (18)

Round 5 :

(2 sc, inc) x 6 (24)

Round 6 :

sc around (24)

Round 7 :

(3 sc, inc) x 6 (30)

Round 8 :

(4 sc, inc) x 6 (36)

Round 9 :

(5 sc, inc) x 6 (42)

Round 10-13 :

sc around (42)

Round 14 :

(5 sc, dec) x 6 (36)

Round 15 :

sc around (36)

Round 16 :

(4 sc, dec) x 6 (30)

Round 17 :

sc around (30)

Round 18 :

(3 sc dec) x 6 (24)

Info :

sl st & FO. Leave a long yarn tail for attaching. STUFF

Info :

Attach the body 4 rounds from the center of head and 4 rounds from the bottom of the head. I attach my body right up against the legs.

Assembly Instructions

  • Attach head to body by aligning the body 4 rounds from the center of the head and 4 rounds from the bottom of the head, then whipstitch together using the long yarn tail left on the body.
  • When attaching legs, insert the leg loops into the head body at round 9 as described: 3 sc with leg, go through the front and back sts of the leg then through the body; attach 4 legs, leave 7 sc for the front eye placement, then attach remaining 4 legs.
  • Secure leg tails with knots inside the head after the legs are attached and weave the tails into the interior for a clean finish.
  • Position safety eyes between rows 7-8 above the legs in the 7 stitch space with 3 stitches between the center eyes; smaller outer eyes may be placed 2-3 stitches back or between rows 6-7 according to preference.
  • Attach fangs on row 8 below the eyes, spacing them 1-2 stitches apart; use the yarn tails to slip through and tie a knot on the inside to secure the fuzzy fangs.

Important Notes

  • πŸ’‘Use a stitch marker to keep track of the start of rounds since the pattern is written in continuous rounds.
  • πŸ’‘Stuff legs as you go to achieve evenly shaped, consistent limbs and to avoid large unfillable cavities.
  • πŸ’‘Leave a long yarn tail on the body when fastening off so you can securely sew the body to the head.
  • πŸ’‘Secure leg tails with knots and weave ends into the interior of the head to prevent them from loosening during play.

This low-sew spider is a squishy, lovable project that comes together quickly with plush yarn and minimal finishing. 🧢 The pattern is perfect for gifting or a cozy dΓ©cor piece that adds whimsical charm to any room. πŸ•·οΈ Have fun customizing colors and textures β€” this little spider is sure to spark smiles and handmade joy. ✨

You ask,

we answer.

FAQs

What size will the finished piece be?

The finished amigurumi measures approximately 8" tall when using the recommended Parfait Chunky yarn and hook sizes.

Can I use different yarn weights for this pattern?

Yes, you can substitute yarn weights, but the final size and texture will change; choose an appropriate hook for your yarn and expect adjustments in gauge and stuffing amount.

Do I need prior crochet experience for this pattern?

This pattern is rated intermediate; basic knowledge of single crochet, increases, decreases, magic ring technique, and working in continuous rounds is recommended for best results.

How long does this project typically take to complete?

Most crocheters finish this project in about 5-7 hours, depending on experience and how much time you spend on assembly and finishing.