🧢 Beautiful ✨ Detailed πŸ’ Adorable

Little Spark Amigurumi Pattern

Little Spark Amigurumi Pattern
4.4β˜… Rating
2-3 Hours Time Needed
2.4K Made This
βœ‚οΈ

Beginner Friendly Level

Perfect for those just starting their crochet journey, with clear instructions and simple techniques

⏱️

Bite-Sized Project

Finishes in 2-4 hoursβ€”perfect for an afternoon of creative relaxation.

🎁

Tiny Treasure

Small, sweet, and gift-worthy creations that fit perfectly in the palm of your hand with detailed charm.

About This Little Spark Amigurumi Pattern

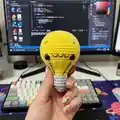
This pattern creates a sweet little lightbulb amigurumi called Little Spark, designed to be cuddly and easy to make. It uses cotton yarn, simple single crochet rounds, and a small screw fitting in contrasting silver. Youll finish with embroidered details for expression and charm.

Little Spark Amigurumi Pattern crochet pattern - detailed view of completed project

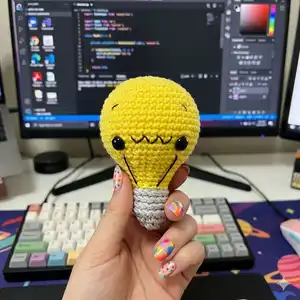
Written in US terminology for beginner crocheters, the pattern includes full round-by-round instructions and clear materials. The finished lightbulb measures approximately 8 cm tall using the recommended yarn and hook.

Why You'll Love This Little Spark Amigurumi Pattern

I absolutely love this pattern because it turns a simple shape into a playful tiny companion that fits in the palm of your hand. I enjoy how quickly it works up β€” you can have a finished Little Spark in an afternoon. The embroidered face gives each bulb personality, and I find stitching those little details very relaxing. Making multiples in different colors is so satisfying and they make lovely handmade gifts.

Little Spark Amigurumi Pattern step 1 - construction progress Little Spark Amigurumi Pattern step 2 - assembly progress Little Spark Amigurumi Pattern step 3 - details and accessories Little Spark Amigurumi Pattern step 4 - final assembly and finishing

Switch Things Up

I love customizing this pattern by changing colors to create different moods β€” try pastel yellow for a soft look or bright neon for a playful feel.

You can make minis by using thinner yarn and a smaller hook for keychains or make larger bulbs by using bulkier yarn and a bigger hook for a plush version.

I often swap the silver screw for bronze or black yarn to give the bulb a vintage or industrial look that suits different decor styles.

Try embroidering different faces: a sleepy expression, a big smile, or closed eyes to change the personality of each bulb.

For a child-safe toy, I recommend embroidering the eyes with black thread instead of using safety eyes.

If you want a weighted base, add a small pouch of poly pellets inside the screw fitting before closing to help the bulb stand upright.

I sometimes add a tiny crocheted hat or bow to turn the bulb into a character for seasonal themes or gift sets.

Experiment with variegated yarn for the bulb body to produce subtle color shifts and a unique textured appearance.

I like to create matching sets in complementary colors and display them as a cheerful collection on a shelf or desk.

Finally, try mixing fibers β€” a cotton body with a slightly fuzzy acrylic accent for the screw can add interesting contrast in texture and appearance.

Common Mistakes & How to Fix Them

βœ— Placing safety eyes too close together can ruin the facial proportions; insert the safety eyes between rounds 16-17 with about 10 stitches visible between them for proper spacing. βœ— Forgetting to stuff as you go results in lumps or an underfilled top; start to add stuffing at the eye placement stage and continue to stuff gradually to maintain a smooth shape. βœ— Not changing to the correct loop (BLO/FLO) for the screw fitting can produce a flat or uneven finish; when instructed join silver yarn to the first grey open front loop of round 26 and work in the front loops only for rounds 26-30. βœ— Using a much larger hook than recommended will make the piece floppy and oversized; use the recommended 2.5mm hook with the 125m/50g cotton yarn for the intended 8 cm size. βœ— Neglecting to weave the yarn tail through the final front loop closure may open the top; break the yarn, pull through and weave the yarn tail through the FLO of the final round to securely close the opening.

Little Spark Amigurumi Pattern

Make a cheerful little lightbulb amigurumi that sparks joy and creativity. This beginner-friendly pattern guides you through simple rounds and a tiny screw fitting to create a cute 8 cm tall plush. Perfect for quick handmade gifts or a fun make to practice basic crochet techniques. Youll love the charming embroidered face and compact size.

Beginner Friendly 2-3 Hours

Materials Needed for Little Spark Amigurumi Pattern

β€” Main Fabric

  • 01
    Cotton yarn 125m/50g (sample uses Paintbox Cotton & Yarn & Color Must Have)
  • 02
    Yellow yarn - approx. 15g (main bulb color)
  • 03
    Silver/grey yarn - approx. <10g (screw fitting)
  • 04
    Small amount of black thread for embroidery (eyebrows, zig zag and lines)

β€” Tools Required

  • 01
    Crochet hook size 2.5mm
  • 02
    Safety eyes 8 mm x 2 (not recommended for young children; can be embroidered instead)
  • 03
    Toy stuffing (polyester fiberfill)
  • 04
    Tapestry needle for construction and embroidery
  • 05
    Stitch marker
  • 06
    Scissors

Progress Tracker

0% Complete

β€” Light Bulb :

Info :

Start in Yellow. Work in the round.

Round 1 :

Sc x 6 in to a MR (6)

Round 2 :

Inc x 6 (12)

Round 3 :

(Sc, inc) x 6 (18)

Round 4 :

(Sc x 2, inc) x 6 (24)

Round 5 :

(Sc x 3, inc) x 6 (30)

Round 6 :

Sc x 2, inc, (Sc x 4, inc) x 5, Sc x 2 (36)

Round 7 :

(Sc x 5, inc) x 6 (42)

Round 8 :

Sc x 3, inc, (Sc x 6, inc) x 5, Sc x 3 (48)

Round 9-17 :

Sc x 48 (48) 9 rounds

Round 18 :

(Sc x 6, dec) x 6 (42)

Round 19 :

(Sc x 5, dec) x 6 (36)

Round 20 :

(Sc x 4, dec) x 6 (30)

Info :

Insert the safety eyes between round 16-17 with a space of 10 stitches visible between them. Start to add stuffing and continue to stuff as you go.

Round 21 :

(Sc x 4, dec) x 5 (25)

Round 22 :

Sc x 25 (25)

Round 23 :

(Sc x 3, dec) x 5 (20)

Round 24 :

Sc x 20 (20)

Round 25 :

(Sc x 2, dec) x 5 (15)

Info :

Change to Silver yarn

Round 26-30 :

BLO, Sc x 15 (15) 5 rounds

Round 31 :

(Sc, dec) x 5 (10)

Round 32 :

dec x 5 (5)

Info :

Break the yarn and pull through. Weave the yarn tail through the FLO of the final round to close.

Info :

With black thread embroider small eyebrows above the eyes over r 11. Embroider a zig zag between the eyes on r 16. Embroider a line from the base of each eye down towards to screw base of the lightbulb (over r 19-25).

β€” Screw Fitting :

Info :

Turn the light bulb upside down, so that the yellow bulb is at the bottom and the grey is at the top. Join Silver yarn to the first grey open front loop of r 26.

Info :

Ss in all open front loops of r 26-30.

Info :

Cut the yarn and pull through. Weave in the loose end.

Info :

Eureka! Your light bulb is complete!!!

Info :

I love seeing your finished work. Please share your makes on social media using #lexinstitches

Assembly Instructions

  • Insert the safety eyes between rounds 16-17 with a space of 10 stitches visible between them and secure the safety backs or embroider instead for child-safe toys.
  • Start adding stuffing when you insert the eyes and continue to stuff gradually as you work downwards to ensure an even, smooth shape.
  • Change to silver yarn for the screw fitting and join to the first grey open front loop of round 26, then work BLO rounds 26-30 to form the screw base.
  • Turn the bulb upside down so the grey screw is on top before joining the silver yarn and working the front loops for the screw fitting.
  • Embroider small eyebrows above round 11, a zig zag between the eyes on round 16, and lines from the base of each eye down over rounds 19-25 to create the face and screw detail.
  • After completing the final rounds cut the yarn, pull through, and weave in all loose ends securely; weave the final tail through the FLO of the last round to close the opening.

Important Notes

  • πŸ’‘Work in continuous rounds unless stated otherwise to maintain an invisible spiral join and tidy stitches.
  • πŸ’‘Safety eyes are not recommended for young children; consider embroidering eyes with black thread for a safer toy.
  • πŸ’‘Use a stitch marker to mark the beginning of rounds so you can track your place and keep counts accurate.
  • πŸ’‘Stuff gradually and evenly as you go to avoid lumps and to control shaping of the bulb.
  • πŸ’‘When changing to the screw fitting join to the first grey open front loop of round 26 and work in FLO/BLO as instructed for correct texture.

This Little Spark lightbulb was designed to brighten your makes and spark creativity in small, joyful projects. Whether you make one or a set, these tiny bulbs are perfect gifts and shelf friends. Share your creations with #lexinstitches and spread a little handmade light! πŸ§ΆπŸ’‘

You ask,

we answer.

FAQs

What size will the finished piece be?

The finished amigurumi measures approximately 8 cm tall when made using the recommended 125m/50g cotton yarn and a 2.5mm hook.

Can I use different yarn weights for this pattern?

Yes, you can use different yarn weights but your finished size will change; use an appropriate hook size and be aware that stitch counts remain the same but dimensions will vary.

Do I need prior crochet experience for this pattern?

This pattern is rated beginner friendly and uses basic single crochet, increases and decreases; some familiarity with working in the round and simple embroidery will help.

How long does this project typically take to complete?

Most crocheters complete this project in 2-3 hours, though time may vary based on experience level and how much time you spend on embroidery and finishing.