🧢 Beautiful ✨ Detailed πŸ’ Adorable

Little Lamp Series Totoro Amigurumi Pattern

Little Lamp Series Totoro Amigurumi Pattern
4.0β˜… Rating
8-10 Hours Time Needed
3.0K Made This
βœ‚οΈ

Intermediate Level

Ideal for those with basic crochet experience, featuring slightly more advanced stitches and techniques to expand your skills.

⏱️

All-Day Adventure

Requires 8-10 hours, ideal for a full day of immersive crocheting.

🧸

Cute Companion

An adorable friend to cherish, handcrafted with love to bring comfort and joy for years to come.

About This Little Lamp Series Totoro Amigurumi Pattern

This pattern creates a tiny Totoro night lamp with a crochet umbrella and a USB LED inside the umbrella for soft warm light. It combines amigurumi techniques with a simple wiring and assembly method so you can make a functional, decorative lamp. The pattern includes step-by-step rounds for every piece plus clear photo guidance for assembly and glazing the umbrella for stiffness.

Little Lamp Series Totoro Amigurumi Pattern crochet pattern - detailed view of completed project

You will crochet the body, arms, ears, belly, eyes, leaf and umbrella, assemble a wooden umbrella pole and insert LED wire. Detailed photos and notes help with shaping and finishing.

Why You'll Love This Little Lamp Series Totoro Amigurumi Pattern

I absolutely love this pattern because it combines sweet amigurumi charm with practical function β€” a cuddly Totoro that also glows. I enjoy the mix of crochet shaping and simple craft assembly; the umbrella detail gives so much personality. I like that the pattern is photo-heavy and shows how to glue and finish the umbrella, which makes the process less intimidating. I hope you find the same joy in making and gifting this little lamp.

Little Lamp Series Totoro Amigurumi Pattern step 1 - construction progress Little Lamp Series Totoro Amigurumi Pattern step 2 - assembly progress Little Lamp Series Totoro Amigurumi Pattern step 3 - details and accessories Little Lamp Series Totoro Amigurumi Pattern step 4 - final assembly and finishing

Switch Things Up

I love how versatile this Totoro pattern is for customization; you can change umbrella color to match your decor or a favorite character palette.

I often make a pastel version by swapping the gray for a soft beige and using light pink for the cheeks to create a nursery-friendly lamp.

I also try different yarn weights; using a bulkier yarn with a larger hook gives a chunky, cuddly version while a sport/light yarn makes a delicate mini version for keychains.

I add embroidered details like tiny flowers on the leaf or buttons on the belly to personalize each Totoro and make them one-of-a-kind.

I sometimes leave out the LED and make the umbrella removable so the Totoro becomes a small toy as well as decorative piece.

I recommend trying felt eyes instead of safety eyes for a soft, baby-safe option; glue the felt securely or sew for extra durability.

I experiment with different umbrella patterns β€” swap the popcorn edging for simple shells to change the silhouette and texture.

I also like to add a tiny corduroy scarf or a miniature crochet prop (book, leaf) to tell a little story with each Totoro I make.

If you want a posable neck or limbs, you can add pipe cleaner or armature wire into the limbs before stuffing, then stitch the ends shut to hide the wire.

Have fun mixing yarn colors, stitches, and tiny accessories β€” I find the small creative touches are what make each amigurumi feel truly special.

Common Mistakes & How to Fix Them

βœ— Skipping stitch markers when marking arm and nose positions leads to misplacement during assembly; use scrap yarn or stitch markers to mark placement points exactly as shown and double-check counts. βœ— Not tightening the magic ring enough causes a loose center and gaps; pull the magic ring fully closed before working the first rounds and weave in the tail to secure the center. βœ— Overstuffing the body makes it difficult to shape and close smoothly; add fiberfill gradually and spread it evenly, stuffing tightly only at the end to keep the body rounded. βœ— Forgetting to leave space for the USB cable means you may need to undo rounds later; plan and crochet the cable exit as instructed (row 15) and insert the wire early so you can build around it. βœ— Using too large a hook for the umbrella or leaf will create large holes and a weak shape; follow the recommended 3.0mm hook and if using a different yarn adjust tension accordingly.

Little Lamp Series Totoro Amigurumi Pattern

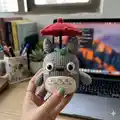
Make a charming Totoro lamp amigurumi with a built-in umbrella and USB LED lights. This pattern guides you step-by-step through crochet pieces, assembly, and wiring so you can create a functional, adorable bedside lamp. Perfect as a thoughtful handmade gift or a cozy nightlight for your home. Follow the detailed photos and instructions to bring this tiny Totoro to life.

Intermediate 8-10 Hours

Materials Needed for Little Lamp Series Totoro Amigurumi Pattern

β€” Main Fabric

  • 01
    Gray yarn (Fine/Sport weight, thickness 2.2 mm) approx 40 g
  • 02
    Red yarn (for umbrella) approx 10 g
  • 03
    Green yarn (leaf) approx 2 g
  • 04
    Pink yarn (cheeks) approx 2 g
  • 05
    Black yarn approx 2 g
  • 06
    White yarn approx 10 g for belly and eyes
  • 07
    USB LED warm white string lights, length 2-5 meters
  • 08
    Any cloth for weight bag approx 65x130 mm
  • 09
    Sand or coins to fill weight bag

β€” Tools Required

  • 01
    Crochet hook size 3.0 mm
  • 02
    Safety eyes for toys 12 mm (2 pieces)
  • 03
    Fiberfill (ball polyester recommended)
  • 04
    Sewing equipment and yarn needle
  • 05
    Felt cloth or cardboard (to keep foundation smooth)
  • 06
    Scissors
  • 07
    UHU glue (or liquid/latex/white glue) for attaching parts and umbrella interior
  • 08
    Wooden stick, BBQ stick or 1 chopstick length about 180 mm, thickness about 0.8-1.0 mm (umbrella pole)
  • 09
    Cloth to make weight bag size about 65x130 mm
  • 10
    Sand or coins for weight bag
  • 11
    Pins for assembly
  • 12
    Stitch markers
  • 13
    USB LED string lights (battery option available)
  • 14
    Small bottle or weight for base while gluing

Progress Tracker

0% Complete

β€” Umbrella :

Row 1-3 :

8 sc. (Magic ring) (8)

Row 4 :

[sc, inc]*4 times. (12)

Row 5 :

[sc, inc]*6 times. (18)

Row 6 :

[2sc, inc]*6 times. (24)

Row 7 :

[3sc, inc]*6 times. (30)

Row 8 :

[4sc, inc]*6 times. (36)

Row 9 :

[5sc, inc]*6 times. (42)

Row 10 :

[6sc, inc]*6 times. (48)

Row 11 :

[7sc, inc]*6 times. (54)

Row 12 :

[8sc, inc]*6 times. (60)

Row 13 :

[9sc, inc]*6 times. (66)

Row 14 :

66 sc. (66)

Row 15 :

[10sc, inc]*6 times. (72)

Row 16 :

[11sc, 1ch, 3dc popcorn, 1ch]*6 times, slst with first stitch to close. (72)

Info :

Fasten off, hide yarn end. To decorate more (Optional) Pic 1-8. Paint the inside with latex/liquid/white glue and let dry 4-5 hours to strengthen and keep shape.

β€” Body :

Round 1 :

6 sc. (Magic ring) (6)

Round 2 :

6 inc. (12)

Round 3 :

[sc, inc]*6 times. (18)

Round 4 :

[2sc, inc]*6 times. (24)

Round 5 :

[3sc, inc]*6 times. (30)

Round 6 :

[4sc, inc]*6 times. (36)

Round 7 :

[5sc, inc]*6 times. (42)

Round 8 :

[6sc, inc]*6 times. (48)

Round 9 :

[7sc, inc]*6 times. (54)

Round 10 :

[8sc, inc]*6 times. (60)

Round 11-12 :

60 sc. (60)

Info :

Pause work, and attach the inner side with a floor. Installing the inner floor makes the base smooth suitable for placing and not easy to lose shape. Then continue to crochet, page 6.

Round 13-14 :

60 sc. (60)

Round 15 :

Crochet to cover the cable so that the USB end comes out of the workpiece (pic 6-7). 60 sc. On the side of the bulb, use a wire to wrap it in a spiral and put it inside the workpiece. (60)

Round 16-21 :

60 sc. (6 rnds) (60)

Round 22 :

*Mark1, For sewing Arms. Use scrap yarn to mark this point. 12 sc, Mark1, 6 sc, Mark1, 24 sc, Mark1, 6 sc, Mark1, 12 sc. (60)

Round 23-25 :

60 sc. (3 rnds) (60)

Round 26 :

*Mark2, For making the nose. 28 sc, Mark2, 4 sc, Mark2, 28 sc. (60)

Round 27-29 :

60 sc. (3 rnds) (60)

Round 30 :

4 sc, dec, [8 sc, dec]*5 times, 4 sc. (54)

Round 31 :

54 sc. (54)

Round 32 :

[dec, 7 sc]*6 times. (48)

Round 33 :

48 sc. (48)

Info :

Take the end of the wires to the outside, put the weight bag on the bottom, center the wires. Fill the fiberfill "tightly" until almost full: see next page.

Round 34 :

3 sc, dec, [6 sc, dec]*5 times, 3 sc. (42)

Round 35 :

[dec, 5 sc]*6 times. (36)

Round 36 :

2 sc, dec, [4 sc, dec]*5 times, 2 sc. (30)

Round 37 :

[dec, 3 sc]*6 times. (24)

Round 38 :

[dec, 2 sc]*6 times. (18)

Round 39 :

9 dec. (9)

Info :

Add fiberfill to make it "tight" until the workpiece is fully inflated so that when you press it it won't collapse easily. Fasten off, hide yarn end.

β€” Arms :

Row 1 :

6 sc. (Magic ring) (6)

Row 2 :

6 inc. (12)

Row 3 :

[sc, inc]*6 times. (18)

Row 4-7 :

18 sc. (4 rnds) (18)

Row 8 :

[4 sc, dec]*3 times. (15)

Row 9 :

15 sc. (15)

Row 10 :

[3 sc, dec]*3 times. (12)

Row 11 :

12 sc. (12)

Info :

Fasten off, leave a yarn for sewing. Add fiberfill up to the 7th-8th row, not too full. Squeeze the top ends together and sew them closed. Pic 1-4.

β€” Ears :

Row 1 :

6 sc. (Magic ring) (6)

Row 2 :

[sc, inc]*3 times. (9)

Row 3 :

9 sc. (9)

Row 4 :

[2 sc, inc]*3 times. (12)

Row 5 :

12 sc. (12)

Row 6 :

[3 sc, inc]*3 times. (15)

Row 7 :

[4 sc, inc]*3 times. (18)

Row 8 :

18 sc. (18)

Row 9 :

9 dec. (9)

Row 10 :

9 sc. (9)

Row 11 :

5 sc. (Crochet half round from row 10.) slst to close and fasten off, leave a yarn for sewing. Fill it up with fiberfill.

β€” Eyes :

Row 1 :

MR, 2 sc, 2 hdc, 5 dc, 2 hdc, 2 sc, slst with first stitch to close the round. (13)

Info :

Before pulling the closure, insert the plastic eye in the center as picture 1-2. Fasten off, hide yarn end. Use glue to assemble will make the edges look more beautiful. If you want to use the sewing method leave some yarn for sewing.

β€” Belly :

Row 1 :

Begin 12 chains for foundation. 1 ch, 26 sc. (Around 12 chains) (26)

Row 2 :

inc, 10 sc, 3 inc, 10 sc, 2 inc. (32)

Row 3 :

3 sc in same stitch, 12 sc, 3 sc in same stitch, 3 sc, inc, 2 sc, inc, 4 sc, inc, 2 sc, inc, 3 sc. (40)

Row 4 :

sc, 3 sc in same stitch, 14 sc, 3 sc in same stitch, 6 sc, inc, 4 sc, 2 inc, 4 sc, inc, 5 sc. (48)

Row 5 :

48 sc, slst with first stitch to close the round. Fasten off, hide yarn end. Use glue to assemble will make the edges look more beautiful. If you want to use the sewing method leave some yarn for sewing.

β€” Pink Cheeks :

Row 1 :

Begin 3 chains for foundation. 1 ch, 3 sc. (On 3 chains) (3)

Info :

Pink Cheeks will use glue, if you don't want the pink cheeks you can embroider whiskers instead using black yarn after finishing other parts.

β€” Leaf :

Row 1 :

Crochet 8 ch into a circle (foundation). Crochet to cover the foundation 6 sc, 6 ch (use 1 size larger hook to make next row easier or make chain larger than usual). Crochet with the 2nd loop from the hook 5 sc. Crochet to cover the foundation 6 sc, slst with first stitch to close. (22)

Row 2 :

2 ch, dc in same stitch, 2 inc, 2 dc, inc, 2 dc, hdc, 2 sc. 2 ch, crochet on the other side. 2 sc, hdc, 2 dc, inc, 2 dc, inc, dc, inc, slst with first stitch to close the round. Fasten off, hide yarn end. (28)

β€” Assemble the umbrella :

Info :

At the top, use scissors or sharp pencil to gently part the fiberfill down to the bottom in a straight line. Stick the wooden stick to the bottom as pic 2-3. Mark the edge with a pen, pull the stick out. Remaining length at the top should be approximately 80-90 mm; if too long, cut it off. You can use a nail file to sharpen the tip.

Info :

Measure the wires so that the first light from the USB end is at the end of the stick. Apply glue from the end of the wood slightly past the mark and attach the wires to the wood. Wait until it dries about 5 minutes. Use black yarn length about 3 feet+, press one end of the yarn thread against the stick and wrap. Apply glue in a line and press. Wrap yarn at the long end and tie the stick down until it passes the mark. Apply glue periodically until finish and cut off ends. "Umbrella Pole" Done.

Info :

Put the stick back into the head and gently pull the USB cable out the back until it stops. Attach the leaf to the umbrella pole by gently running the wire through the hole from the bottom. Apply glue all around the base of the umbrella pole and bring the leaf down as shown. Wait until completely dry. The leaf will help cover the top hole and UHU glue will help hold the leaf to the head.

β€” Body decoration and assembly :

Info :

Use UHU glue to attach parts, as it dries quickly. After attaching parts, use pin needles or hand to press down for 3-5 minutes to allow glue to set. You can also use the sewing method. Count from the nose down 3 rows and align left and right for eye and belly placement. Embroider whiskers or attach pink cheeks as shown in pictures.

β€” Tail (Optional) :

Row 1 :

12 sc. (Magic ring) (12) Before pulling the closure, insert the USB power cable in the center as picture 2-4.

Row 2 :

[3 sc, inc]*3 times. (15)

Row 3-5 :

15 sc. (15)

Row 6 :

[3 sc, dec]*3 times. (12)

Row 7 :

12 sc. (12)

Row 8 :

[2 sc, dec]*3 times. (9)

Row 9 :

9 sc. (9)

Info :

Fasten off, leave a long end for sewing. Slightly fill with fiberfill, sew to the body. Picture 5-6. Done.

Assembly Instructions

  • Attach the inner floor (felt or cardboard) to the inside of the body at about row 9 using UHU glue, allow to dry and then insert a small bottle or weight before finishing the bottom.
  • Sew the arms to the body at Mark1 points using the yarn tails; align markers and sew firmly so arms sit evenly on both sides.
  • Sew the ears to the head at the marked points (Mark1 area) forming a slight oblique base so they lean as pictured; use pins to position before sewing or use glue for a clean edge.
  • Glue or sew the white eye rounds and insert 12 mm safety eyes before pulling closure; use glue to secure edges for a neat finish.
  • Attach the umbrella pole through the top opening, feed the USB cable out the back, secure the pole with glue and wrap yarn around the stick to finish the pole, then glue the leaf onto the base to hide the hole.
  • Place the weight bag into the bottom, center the wires and fill the body with fiberfill tightly before closing the final rounds to keep the body firm and stable.

Important Notes

  • πŸ’‘Use stitch markers to mark placement points (Mark1, Mark2) and the arm/nose positions to ensure accurate assembly.
  • πŸ’‘Paint the inside of the umbrella with latex or white glue and let it dry completely (4-5 hours) so it keeps its shape and becomes stronger.
  • πŸ’‘Insert the USB cable early (row 15) and crochet around it so the cable exit is neat and you don't have to rip back to create space.

This Totoro lamp amigurumi brings warmth and whimsy to any room with soft LED light and handcrafted detail. Make one for a cozy nightlight or a thoughtful gift that sparks smiles every time you turn it on. Follow the step-by-step photos and tips to assemble the umbrella pole and wiring safely for a charming finished piece. 🧢✨

You ask,

we answer.

FAQs

What size will the finished piece be?

The finished amigurumi measures approximately 15-20 cm tall depending on yarn tension and the size of the umbrella pole; using the recommended yarn and 3.0 mm hook will give results similar to the photos.

Can I use different yarn weights for this pattern?

Yes, you can use different yarn weights, but this will affect the final size; adjust your hook accordingly and expect to change quantities and the fit of safety eyes and the umbrella base.

Do I need prior crochet experience for this pattern?

This pattern is rated intermediate; basic amigurumi skills (magic ring, inc/dec, working in rounds) and some sewing/finishing experience are recommended.

How long does this project typically take to complete?

Most crocheters complete this project in 8-10 hours, though time may vary based on experience level and how long you spend on assembly and glue-drying steps.