🧢 Beautiful ✨ Detailed πŸ’ Adorable

Little Chick Amigurumi Pattern

Little Chick Amigurumi Pattern
4.7β˜… Rating
5-7 Hours Time Needed
3.8K Made This
βœ‚οΈ

Intermediate Level

Ideal for those with basic crochet experience, featuring slightly more advanced stitches and techniques to expand your skills.

⏱️

Weekend Treat

Takes 5-7 hours, making it an enjoyable project to finish over a couple of days.

🧸

Cute Companion

An adorable friend to cherish, handcrafted with love to bring comfort and joy for years to come.

About This Little Chick Amigurumi Pattern

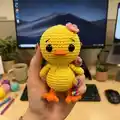
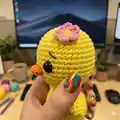
This pattern creates a charming little crocheted chick with a round head, plump body, tiny wings, beak and decorative flower on its head. You will work mostly in single crochet in the round and shape the piece with increases and decreases. The finished toy is cuddly and perfect for gifting or decorating a nursery. Clear photos and step-by-step rounds help guide you through the assembly.

Little Chick Amigurumi Pattern crochet pattern - detailed view of completed project

Includes full materials list, US abbreviations, and all rounds written out so you won’t miss a stitch. Suitable for crocheters who are comfortable with amigurumi basics and want a satisfying weekend project.

Why You'll Love This Little Chick Amigurumi Pattern

I absolutely love this pattern because it captures a sweet personality with very simple shapes and a tiny floral accent that makes it special. I enjoy how quickly the chick takes shape β€” the head and body are worked seamlessly which feels so satisfying when stuffing and shaping. I also love that the design is versatile; you can change colors or make a whole family of chicks. It brings me joy seeing the finished toy sitting on a shelf, and I hope you feel the same pride while making it.

Little Chick Amigurumi Pattern step 1 - construction progress Little Chick Amigurumi Pattern step 2 - assembly progress Little Chick Amigurumi Pattern step 3 - details and accessories Little Chick Amigurumi Pattern step 4 - final assembly and finishing

Switch Things Up

I love to customize this chick by changing the main color to pastels for a softer baby gift look.

I sometimes switch the beak and feet color to a brighter orange or coral for extra contrast and personality.

I often make the pattern smaller by using thinner yarn and a 2.0 mm hook to create keychain-size chicks.

I also try bulkier yarn and a larger hook to make a cuddly, chunky version that is great for toddlers.

I add embroidered eyelashes or freckles for a different facial expression and a touch of charm.

I like to make seasonal accessories like tiny scarves or hats to turn the chick into a holiday decoration.

I sometimes substitute safety eyes with embroidered eyes for a softer, child-friendly finish.

I experiment with different flower styles and colors β€” try felt flowers or crocheted tiny bows instead.

I recommend trying variegated yarn for a playful textured look that keeps the stitchwork interesting.

I also braid small yarn strands into a top tuft or use contrasting yarn to outline the wings for more definition.

Common Mistakes & How to Fix Them

βœ— Skipping stitch markers during rounds can lead to losing your starting point; place a marker at the beginning of each round to stay accurate. βœ— Not stuffing gradually causes lumps and uneven shape; stuff little by little and shape as you go for a smooth finish. βœ— Forgetting to leave long thread ends for sewing parts makes assembly harder; always leave a long tail when you fasten off to sew pieces securely. βœ— Placing safety eyes too late or in the wrong round will misposition the face; attach safety eyes between rounds 17-18 with 8 stitches between them as instructed. βœ— Pulling yarn too tight while working increases or decreases changes the gauge; keep a consistent, relaxed tension so shapes match the pattern.

Little Chick Amigurumi Pattern

Make a sweet little chick amigurumi with this friendly crochet pattern. You'll create a rounded head and body, tiny wings, a cute beak and floral detail β€” perfect for gifts or nursery decor. The pattern includes clear round-by-round instructions and step-by-step photos to guide you. Grab your yarn and 2.5 mm hook and enjoy a cozy crochet session.

Intermediate 5-7 Hours

Materials Needed for Little Chick Amigurumi Pattern

β€” Main Fabric

  • 01
    Yarn - Main Color: Yellow (as pictured)
  • 02
    A Color: Orange (for beak and feet)
  • 03
    B Color: Pink (for flower)
  • 04
    C Color: Lilac (optional detail)
  • 05
    Recommended hook: 2.5 mm or a size that fits your yarn

β€” Tools Required

  • 01
    Crochet hook size 2.5 mm (or a size that fits your yarn)
  • 02
    Scissors
  • 03
    Polyester stuffing
  • 04
    Tapestry needle for sewing
  • 05
    Stitch marker
  • 06
    Pins for assembly
  • 07
    Safety eyes (place between rnd 17-18)
  • 08
    Yarn needle

Progress Tracker

0% Complete

β€” Head & Body :

Round 1-6 :

sc in a mr

Round 2-6 :

sc inc(12)

Round 3 :

(6 times)1 sc into sc next inc(18)

Round 4 :

(6 times)2 sc into sc next inc(24)

Round 5 :

(6 times)3 sc into sc next inc(30)

Round 6 :

(6 times)4 sc into sc next inc(36)

Round 7 :

(6 times)5 sc into sc next inc(42)

Round 8 :

(6 times)6 sc into sc next inc(48)

Round 9 :

(6 times)7 sc into sc next inc(54)

Round 10-19 :

(10 ring)sc into sc(54)

Info :

Place the safe eyes between rnd 17-18. There should be 8 sc in between.

Round 20 :

18 sc into sc(18 sc inc)18 sc into sc(72)

Round 21-26 :

(6 ring)sc into sc(72)

Round 27 :

18 sc into sc(18 sc dec)18 sc into sc(54)

Round 28 :

(6 times)7 sc into sc next dec(48)

Round 29 :

(6 times)6 sc into sc next dec(42)

Round 30 :

(6 times)5 sc into sc next dec(36)

Round 31 :

(6 times)4 sc into sc next dec(30)

Info :

Stuff the head tightly. keep filling as you go.

Round 32 :

(6 times)3 sc into sc next dec(24)

Round 33 :

(6 times)2 sc into sc next dec(18)

Round 34-35 :

(2 ring)sc into sc(18)

Round 35 :

(6 times)2 sc into sc next inc(24)

Round 36 :

(6 times)3 sc into sc next inc(30)

Round 37 :

(6 times)4 sc into sc next inc(36)

Round 38 :

(6 times)5 sc into sc next inc(42)

Round 39 :

(6 times)6 sc into sc next inc(48)

Round 40-51 :

(12 ring)sc into sc(48)

Round 52 :

(6 times)6 sc into sc next dec(42)

Round 53 :

(6 times)5 sc into sc next dec(36)

Round 54 :

(6 times)4 sc into sc next dec(30)

Round 55 :

(6 times)3 sc into sc next dec(24)

Info :

Stuff the body tightly. keep filling as you go.

Round 56 :

(6 times)2 sc into sc next dec(18)

Round 57 :

(6 times)1 sc into sc next dec(12)

Round 58 :

6 sc dec fo.clean the end of the thread.

β€” Beak :

Info :

A COLOR

Round 1-6 :

sc in a mr

Round 2 :

sc into sc(6)

Round 3 :

2 sc inc(8)

Round 4-5 :

(2 ring)sc into sc(8)fo.Leave a long thread end to sew.

β€” Wings :

Info :

MAIN COLOR - MAKE 2

Round 1-6 :

sc in a mr

Round 2 :

2 sc inc(8)

Round 3 :

sc into sc(8)

Round 4 :

2 sc inc(10)

Round 5 :

sc into sc(10)

Round 6 :

2 sc inc(12)

Round 7 :

2 sc inc(14)

Round 8 :

2 sc inc(16)

Round 9 :

2 sc inc(18)

Round 10 :

2 sc inc(20)

Round 11-13 :

(3 ring)sc into sc(20)

Round 14 :

2 sc dec(18)

Round 15 :

2 sc dec(16)

Round 16 :

2 sc dec(14)

Round 17 :

Straighten it. sink the needle into both layers. 7 sc fo.

Info :

Leave a long thread end to sew.

β€” Feet - Nails :

Info :

MAKE 2 A COLOR

Info :

NAILS - MAKE 3

Round 1-6 :

sc in a mr

Round 2-4 :

(3 ring)sc into sc(6)

Round 5 :

Birleştirin sc into sc(18)

Round 6-8 :

(3 ring)sc into sc(18)

Round 9 :

Straighten it. sink the needle into both layers. 8 sc fo.

Info :

Leave a long thread end to sew.

β€” Flower :

Info :

B COLOR

Round 1 :

17 ch.turn

Round 2 :

(8 times)1 ch into sc 1 ch into 4 cr fo.Leave a long thread end to sew.

Assembly Instructions

  • Place the safety eyes between rounds 17-18 of the head with 8 single crochet stitches between them and secure the washers behind the eyes.
  • Sew the beak to the center of the face between the eyes using the long thread end left when fastening off, then weave in the tail.
  • Pin and sew the wings to the sides of the body at the seam where head and body meet so they sit slightly angled, using the long tails to secure.
  • Attach the feet to the bottom of the body spaced evenly so the chick can stand, using pins to position then sew firmly.
  • Sew the flower onto the top of the head using the long thread end and add small yarn loops for the top tuft before fastening off.

Important Notes

  • πŸ’‘Use a 2.5 mm hook or size that matches your yarn for the correct gauge and shape.
  • πŸ’‘Place safety eyes between rounds 17-18 with eight stitches between them before closing the head.
  • πŸ’‘Stuff the head and body gradually and keep filling as you go to achieve smooth shaping.
  • πŸ’‘Leave long thread ends at fasten off points for easy sewing of small parts like beak, wings and flower.

This little chick is a charming weekend project that makes a sweet handmade gift or nursery friend. The pattern walks you through every round and includes helpful photos to guide assembly and placement. Make a flock of chicks in different colors or add seasonal accessories for a playful collection. 🧢🌸

You ask,

we answer.

FAQs

What size will the finished piece be?

The finished amigurumi measures around 20 cm in circumference and about 10 cm in length when using the recommended yarn and 2.5 mm hook.

Can I use different yarn weights for this pattern?

Yes, you can use different yarn weights but the final size will change; choose an appropriate hook size and expect a larger or smaller chick accordingly.

Do I need prior crochet experience for this pattern?

This pattern is rated intermediate because it includes shaping, small parts and assembly; basic knowledge of single crochet, increases and decreases is recommended.

How long does this project typically take to complete?

Most crocheters complete this project in about 5-7 hours, depending on experience and how quickly you assemble and sew the parts.