🧢 Beautiful ✨ Detailed πŸ’ Adorable

Lemon gnome Amigurumi Pattern

Lemon gnome Amigurumi Pattern
4.1β˜… Rating
5-7 Hours Time Needed
3.4K Made This
βœ‚οΈ

Intermediate Level

Ideal for those with basic crochet experience, featuring slightly more advanced stitches and techniques to expand your skills.

⏱️

Weekend Treat

Takes 5-7 hours, making it an enjoyable project to finish over a couple of days.

🧸

Cute Companion

An adorable friend to cherish, handcrafted with love to bring comfort and joy for years to come.

About This Lemon gnome Amigurumi Pattern

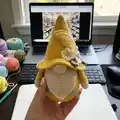
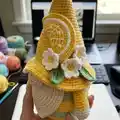
This pattern creates a sweet lemon-inspired gnome complete with a pointed hat, beard, tiny hands, lemon slices and floral accents. You will work mostly in rounds using single crochet and basic increases and decreases. Color changes and assembly steps are included so the final piece matches the photos.

Lemon gnome Amigurumi Pattern crochet pattern - detailed view of completed project

Suitable for crafters who can work in the round and follow crochet abbreviations. The pattern includes diagrams for flowers and leaves and full assembly instructions.

Why You'll Love This Lemon gnome Amigurumi Pattern

I absolutely love this pattern because it combines classic amigurumi shaping with a fresh, summery lemon theme that always brings a smile. I enjoy the simple color changes that create striped details and the small embellishments β€” lemon slices and flowers β€” that make the gnome unique. Sewing the hat and placing the little decorations is my favorite finishing step; it transforms the project into a keepsake. This pattern allowed me to experiment with compact applique pieces, which I find relaxing and creatively satisfying.

Lemon gnome Amigurumi Pattern step 1 - construction progress Lemon gnome Amigurumi Pattern step 2 - assembly progress Lemon gnome Amigurumi Pattern step 3 - details and accessories Lemon gnome Amigurumi Pattern step 4 - final assembly and finishing

Switch Things Up

I love how easy it is to customize this gnome β€” start by switching the yellow to any color you like for a new theme.

If you want a larger gnome, try a thicker cotton or DK yarn and increase the hook size; this will give you a chunkier, more cuddly version.

For a mini keychain version, use thinner thread and a smaller hook to make a tiny, portable gnome that fits on a bag.

I often change the stripe sequence on the body to create different personalities β€” alternate more green or add a third accent color for variety.

Try embroidered faces or felt cutouts for eyes and mouth instead of sculpted features; that can change the look from whimsical to more character-driven.

To make the hat floppier, leave out some increases near the brim or use a softer yarn; to make it stiffer, use a tighter tension or add a small internal wire.

You can swap the cotton yarn for acrylic for a softer, more forgiving texture and a wider color range if you prefer an easier-care toy.

Embellish with tiny beads or buttons in the flower centers for a different sparkling detail, or use metallic thread for stitching the lemon segment lines.

If you like seasonal decor, change the leaves and flowers to autumn tones and small pumpkins instead of lemons for a fall gnome.

I also enjoy creating matching sets β€” make several gnomes in complementary colors and arrange them as a cheerful display.

Common Mistakes & How to Fix Them

βœ— Skipping the back loop-only instruction on the specified row will change the texture and fit of the body; always crochet the indicated row into the back loop only to maintain the intended shape. βœ— Forgetting to place a plastic or paper circle at the base will make the toy unstable and misshapen; cut a circle to the diameter of the gnome bottom and insert it before filling. βœ— Not stuffing as you go can create lumps or uneven shaping; add polyester filling gradually and shape with your fingers to keep the silhouette smooth. βœ— Changing colors without weaving ends securely will lead to loose tails and unraveling; carry yarn neatly or weave in ends and secure color changes firmly.

Lemon gnome Amigurumi Pattern

Make this charming lemon-themed gnome to brighten your home or give as a handmade gift. The pattern includes full, step-by-step instructions for body, hat, beard, nose, hands and cute lemon slices and flowers. Designed with clear rounds and color-change notes so you can recreate the cheerful details exactly.

Intermediate 5-7 Hours

Materials Needed for Lemon gnome Amigurumi Pattern

β€” Main Fabric

  • 01
    YarnArt Begonia (100% cotton), 169 m / 50 g (185 yds / 1.76 oz) - main yarn type
  • 02
    Yellow (main color) - approx. 50 g (one skein) for body, hat and lemon slices
  • 03
    Green (stripe and leaves) - approx. 25 g for stripes and leaves
  • 04
    Beige (skin tone) - approx. 20-25 g for hands and nose
  • 05
    Light beige (beard) - approx. 25 g
  • 06
    White - small amount (10 g) for flower petals and lemon slice detail

β€” Tools Required

  • 01
    Crochet hook size 1.75 mm (US 4)
  • 02
    Sewing needle for finishing and sewing parts
  • 03
    Scissors
  • 04
    Stitch markers
  • 05
    Polyester stuffing (holofiber)
  • 06
    Plastic or paper circle for the bottom
  • 07
    Pins for positioning parts while assembling
  • 08
    Yarn needle for weaving in ends

Progress Tracker

0% Complete

β€” Materials :

Info :

Yarn: YarnArt Begonia (100 % cotton, 169 m/50 g= 185 yds /1.76 oz ). Hook size: 1.75 mm ( US 4 ). Sewing needle and scissors. Stitch marker. Poly fiber fill. Plastic or paper circle.

β€” Difficulty :

Info :

DIFFICULTY LEVEL: Intermediate. These crochet patterns do not contain crochet lessons. You need to have basic crochet skills to finish the pattern. If you have any trouble following the pattern, feel free to contact the designer.

β€” Size information :

Info :

If you use the same yarn, hook the toy will be about 13 cm = 5.1 inches tall. You can make it bigger or smaller using another type of yarn but, please, adapt the crochet hook accordingly.

β€” Notes :

Infos :

Fasten off your work always with needle join and you will get a neat result. Stuff your amigurumi as you go. Use a stitch marker or a piece of yarn to mark the beginning of a round.

β€” Abbreviations :

Infos :

R = row. MR = magic ring. ch = chain. sc = single crochet. sl st = slip stitch. dc = double crochet. Inc = increase (2 sc into one loop). HDC = half double crochet. tr, trc = treble crochet. Dec = decrease (2 sc together). (12) = number of stitches you should have at the end of the round/row. (...) x 6 = repeat whatever is between the brackets the number of times stated.

β€” Body :

Round 1 :

6 sc in MR (6)

Round 2 :

( inc ) x 6 (12)

Round 3 :

( 1 sc, inc ) x 6 (18)

Round 4 :

( 2 sc, inc ) x 6 (24)

Round 5 :

( 3 sc, inc ) x 6 (30)

Round 6 :

( 4 sc, inc ) x 6 (36)

Round 7 :

( 5 sc, inc ) x 6 (42)

Round 8 :

( 6 sc, inc ) x 6 (48)

Round 9 :

( 7 sc, inc ) x 6 (54)

Round 10 :

54 sc ( 1 row) - crochet this row for the back wall of the loops !!!!!

Round 11 :

54 sc ( 1 row)

Round 12 :

( 8 sc, inc) x 6 (60)

Round 13 :

60 sc ( 1 row)

Round 14 :

( 9 sc, inc) x 6 (66)

Info :

Change to green yarn !!!!!

Round 15-19 :

66 sc ( 5 rows)

Info :

Change to yellow yarn !!!!!

Round 20-24 :

66 sc ( 12 rows)

Info :

Change to green yarn !!!!!

Round 25-26 :

66 sc ( 12 rows)

Round 27 :

( 20 sc, dec) x 3 (63)

Round 28-29 :

63 sc ( 2 rows)

Info :

Change to yellow yarn !!!!!

Round 30 :

( 19 sc, dec) x 3 (60)

Round 31-32 :

60 sc ( 2 rows)

Round 33 :

( 18 sc, dec) x 3 (57)

Round 34-35 :

57 sc ( 2 rows)

Round 36 :

( 17 sc, dec) x 3 (54)

Round 37 :

54 sc ( 1 row)

Round 38 :

( 7 sc, dec) x 6 (48)

Round 39 :

48 sc ( 1 row)

Round 40 :

( 6 sc, dec) x 6 (42)

Round 41 :

42 sc ( 1 row)

Round 42 :

( 5 sc, dec) x 6 (36)

Round 43 :

36 sc ( 1 row)

Round 44 :

( 7 sc, dec) x 4 (32)

Round 45 :

( 6 sc, dec) x 4 (28)

Round 46 :

( 5 sc, dec) x 4 (24)

Round 47 :

24 sc ( 1 row)

Round 48 :

( 4 sc, dec) x 4 (20)

Round 49 :

20 sc ( 1 row)

Round 50 :

( 3 sc, dec) x 4 (16)

Round 51 :

( 2 sc, dec) x 4 (12)

Round 52 :

( 1 sc, dec) x 4 (8)

Round 53 :

( dec ) x 4 (4)

Info :

Do not forget to put a plastic or paper circle on the bottom of the gnome's body (the diameter of the circle should correspond to the diameter of the bottom of the body). After that, we fill the body with holofiber.

β€” Nose :

Round 1 :

7 sc in MR (7)

Round 2 :

( inc ) x 7 (14)

Round 3 :

( 1 sc, inc ) x 7 (21)

Round 4-5 :

21 sc ( 2 rows)

Round 6 :

( 1 sc, dec ) x 7 (14)

Round 7 :

( dec ) x 7 (7)

Info :

Fill the nose with holofiber. F.o. and leave a long tail for sewing

β€” Beard :

Round 1 :

6 sc in MR (6)

Round 2 :

6 sc ( 1 row)

Round 3 :

( 1 sc, inc ) x 3 (9)

Round 4 :

( 2 sc, inc ) x 3 (12)

Round 5 :

( 2 sc, inc ) x 4 (16)

Round 6 :

( 3 sc, inc ) x 4 (20)

Round 7 :

( 4 sc, inc ) x 4 (24)

Round 8 :

24 sc ( 1 row)

Round 9 :

( 5 sc, inc ) x 4 (28)

Round 10 :

( 6 sc, inc ) x 4 (32)

Round 11 :

( 7 sc, inc ) x 4 (36)

Round 12 :

( 8 sc, inc ) x 4 (40)

Round 13-19 :

40 sc ( 7 rows)

Round 20 :

( 8 sc, dec ) x 4 (36)

Round 21 :

( 7 sc, dec ) x 4 (32)

Round 22-23 :

32 sc ( 2 rows)

Info :

Don’t stuff with fiberfill. We fold the part in half and knit 1 row, tying both halves together. F.o. and leave a long tail for sewing

β€” Hands (make 2) :

Round 1 :

6 sc in MR (6)

Round 2 :

( inc ) x 6 (12)

Round 3 :

( 2 sc, inc ) x 4 (16)

Round 4-7 :

16 sc ( 4 rows)

Info :

Change to yellow yarn !!!!!

Round 8-11 :

16 sc ( 4 rows)

Round 12 :

( 6 sc, dec ) x 2 (14)

Round 13-20 :

14 sc ( 8 rows)

Info :

Don’t stuff with fiberfill. We fold the part in half and knit 1 row, tying both halves together. F.o. and leave a long tail for sewing

β€” Gnome hat (make 1) :

Round 1 :

8 sc in MR (8)

Round 2 :

8 sc ( 1 row)

Round 3 :

( 1 sc, inc ) x 4 ( 12 )

Round 4 :

12 sc ( 1 row)

Round 5 :

( 2 sc, inc ) x 4 (16 )

Round 6 :

16 sc ( 1 row)

Round 7 :

( 3 sc, inc ) x 4 (20 )

Round 8 :

20 sc ( 1 row)

Round 9 :

( 4 sc, inc ) x 4 (24 )

Round 10 :

24 sc ( 1 row)

Round 11 :

( 5 sc, inc ) x 4 (28 )

Round 12 :

28 sc ( 1 row)

Round 13 :

( 6 sc, inc ) x 4 (32 )

Round 14 :

32 sc ( 1 row)

Round 15 :

( 7 sc, inc ) x 4 (36 )

Round 16 :

36 sc ( 1 row)

Round 17 :

( 5 sc, inc ) x 6 (42 )

Round 18 :

42 sc ( 1 row)

Round 19 :

( 6 sc, inc ) x 6 (48 )

Round 20 :

48 sc ( 1 row)

Round 21 :

( 7 sc, inc ) x 6 (54 )

Round 22 :

54 sc ( 1 row)

Round 23 :

( 8 sc, inc ) x 6 (60 )

Round 24 :

60 sc ( 1 row)

Round 25 :

( 9 sc, inc ) x 6 (66 )

Round 26 :

66 sc ( 1 row)

Round 27 :

( 10 sc, inc ) x 6 (72 )

Round 28 :

72 sc ( 1 row)

Round 29 :

( 8 sc, inc ) x 8 ( 80 )

Round 30 :

80 sc ( 1 row)

Round 31 :

( 9 sc, inc ) x 8 ( 88 )

Round 32 :

( 10 sc, inc ) x 8 ( 96 )

Round 33 :

96 sc ( 1 row)

Round 34 :

( 11 sc, inc ) x 8 (104 )

Round 35-36 :

104 sc ( 2 rows)

Info :

F.o. and leave a long tail for sewing

β€” Slice of lemon :

Round 1 :

6 sc in MR (6)

Round 2 :

( inc ) x 6 (12)

Round 3 :

( 1 sc, inc ) x 6 (18)

Round 4 :

( 2 sc, inc ) x 6 (24)

Round 5 :

( 3 sc, inc ) x 6 (30)

Info :

Change to white yarn !!!!!

Round 6 :

( 4 sc, inc ) x 6 (36)

Info :

Change to yellow yarn !!!!!

Round 7 :

( 5 sc, inc ) x 6 (42)

Info :

Don’t stuff with fiberfill. We fold the part in half and knit 1 row, tying both halves together. F.o. and leave a long tail for sewing

β€” Flowers (make 3) :

Round 1 :

6 sc in MR (6)

Info :

Change to white yarn !!!!!

Info :

Next, we crochet 6 flower petals. Crochet 1 petal in each of the 6 loops. Petal: 1 sl st ,2 ch, 2 dc , 2 ch, 1 sl st in the same loop (in the one in which we knit the petal).

β€” Small leaf (make 1) :

Info :

Make 12 ch. From the 2nd ch from hook: 1 sl st, 1 sc, 1 HDC, 2 dc, 2 tr, 2 dc, 1 HDC, 1 sl st

β€” Big leaf (make 1) :

Info :

Make 12 ch. From the 2nd ch from hook: 1 sl st, 1 sc, 1 HDC, 2 dc, 2 tr, 2 dc, 1 HDC, 3 sc in 1 loop ; further crochet the second half of the braid 1 HDC, 2 dc, 2 tr , 2 dc, 1 HDC, 1 sc, 1 sl st.

β€” Assembly :

Info :

Sew the beard and nose. Sew the hands to the body. Sew a hat. Gradually fill the hat with holofiber during sewing. Make the design of the hat - sew a slice of lemon, leaves and flowers (see photo).

Assembly Instructions

  • Sew the beard and nose to the front of the body, positioning the beard so it covers the central lower front and the nose above it; sew securely with a whipstitch or mattress stitch.
  • Attach the hands to the sides of the body at the height of the stripes, pinning in place to check symmetry before sewing with a strong thread.
  • Sew the hat onto the top opening of the body; gradually stuff the hat with holofiber while you sew to preserve the hat's point and shape.
  • Decorate the hat by sewing the lemon slice, flowers and leaves onto the brim as shown in photos, arranging the pieces and pinning before final stitching.
  • Place and glue or stitch the plastic/paper circle in the base before filling to create a flat, stable bottom; then fill the body firmly with polyester stuffing.

Important Notes

  • πŸ’‘Use a stitch marker to mark the beginning of each round, especially when working many rounds and color changes.
  • πŸ’‘Insert a plastic or paper circle into the bottom before stuffing to ensure a stable, flat base for the gnome.
  • πŸ’‘Stuff gradually and evenly to avoid lumps and to keep the gnome’s silhouette smooth and well-shaped.

This Lemon Gnome pattern is a delightful blend of bright citrus charm and cozy amigurumi shaping. It includes everything you need to make a playful gnome with hat decorations, lemon slices and flowers. Perfect as a gift or a sunny home accent β€” happy crocheting! πŸ‹πŸ§Ά

You ask,

we answer.

FAQs

What size will the finished piece be?

The finished amigurumi measures approximately 13 cm (5.1 inches) tall when using the recommended YarnArt Begonia and 1.75 mm hook.

Can I use different yarn weights for this pattern?

Yes, you can use different yarn weights but it will change the finished size; choose an appropriate hook for your yarn and expect changes in proportions.

Do I need prior crochet experience for this pattern?

This pattern is rated intermediate, so you should be comfortable working in rounds, reading abbreviations, and performing increases/decreases.

How long does this project typically take to complete?

Most crocheters complete this project in 5-7 hours, depending on experience, speed, and time spent on decorative details.