🧶 Beautiful ✨ Detailed 💝 Adorable

Leaf Garland Pattern

Leaf Garland Pattern
4.1★ Rating
2-3 Hours Time Needed
2.4K Made This
✂️

Beginner Friendly Level

Perfect for those just starting their crochet journey, with clear instructions and simple techniques

⏱️

Bite-Sized Project

Finishes in 2-4 hours—perfect for an afternoon of creative relaxation.

🏡

Cozy Accent

A warm touch for your space that transforms ordinary corners into inviting nooks filled with handmade charm.

About This Leaf Garland Pattern

This pattern creates a flexible, decorative leaf garland worked from a simple chain with small leaves, large leaves and nodules added as you go. It is versatile — make short lengths for napkin rings, longer vines for garlands, or even a leafy necklace. The pattern includes options to finish the vine simply or to work back along the chain for a thicker, more substantial vine.

Leaf Garland Pattern crochet pattern - detailed view of completed project

You can use a variety of yarns from cotton to wool or metallic for seasonal sparkle, and spacing of leaves is adjustable. Clear step-by-step instructions and both UK and US stitch versions are provided so you can choose the terminology you prefer.

Why You'll Love This Leaf Garland Pattern

I absolutely love this pattern because it is endlessly adaptable — a single simple motif becomes so many different projects depending on yarn and spacing. I enjoy how quickly a vine takes shape, and how satisfying it is to see whimsical leaves appear along a chain. I also love that it works equally well for beginners and more experienced crocheters looking for a quick, creative project. Making several repeats to reach the desired length feels relaxing and productive, and the finished garland makes lovely gifts and seasonal decorations.

Leaf Garland Pattern step 1 - construction progress Leaf Garland Pattern step 2 - assembly progress Leaf Garland Pattern step 3 - details and accessories Leaf Garland Pattern step 4 - final assembly and finishing

Switch Things Up

I love experimenting with different yarns and colours to change the mood of this pattern — try soft pastels for a spring garland or rich jewel tones for autumn.

You can make it chunkier by using a bulkier yarn and a bigger hook which will create a bold, statement vine.

For a dainty necklace or keychain, use a fine cotton or lace yarn and a small hook to make miniature leaves.

I often add small beads or sequins at the base of leaves for a little sparkle on festive versions.

Adjust spacing between leaves by increasing or decreasing the number of chains between repeats — longer chains = more vine, shorter chains = denser foliage.

Try metallic or novelty yarn for seasonal garlands that catch the light and make great holiday decorations.

If you want a posable vine, thread a thin wire inside a crocheted cord before adding leaves to create flexible stems.

Work back along the chain with slip stitches to create a double-thickness vine and then add extra leaves for a lusher look.

Create matching napkin rings by working very short lengths and finishing with a tidy weave-in of ends; they make charming table settings.

I sometimes mix leaf sizes irregularly along the chain for a more natural, organic appearance — don't be afraid to improvise and make it your own.

Common Mistakes & How to Fix Them

✗ Skipping the back loop only (BLO) instruction when making the leaf base will result in a flat or misshapen leaf; be sure to insert your hook into the BLO where the pattern specifies to get the correct leaf profile. ✗ Turning the work instead of rotating it for the leaf will flip the right-side facing and change the appearance; rotate your work as directed and keep the right-side facing when instructed. ✗ Working chains that are too tight makes it difficult to work the next stitches into the chain; keep your chain tension loose and even so your hook can easily enter the chains for slip stitches and leaf shaping. ✗ Forgetting to slip stitch back to the base when finishing a leaf can leave a loose join; always sl st again where the base of the leaf meets the long chain to secure it neatly. ✗ Using a stretchy yarn for a long garland can cause sagging under weight; choose a non-stretchy yarn such as cotton, linen or hemp if you plan to hang items or make a long decorative garland.

Leaf Garland Pattern

Make a delicate, decorative leaf garland you can style in many ways — from table edging to a seasonal hanging. This pattern uses simple chains and slip stitches to build an organic vine of small and large leaves with optional nodules. You can adapt yarn weight and spacing to create anything from napkin rings to a long festive garland. Follow the clear step-by-step instructions and photos to create a leafy accent for your home or gifts.

Beginner Friendly 2-3 Hours

Materials Needed for Leaf Garland Pattern

— Main Fabric

  • 01
    Organic cotton double-knitting (DK, Category 3, light worsted weight) yarn (sample shown)
  • 02
    Non-stretchy yarns recommended for long garlands: cotton, linen, hemp
  • 03
    Metallic yarn (optional for festive garlands)
  • 04
    Household string (optional for very unusual washing-line style garlands)

— Tools Required

  • 01
    Crochet hook size 3.5mm (US E-4)
  • 02
    Yarn for chosen project
  • 03
    Scissors (to cut yarn and finish)
  • 04
    Tapestry/yarn needle for weaving in ends

Progress Tracker

0% Complete

— About this project :

Info :

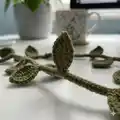
This pattern is a great one to have under your belt, because from the same basic design, you can work a great variety of things! You can make a lovely long decorative garland in colours to suit the seasons, or work short lengths to make napkin rings. You can work in a thick woollen yarn to make a warm leafy scarf, or with fine cotton or cobweb yarn to make a necklace with an organic vibe. Use a metallic yarn for a perfect Christmas garland, or household string for an unusual washing line! One of my customers has used this as an edging to a table runner. There really are endless permutations!

Info :

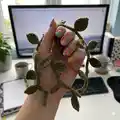
Materials & Tools: Anything goes, depending on what you are aiming to create! Note that if you're making a long garland, or something you are going to hang something else from, it's best to choose a non-stretchy yarn - cotton, linen, hemp, etc are perfect. In my example in the pictures below, I am using a lovely organic cotton light worsted weight (DK, Category 3) yarn, and a 3.5mm (US size E-4) hook.

Info :

Tension and Size: Size and tension are not critical in this project! Just choose the hook that feels right for you with the yarn you are using, or for the look you want to create.

Info :

Patterns Notes & Abbreviations: This pattern uses UK crochet terminology (a US version is available) with standard crochet abbreviations as follows: sl st - slip stitch. ch - chain. dc - double crochet. htr - half treble. tr - treble crochet. BLO - back loop only. Unless otherwise stated, work through both loops of any given stitch. The whole piece is worked with right-side facing throughout.

— The pattern (UK terminology version) :

Instruction 1 :

* Make 9ch.

Make a Small Leaf :

6ch, sl st in the back loop only (BLO) of the second ch from the hook and the next 4 ch –5 sl st.

Make a Small Leaf :

Rotate your work (do not turn over, keep the right-side facing) and now work in the unworked loops of the 5 ch you just worked into: 1dc, 3htr, 1dc (first side of leaf formed).

Make a Small Leaf :

2ch, sl st into the BLO of the second chain from hook (point of leaf formed).

Make a Small Leaf :

Now working into the BLO of the slip stitches, work: 1dc, 3htr, 1 sl st (second side of leaf formed).

Make a Small Leaf :

Sl st again where the base of the leaf meets the long chain.

Instruction :

Make 3ch.

Make a Nodule :

2ch, sl st in BLO of second chain from hook.

Instruction :

Repeat this whole pattern from * to ** (beginning with the 9ch) until the garland is the length you require.

Instruction :

Make 14ch.

Make a Large Leaf :

8ch, sl st in BLO of second ch from hook and next 6 ch –7 sl st.

Make a Large Leaf :

Working in unworked loops: 1dc, 1htr, 2tr, 2htr, 1dc.

Make a Large Leaf :

2ch, sl st in BLO of second chain from hook.

Make a Large Leaf :

Working into BLO of slip stitches: 1dc, 2htr, 2tr, 1dc, sl st.

Make a Large Leaf :

Sl st again where base of leaf meets chain.

Info :

Instead of repeating the pattern identically, however, you can vary the spacing of the leaves by working longer/shorter chains between them, according to the effect you want to achieve. Make 10ch to finish the vine.

Info :

In my example, I have worked 5 identical repeats + 10ch, and my garland is about 65cm long.

— The pattern (US terminology version) :

Instruction 1 :

* Make 9ch.

Make a Small Leaf :

6ch, sl st in the back loop only (BLO) of the second ch from the hook and the next 4 ch – 5 sl st.

Make a Small Leaf :

Rotate your work (do not turn over, keep the right-side facing) and now work in the unworked loops of the 5 ch you just worked into: 1sc, 3hdc, 1sc (first side of leaf formed).

Make a Small Leaf :

2ch, sl st in the BLO of the second chain from hook (point of leaf formed).

Make a Small Leaf :

Now working into the BLO of the slip stitches, work: 1sc, 3hdc, 1 sl st (second side of leaf formed).

Make a Small Leaf :

Sl st again where the base of the leaf meets the long chain.

Instruction :

Make 3ch.

Make a Nodule :

2ch, sl st in BLO of second chain from hook.

Instruction :

Repeat this whole pattern from * to ** (beginning with the 9ch) until the garland is the length you require.

Instruction :

Make 14ch.

Make a Large Leaf :

8ch, sl st in BLO of second ch from hook and next 6 ch – 7 sl st.

Make a Large Leaf :

Working in unworked loops: 1sc, 1hdc, 2dc, 2hdc, 1sc.

Make a Large Leaf :

2ch, sl st in BLO of second chain from hook.

Make a Large Leaf :

Working into BLO of slip stitches: 1sc, 2hdc, 2dc, 1sc, 1 sl st.

Make a Large Leaf :

Sl st again where base of leaf meets chain.

Info :

Instead of repeating the pattern identically, you can vary the spacing of the leaves by working longer/shorter chains between them, according to the effect you want to achieve. Make 10ch to finish the vine.

Info :

In my example, I have worked 5 identical repeats + 10ch, and my garland is about 25 inches long.

— Working back along the vine (optional) :

Info :

Now you can choose EITHER to fasten off at this point OR to start working back along the length of the vine as given below. Working slip stitches back along the length of the chain creates a thicker vine, and you can work more leaves and nodules (or none) as you wish.

Instruction :

Make 5ch.

Instruction :

In the BLO of the chain, starting in the second ch from hook, work as follows: 12 sl st.

Instruction :

Make a Small Leaf.

Instruction :

Continuing in the next chain of the main vine, 12 sl st.

Instruction :

Make a Large Leaf.

Instruction :

Continuing in the next chain of the main vine, 10 sl st.

Instruction :

Make a Nodule.

Instruction :

Continuing in the next chain of the main vine, 4 sl st.

Info :

As before, you can now choose whether to work identical repeats of the pattern on the way back along the chain, or to improvise with different leaf spacing. In my example I have worked 5 identical repeats on the way back along the chain.

Instruction :

Now continue slip-stitching to the end of your vine as necessary.

Info :

Cut your yarn, fasten off and weave in the ends. All done!

Assembly Instructions

  • Finish the vine by working 10ch to the desired length, cut the yarn, fasten off and weave in the ends neatly with a yarn needle.
  • To create a thicker vine, work slip stitches back along the chain and add leaves and nodules as specified; space the repeats evenly or vary spacing for an organic look.
  • Use non-stretchy yarns (cotton, linen or hemp) for long garlands or for hanging additional items to prevent sagging; test spacing before committing to a final length.
  • Make short lengths for napkin rings or long lengths for garlands; pin the garland in place when arranging on a table, then secure with small discreet stitches or removable tape depending on surface.

Important Notes

  • 💡Use the BLO (back loop only) for the base of each leaf to achieve the raised leaf profile and correct shaping.
  • 💡Work with right-side facing throughout as instructed and rotate rather than turning over when forming the leaf sides.
  • 💡Size and tension are not critical; choose a hook that gives the look you want, but keep chains loose enough to work into.
  • 💡If making a long garland or hanging items, choose a non-stretchy yarn to avoid sagging and ensure durability.
  • 💡Weave in ends as you go or at the end to keep the back of the vine tidy and avoid long loose tails.

This leaf garland is a tiny, versatile delight you can make again and again in different yarns and colours. 🍃 It transforms tables, walls and gifts with effortless handmade charm. ✨ Try cotton for a crisp look or metallic yarn for holiday sparkle — and enjoy crafting a little bit of nature for your home! 🌿

You ask,

we answer.

FAQs

What size will the finished piece be?

The finished garland length depends on how many repeats you make; the example in the pattern is about 65cm (25 inches) using five repeats plus 10 chains.

Can I use different yarn weights for this pattern?

Yes, you can use different yarn weights, but this will change the final size and look; use a larger hook for bulkier yarns and a smaller hook for finer yarns.

Do I need prior crochet experience for this pattern?

This pattern is beginner friendly and uses basic stitches (chain and slip stitch) with simple leaf shaping, so a basic knowledge of crochet is helpful but not essential.

How long does this project typically take to complete?

Most crafters complete a short garland in about 2-3 hours, though time varies depending on length, yarn choice and how many repeats you make.

Can I make the vine thicker or more robust?

Yes — work slip stitches back along the chain as instructed to create a thicker vine and add more leaves or nodules while working back.