🧢 Beautiful ✨ Detailed πŸ’ Adorable

Lavender plant Pattern

Lavender plant Pattern
4.1β˜… Rating
1-2 Hours Time Needed
2.5K Made This
βœ‚οΈ

Beginner Friendly Level

Perfect for those just starting their crochet journey, with clear instructions and simple techniques

⏱️

Quick Make

Complete in under 2 hoursβ€”lightning fast fun for instant gratification and quick gifts.

🏑

Cozy Accent

A warm touch for your space that transforms ordinary corners into inviting nooks filled with handmade charm.

About This Lavender plant Pattern

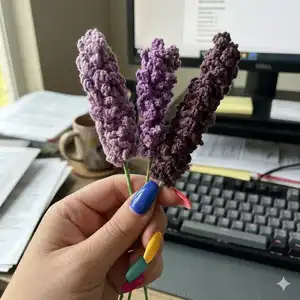
This pattern creates a small crochet lavender flowerhead worked flat and wrapped around a flower wire stem to make a finished lavender sprig. It uses basic stitches and a short repeating row sequence, making it ideal for those new to decorative crochet. The finished flowerhead is lightweight and quick to make β€” perfect for bunches or small arrangements.

Lavender plant Pattern crochet pattern - detailed view of completed project

The pattern includes full materials, abbreviations and a clear assembly section showing how to secure the wire and shape the flowerhead. No special stitches are required β€” just chains, slip stitches and single crochet.

Why You'll Love This Lavender plant Pattern

I absolutely love this pattern because it turns a few simple stitches into a beautiful decorative lavender sprig that looks charming in a vase. I enjoy how quickly you can make multiple stems to create a bouquet or add to other projects. The technique is satisfying β€” you crochet a flat strip that becomes textured flower buds when worked on both sides. I also love that it uses minimal yarn (about 10 g), so it is economical and perfect for using small leftovers.

Lavender plant Pattern step 1 - construction progress Lavender plant Pattern step 2 - assembly progress Lavender plant Pattern step 3 - details and accessories Lavender plant Pattern step 4 - final assembly and finishing

Switch Things Up

I love to change colours to create different looks; try pale lilac, deep purple, or even pink for playful bouquets.

I often make the chain longer or shorter to create varying sizes of flowerheads; experiment with different chain counts for variety.

I sometimes use a thicker DK or light worsted yarn with a larger hook to make chunkier stems that look bolder in arrangements.

I will occasionally add embroidered details or tiny French knots for extra texture on the flowerhead for a bespoke finish.

I like to wrap floral tape around the wire stem and then wrap with floral tape again for a more natural stem finish when combining multiple stems.

I sometimes pair the lavender heads with crocheted leaves made from green DK yarn to make more complete sprigs.

I recommend trying metallic or sparkly yarn for seasonal decorations to give a modern twist to the classic lavender look.

I often glue or wrap real dried lavender with my crocheted stems to create mixed-media bouquets that smell wonderful.

I encourage you to combine several stems into bunches and tie them with twine or ribbon for ready-made gifts or table accents.

I love making a set of different-sized lavender heads and arranging them in small glass bottles for a charming, low-effort display.

Common Mistakes & How to Fix Them

βœ— Skipping the opposite side of the chain on row 2 will leave your flowerhead lopsided; be sure to work sc on the opposite side as instructed to create symmetrical buds. βœ— Cutting the yarn too short at the end will make it hard to sew the wire in place; always leave a long tail for securing the bent wire with yarn stitches. βœ— Working with loose tension creates floppy buds that do not hold shape; keep your stitches firm and consistent so the flowerhead maintains texture. βœ— Not bending the top of the wire before sewing can cause the flowerhead to slide off; bend the wire and sew over the bent end several times to secure it. βœ— Failing to chain the correct amount (chain 50) will result in an incorrect length; recount your initial chain before starting R1 to ensure proper sizing.

Lavender plant Pattern

Create a delicate crochet lavender plant to brighten your home or give as a handcrafted gift. This pattern walks you through a simple two-row flowerhead and a quick assembly method to attach the flower wire stem. Youll enjoy a repeatable, compact project that works up quickly with DK yarn and a 3.5 mm hook. Perfect for making a bunch to display in a small vase or add to bouquets.

Beginner Friendly 1-2 Hours

Materials Needed for Lavender plant Pattern

β€” Main Fabric

  • 01
    DK (size 3) yarn - approximately 10 g purple shade for each lavender head
  • 02
    Flower wire for the stem - floral wire suitable for stems (length as required per stem)
  • 03
    Optional small amount of tape to secure the stem below the flowerhead

β€” Tools Required

  • 01
    3.5 mm crochet hook
  • 02
    Yarn needle
  • 03
    Scissors
  • 04
    Flower wire for the stem
  • 05
    Small piece of tape to secure the stem (optional)

Progress Tracker

0% Complete

β€” Lavender plant :

Info :

With purple yarn. Start by creating a slip knot and chain 50.

Round 1 :

R 1: Skip one from the hook, sc into each chain until one chain remains. Sc 5, slst into the final chain.

Info :

You will now be working on the opposite side of the chain.

Round 2 :

R 2: *ch 6, sc into the next stitch*, repeat from * to * until the end of the row, ch 6, sc into the opposite side of your work and repeat from * to * on the other side until you reach the first ch-6, slst and fasten off. Cut yarn but leave a long tail.

β€” Assembly :

Infos :

From the top end (where you finished your crocheting), start feeding the flower wire through the row 1 sc stitches, going in one and out next. Bend the top part of the wire so that your plant will not pop out of the top. Using the end tail of your yarn, sew over the bent end of the wire a few times to keep it in place. Push and twist the flowerhead towards the top. To finish off, add a little bit of tape to the stem just below the flowerhead to keep it in place.

Info :

Happy crocheting!

Assembly Instructions

  • Feed the flower wire through the Row 1 single crochet stitches from the top end, going in one sc and out the next across the row to form the stem connection.
  • Bend the top end of the wire so it forms a small hooked stop that will prevent the flowerhead from slipping off the wire.
  • Use the long tail left when fastening off to sew over and around the bent wire several times, securing the wire firmly to the crocheted piece.
  • Push and twist the crocheted flowerhead toward the top of the wire to form a natural bud shape, then add a small piece of tape just below the flowerhead to hold it in place.
  • Trim any excess wire or yarn tail neatly and hide ends by weaving them into the back of the flowerhead with a yarn needle.

Important Notes

  • πŸ’‘Gauge/tension is not important for this pattern, but keep stitches tight and consistent to create a textured flowerhead.
  • πŸ’‘Leave a long tail when fastening off so you have enough yarn to sew the bent wire securely into the flowerhead.
  • πŸ’‘Bend the top of the flower wire before securing with yarn to prevent the head from sliding off the stem.
  • πŸ’‘You can use a different yarn weight and a suitable hook, but this will change the finished size of the lavender head.

This lavender plant pattern is a sweet, small project that adds handmade charm to any space. Perfect for bunches, gifts, or little accents around the home. Make several stems to create a fragrant-looking display and enjoy the satisfaction of quick, creative crocheting. 🧢🌿

You ask,

we answer.

FAQs

What size will the finished piece be?

The finished lavender head measures approximately the length of the chain used (chain 50) and will make a small sprig ideal for bunching; final size varies slightly with yarn and tension.

Can I use different yarn weights for this pattern?

Yes, you can use different yarn weights, but your finished size will change; choose an appropriate hook if switching yarn and expect a thicker or smaller flowerhead accordingly.

Do I need prior crochet experience for this pattern?

No advanced skills are required β€” this is a confident-beginner level pattern using basic stitches like chain, single crochet and slip stitch.

How do I secure the wire so the flowerhead does not slip off?

Bend the top of the wire, sew over the bent end several times with the yarn tail, and finish with a small piece of tape below the flowerhead for extra security.