🧢 Beautiful ✨ Detailed πŸ’ Adorable

Lamas Amigurumi Pattern

Lamas Amigurumi Pattern
4.1β˜… Rating
5-7 Hours Time Needed
3.3K Made This
βœ‚οΈ

Intermediate Level

Ideal for those with basic crochet experience, featuring slightly more advanced stitches and techniques to expand your skills.

⏱️

Weekend Treat

Takes 5-7 hours, making it an enjoyable project to finish over a couple of days.

🧸

Cute Companion

An adorable friend to cherish, handcrafted with love to bring comfort and joy for years to come.

About This Lamas Amigurumi Pattern

This pattern creates a charming mother and baby lama amigurumi set with a removable pocket and curly hair. Youll work in the round using sport weight yarn and a small hook for tight stitches. The design features sewn-on ears, nose, embroidered facial features and decorative edging.

Lamas Amigurumi Pattern crochet pattern - detailed view of completed project

Includes every round and assembly step with clear photo references to guide you. Perfect for gifting or decorating a nursery with lovable handmade characters.

Why You'll Love This Lamas Amigurumi Pattern

I absolutely love this pattern because it combines simple amigurumi techniques with delightful details like the removable pocket and curly hair. I enjoy how the color changes create a sweet outfit without complicated colorwork. Making both mother and baby allows me to practice small-scale shaping and finishing skills. The finished pair is playful and gift-ready, which always makes me happy to give them away.

Lamas Amigurumi Pattern step 1 - construction progress Lamas Amigurumi Pattern step 2 - assembly progress Lamas Amigurumi Pattern step 3 - details and accessories Lamas Amigurumi Pattern step 4 - final assembly and finishing

Switch Things Up

I love swapping the dress color to make themed versions β€” try pastel pinks for a baby shower or bright primaries for a playful look.

I often use a bulkier yarn and a larger hook to create a chunky, cuddle-friendly version for younger children.

I like to change the number and size of curls to alter the hairstyle; adding more short curls creates a fuller mane.

I sometimes replace embroidery with safety eyes for older kids, but I keep embroidered features for baby-safe toys.

I add tiny accessories like a crocheted bow or scarf to personalize the lama and create unique gift options.

I recommend experimenting with metallic or variegated yarn for small accents to give a subtle sparkle to the pocket trim.

I sometimes add a loop on top of the head to turn the baby lama into a keyring or bag charm.

I’ve used thin wire inside limbs for a poseable version when I want standing poses that hold shape.

I vary stuffing density to achieve different facial expressions β€” firmer stuffing makes the face firmer and rounder, softer stuffing gives a gentler look.

I enjoy making a whole family by changing scale: use thinner yarn and a tiny hook for mini keychain lamas, or thicker yarn for oversized plush versions.

Common Mistakes & How to Fix Them

βœ— Skipping stitch markers while joining legs and body can cause miscounted rounds; place a marker at the new round beginning to keep your stitch count accurate. βœ— Overstuffing the head and body makes shaping difficult and can distort the garment lines; stuff gradually and evenly, checking shape as you go. βœ— Changing color without finishing the front/back loop instructions will hide the intended texture; when instructed to work BLO or FLO, make sure to complete the row in the specified loops before switching colors. βœ— Not folding and sewing limbs correctly will lead to loose attachments; fold limbs neatly, tack in place and sew with small whipstitches securing through both layers for strength.

Lamas Amigurumi Pattern

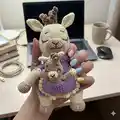
Make a sweet Mama and Baby Lama amigurumi set with clear step-by-step instructions and helpful photos. Youll create cuddly, detailed characters with a removable pocket for the baby lama. The pattern includes every round, materials, abbreviations and assembly tips so you can follow along easily.

Intermediate 5-7 Hours

Materials Needed for Lamas Amigurumi Pattern

β€” Main Fabric

  • 01
    Sport weight 4ply yarn Yarn Art Jeans (50g /160m) - N40 Brown (small amounts for curls, hooves and hair)
  • 02
    Sport weight 4ply yarn Yarn Art Jeans (50g /160m) - N86 Yellow (body accents, inner limbs)
  • 03
    Sport weight 4ply yarn Yarn Art Jeans (50g /160m) - N87 Beige (main body color)
  • 04
    Sport weight 4ply yarn Yarn Art Jeans (50g /160m) - N89 Purple (dress and trim)
  • 05
    Polyester fiberfill stuffing (small amounts for head, body, arms, legs, nose and tail)

β€” Tools Required

  • 01
    Crochet hook size 2.0 mm
  • 02
    Scissors
  • 03
    Yarn needle for sewing pieces and weaving in ends
  • 04
    Stitch markers
  • 05
    Needle for sewing pieces (sewing needle)
  • 06
    Pins for positioning pieces
  • 07
    Small tool for stuffing (optional)

Progress Tracker

0% Complete

β€” MOTHER LAMA :

β€” Arms (make 2) :

Round 1 :

With beige yarn. 6sc in MR

Info :

Place row marker here.

Round 2 :

6inc (12)

Round 3 :

(1sc, inc) *6 (18)

Round 4 :

(2sc, inc) *6 (24)

Round 5-8 :

24sc (4 rounds)

Round 9 :

(2sc, dec) *6 (18)

Round 10 :

Change color to yellow. BLO 18sc.

Round 11-21 :

18sc (11 rounds)

Round 22 :

Change color to purple. BLO 18sc.

Round 23-26 :

18sc (4 rounds)

Info :

Stuff the arms with fiberfill.

Info :

Fold in half and make 9sc through both sides, weave in the yarn ends.

Info :

Return to round 22 of the arms and work with purple yarn through front loops: FLO ch1, 18sc, sl st in one stitch. Cut the yarn and fasten off.

β€” Ears (make 2) :

Round 1 :

With yellow yarn. 6sc in MR

Info :

Place row marker here.

Round 2 :

(1sc, inc) *3 (9)

Round 3 :

9sc

Round 4 :

(2sc, inc) *3 (12)

Round 5 :

(3sc, inc) *3 (15)

Round 6 :

(4sc, inc) *3 (18)

Round 7-8 :

18sc (2 rounds)

Round 9 :

(1sc, dec) *6 (12)

Round 10-12 :

12sc (3 rounds)

Info :

Leave long tail for sewing. Do not stuff.

β€” Nose :

Round 1 :

With beige yarn. 6sc in MR

Info :

Place row marker here.

Round 2 :

6inc (12)

Round 3 :

(3inc, 3sc) *2 (18)

Round 4 :

(1sc, inc)*3, 3sc, (1sc, inc)*3, 3sc (24)

Round 5 :

(3sc, inc) *6 (30)

Round 6-7 :

30sc (2 rounds)

Info :

Stuff the nose with fiberfill. Leave long tail for sewing.

β€” Curls (make 6) :

Info :

Crochet 3 pieces in beige and 3 pieces in brown. Chain 21. Start in the second chain from the hook 20inc. Leave long tail for sewing.

β€” Legs (make 2) :

Round 1 :

With beige yarn. 6sc in MR

Info :

Place row marker here.

Round 2 :

6inc (12)

Round 3 :

(1sc, inc) *6 (18)

Round 4 :

(2sc, inc) *6 (24)

Round 5 :

(3sc, inc) *6 (30)

Round 6-9 :

30sc (4 rounds)

Round 10 :

(3sc, dec) *6 (24)

Round 11 :

Change color to yellow. BLO 24sc.

Round 12-17 :

24sc (6 rounds)

Round 18 :

Change color to purple. Stuff the legs with fiberfill.

Info :

Fold in half and crochet 12sc through both sides. Cut the yarn and fasten off on the first leg. Crochet the second leg in the same way then continue: turn, ch1, 12sc, do not cut the yarn.

β€” Body :

Round 19 :

ch10, join the first leg, 12sc in the first leg. Place marker, this will be the beginning of your new round.

Round 20 :

Crochet in a spiral: FLO 12sc, 10sc on the chain, FLO 12sc, continue on other side FLO 12sc, 10sc on the chain, FLO 12sc. (68)

Round 21 :

BLO 68sc

Round 22-29 :

68sc (8 rounds)

Round 30 :

(32sc, dec) *2 (66)

Round 31 :

66sc

Round 32 :

(9sc, dec) *6 (60)

Round 33 :

60sc

Round 34 :

(8sc, dec) *6 (54)

Round 35-37 :

54sc (3 rounds)

Round 38 :

(7sc, dec) *6 (48)

Round 39-41 :

48sc (3 rounds)

Round 42 :

Attach the arms : 45sc on the body, attach arm using the last 3 sc on round 42 and the first 6 sc on round 43 (to give a total of 9 sc) through both left arm and body.

Round 43 :

15sc on the body, 9sc on right arm and body, 18sc on the body (48)

Round 44 :

48sc

Round 45 :

(6sc, dec) *6 (42)

Round 46-47 :

42sc (rounds)

Round 48 :

Change color to yellow. BLO 42sc. Stuff the body with fiberfill.

β€” Head :

Round 49 :

42sc

Round 50 :

(6sc, inc) *6 (48)

Round 51 :

(7sc, inc) *6 (54)

Round 52 :

(8sc, inc) *6 (60)

Round 53-58 :

60sc (6 rounds)

Round 59 :

(8sc, dec) *6 (54)

Round 60-64 :

54sc (5 rounds)

Round 65 :

(7sc, dec) *6 (48)

Round 66 :

48sc

Round 67 :

(6sc, dec) *6 (42)

Round 68 :

42sc

Info :

Stuff the head with fiberfill.

Round 69 :

(5sc, dec) *6 (36)

Round 70 :

(4sc, dec) *6 (30)

Round 71 :

(3sc, dec) *6 (24)

Round 72 :

(2sc, dec) *6 (18)

Round 73 :

(1sc, dec) *6 (12)

Round 74 :

6dec

Info :

Fasten off, cut the yarn, weave in the yarn ends.

Info :

Return to round 21 of the body and work with purple yarn through the front loops: ch1,(3dc in one stitch, sc)*34. Cut the yarn and fasten off.

Info :

Return to round 48 of the body-head and work with purple yarn through front loops: 1. ch1,(dc, dc-inc)*20, 2dc, sl st, turn (62)

Info :

2. ch1,( Fpdc, Bpdc ) *31, sl st, turn (62)

Info :

3. ch1, ( Bpdc, Fpdc ) *31, sl st (62) Fasten off weave in ends.

β€” Pocket :

Info :

With purple yarn. Work in rows.

Round 1 :

Chain 23. From the second chain on the hook: 22sc, turn (22)

Round 2 :

Ch1, 4sc, ch6 (skip 6sc, start from the next stitch), 2sc, ch6 (skip 6sc, start from the next stitch), 4sc, turn (22)

Round 3-13 :

Ch1, 22sc, turn (10 rounds)

Info :

Crocheted with yellow yarn around the perimeter of the pocket: (sc, 3dc in one stitch) *23.

Info :

Fasten off, cut the yarn, weave in the yarn ends.

Info :

Sew the pocket on to the front of the body 2 Rows down from under arms and in line to the top of the legs, make sure you allow enough room for the baby lama to be inserted.

Info :

Sew the nose and ears to the head. Sew the curls to the head.

Info :

Add Indentation’s to hooves follow the photos below.

Info :

Embroider the nose, mouth, eyes and eyebrows with brown yarn.

β€” BABY LAMA :

β€” Arms (make 2) :

Round 1 :

With yellow yarn. 6sc in MR

Info :

Place row marker here.

Round 2 :

6inc (12)

Round 3 :

12sc

Round 4 :

(2sc, dec) *3 (9)

Round 5 :

Change color to beige. BLO 7sc, dec (8)

Round 6-11 :

8sc (6 rounds)

Info :

Stuff the arms with fiberfill. Fold in half and make 4sc through both sides, weave in the yarn ends.

β€” Ears (make 2) :

Round 1 :

With yellow yarn. 6sc in MR

Info :

Place row marker here.

Round 2-3 :

6sc (2 rounds)

Info :

Leave a long tail for sewing.

β€” Nose :

Round 1 :

With yellow yarn. 6sc in MR

Info :

Place row marker here.

Round 2 :

6inc (12)

Round 3 :

12sc

Info :

Leave a long tail for sewing.

β€” Tail :

Round 1 :

With yellow yarn. 6sc in MR

Info :

Place row marker here.

Round 2 :

6inc (12)

Round 3 :

12sc

Round 4 :

6dec

Info :

Stuff the tail with fiberfill. Leave a long tail for sewing.

β€” Curl :

Info :

With beige yarn. Chain 16. Start in the second chain from the hook: 15inc. Leave a long tail for sewing.

β€” Legs (make 2) :

Round 1 :

With yellow yarn. 6sc in MR

Info :

Place row marker here.

Round 2 :

6inc (12)

Round 3 :

12sc

Round 4 :

(2sc, dec) *3 (9)

Round 5 :

Change color to beige. BLO 9sc

Round 6-8 :

9sc (3 rounds)

Info :

Body: Stuff the legs. Fasten off on the first leg. Crochet the second leg in the same way and crochet an extra sl st, do not cut the yarn.

Round 9 :

ch5, join the first leg, 9sc, 5sc on the chain, 9sc on the second leg. Place a marker of a new round beginning. (28)

Round 10 :

28sc

Info :

Stuff the body with fiberfill.

Round 11 :

24sc, inc, 2sc, inc (30)

Round 12-14 :

30sc (3 rounds)

Round 15 :

(3sc, dec) *6 (24)

Round 16-18 :

24sc (3 rounds)

Round 19 :

Add arms: 1sc, 4sc with the arm and body together; 8sc; 4sc with the second arm and body; 7sc (24)

Round 20 :

(2sc, dec) *6 (18)

Round 21 :

18sc

Round 22 :

(2sc, inc) *6 (24)

Round 23 :

(3sc, inc) *6 (30)

Round 24-26 :

30sc (3 rounds)

Round 27 :

(3sc, dec) *6 (24)

Round 28-32 :

24sc (5 rounds)

Round 33 :

(2sc, dec) *6 (18)

Round 34 :

(1sc, dec) *6 (12)

Round 35 :

6dec

Info :

Stuff the head with fiberfill. Fasten off, cut the yarn, weave in the yarn ends.

Info :

Sew the nose and ears to the head.

Info :

Hoof indentations follow the photos below.

Info :

Sew the tail to the body and sew the curly hair to the head. Embroider eyes, eyebrows, nose and mouth with brown yarn.

Assembly Instructions

  • Attach the arms to the body by aligning the arm top with the counted stitches: use the last 3 stitches of round 42 and the first 6 stitches of round 43 to secure the left arm, then sew the right arm in the same way, ensuring 9 stitches join arm to body.
  • Sew the pocket to the front of the body two rows down from under the arms and aligned with the top of the legs, leaving enough opening so the baby lama fits into the pocket comfortably.
  • Sew the nose and ears to the head centered on the face, using the long tails left for sewing and anchoring firmly with hidden stitches.
  • Sew the curls to the top of the head in a cluster to form the curly hair and attach the tail to the lower back; secure all ends and weave in neatly.
  • Add hoof indentations by passing a long needle and yarn through the hoof center to create the crease, then embroider the nose, mouth, eyes and eyebrows with brown yarn according to the photo guide.

Important Notes

  • πŸ’‘Use stitch markers to mark the beginning of each round and each join point to prevent miscounting when joining legs to body and attaching arms.
  • πŸ’‘Work with consistent tension and use a 2.0 mm hook as specified to achieve the correct gauge so pieces sit together neatly.
  • πŸ’‘When instructed to work in BLO or FLO, be precise to get the decorative edges and matching texture for the dress and cuffs.
  • πŸ’‘Stuff gradually and evenly, especially the head and body, to avoid lumps and to achieve a smooth finished shape.
  • πŸ’‘Weave in ends as you go and leave long tails for pieces you will sew on (nose, ears, curls, tail) to make assembly easier.

Create this handmade Mama and Baby Lama set to celebrate tiny moments and big smiles! The pattern includes step-by-step rounds, assembly notes and photo guidance to help you through each stage. Whether gifting or keeping, these amigurumi Lamas bring cozy charm and personality to your home. 🧢😊

You ask,

we answer.

FAQs

What size will the finished piece be?

The finished mother lama measures approximately 24 cm / 9.4 inches tall using the recommended yarn and 2.0 mm hook; the baby lama measures approximately 12 cm / 4.7 inches.

Can I use different yarn weights for this pattern?

Yes, you can use different yarn weights but this will change the finished size; choose an appropriate hook for your yarn and expect the pair to be larger or smaller based on yarn and hook.

Do I need prior crochet experience for this pattern?

This pattern is rated intermediate; basic amigurumi skills like working in the round, increases, decreases, BLO/FLO and sewing pieces together are recommended for best results.

How long does this project typically take to complete?

Most crocheters finish the mother and baby set in about 5-7 hours total, though time will vary depending on experience, finishing and assembly speed.