🧢 Beautiful ✨ Detailed πŸ’ Adorable

Lady Bunny Amigurumi Pattern

Lady Bunny Amigurumi Pattern
4.5β˜… Rating
5-7 Hours Time Needed
2.1K Made This
βœ‚οΈ

Intermediate Level

Ideal for those with basic crochet experience, featuring slightly more advanced stitches and techniques to expand your skills.

⏱️

Weekend Treat

Takes 5-7 hours, making it an enjoyable project to finish over a couple of days.

🧸

Cute Companion

An adorable friend to cherish, handcrafted with love to bring comfort and joy for years to come.

About This Lady Bunny Amigurumi Pattern

This pattern creates a charming Lady Bunny amigurumi complete with dress, tiny flowers, a basket and carrots. You'll work in rounds to make the head, body, arms, legs, ears and accessories with clear shaping instructions. Techniques used include magic ring, single crochet, increases, decreases, front/back loop work and simple decorative stitches. Photos accompany the pattern to help you assemble and finish the doll with a polished look.

Lady Bunny Amigurumi Pattern crochet pattern - detailed view of completed project

Suitable for crocheters familiar with basic amigurumi techniques, this pattern provides all rounds and finishing notes. Follow the step-by-step rounds to make each piece and sew them together for a delightful finished toy.

Why You'll Love This Lady Bunny Amigurumi Pattern

I absolutely love this pattern because it combines classic amigurumi shaping with charming little details like the dress flowers and basket of carrots that bring the character to life. I enjoy designing pieces that are both fun to stitch and rewarding to assemble β€” this bunny fits perfectly into that goal. The pattern balances straightforward rounds with small finishing touches so you always have progress to celebrate. I find the color combinations and tiny embroidery really elevate the final look, and I hope you feel the same pride when your Lady Bunny stands finished.

Lady Bunny Amigurumi Pattern step 1 - construction progress Lady Bunny Amigurumi Pattern step 2 - assembly progress Lady Bunny Amigurumi Pattern step 3 - details and accessories Lady Bunny Amigurumi Pattern step 4 - final assembly and finishing

Switch Things Up

I love experimenting with color schemes for this bunny; try pastel tones for a baby-friendly version or high-contrast brights for a vibrant look.

Change yarn weight and hook size to alter the finished size β€” bulky yarn with a larger hook makes a chunky cuddly bunny, while fine yarn creates a tiny keepsake.

I often swap the dress color or add stripes and patterns to the skirt to create themed outfits and seasonal variations.

Use embroidery to change facial expressions; move the eyes and mouth placement to give the bunny different personalities.

Add wire inside the limbs for posability if you want the bunny to hold props or sit in different poses.

Make extra accessories like tiny hats, scarves or a crocheted carrot bouquet to create a set of gifts.

Substitute beads or small buttons for the dress pearls to add another texture and sparkle to the outfit.

Try crocheting the flowers in different stitches (such as picot edges) to vary the flower shapes and sizes on the dress.

Create a matching mini bunny friend by scaling down the pattern and using thinner yarn for delightful paired gifts.

I sometimes use fuzzy or boucle yarn for a soft fur effect on the head for a totally different tactile finish.

Common Mistakes & How to Fix Them

βœ— Skipping stitch markers at the start of rounds can cause you to lose track of the beginning; place a marker and move it each round to stay oriented. βœ— Forgetting to stuff gradually makes shaping difficult and creates lumps; stuff a little at a time and shape as you go for a smooth finish. βœ— Using inconsistent tension between parts leads to mismatched sizes and poor fit; maintain similar tension and check gauge by comparing parts as you work. βœ— Not leaving long tails for sewing makes assembly fiddly and weak; leave long thread ends for sewing and join securely when attaching pieces. βœ— Ignoring FLO/BLO instructions can change the look of ribs or edges; pay attention to only in flo or only in blo notes to keep correct texture.

Lady Bunny Amigurumi Pattern

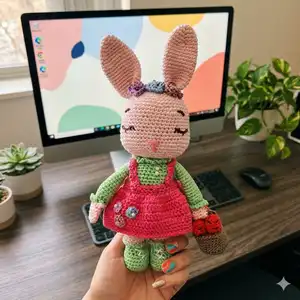
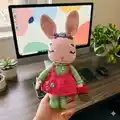
Make a sweet handcrafted Lady Bunny with step-by-step crochet instructions that guide you through each part. This pattern includes detailed rounds for the head, ears, arms, legs, dress, basket and carrots so you can recreate every cute detail. Perfect for gifting or as a charming decor piece, you'll enjoy shaping and stitching this adorable bunny.

Intermediate 5-7 Hours

Materials Needed for Lady Bunny Amigurumi Pattern

β€” Main Fabric

  • 01
    Main Color: Soft Pink (used for head, ears, parts of legs and hands) - quantity as needed
  • 02
    A: Soft Green (used for torso, parts of legs, shoes and arms) - quantity as needed
  • 03
    B: Dark Pink (used for dress and straps) - quantity as needed
  • 04
    C: Smoked color (used for basket) - quantity as needed
  • 05
    D: Orange color (for carrots) - quantity as needed
  • 06
    Additional small amounts of purple, blue and dusty rose for flowers and details

β€” Tools Required

  • 01
    Crochet hook size 2.5 mm (or a size that fits your yarn)
  • 02
    Scissors
  • 03
    Polyester stuffing
  • 04
    Tapestry needle for sewing and embroidery
  • 05
    Stitch marker
  • 06
    Pins for assembly
  • 07
    Small beads or pearls for dress buttons (optional)
  • 08
    Embroidery thread for facial details

Progress Tracker

0% Complete

β€” Info :

Infos :

Materials: Yarn. 2.5 mm hook size or a size that fits your yarn. Scissors, stuffing, tapestry needle, stitch marker and pins. Main Color: Soft Pink A: Soft Green B: Dark Pink C: Smoked color D: Orange color (green color between the legs). FINISHED SIZE Around 20 cm in circumference, about 10 cm in length.

β€” Legs and Torso :

Round 1 :

8 sc in a magic ring

Round 2 :

8 sc inc(16 sc)

Round 3 :

5 sc into sc(5 sc inc)6 sc into sc(21 sc)

Round 4-6 :

(3 ring)sc into sc(21 sc)

Round 7 :

6 sc into sc(5 sc dec)6 sc into sc(16 sc)

Round 8 :

6 sc into sc(2 sc dec)6 sc into sc(14 sc)

Round 9-11 :

(3 ring)sc into sc(14 sc) Ana color

Round 12 :

Only in flo sc into sc(14 sc)

Round 13-21 :

(9 ring)sc into sc(14 sc)

Round 22 :

Put the legs together, make 2 ch together. sc into sc(30 sc)

Info :

Tightly stuff the legs. Keep filling as you go.

Round 23 :

14 sc into sc(2 ch into 4 sc )14 sc into sc(32 sc)

Round 24-26 :

(3 ring)sc into sc(32 sc)

Infos :

A COLOR

Round 27 :

(4 times)6 sc into sc next inc(36 sc)

Round 28-35 :

(8 ring)sc into sc (36 sc)

Round 36 :

(6 times)5 sc into sc next dec(30 sc)

Round 37 :

Sc into sc (30 sc)

Round 38 :

(6 times)5 sc into sc next dec(24 sc)

Round 39 :

Sc into sc(24 sc)

Round 40 :

Only in flo sc into sc(24 sc)

Round 41 :

Only in blo sc into 3 ch fo

β€” Ears :

Item Name (EARS) :

EARS (Make 2) Main color

Round 1 :

6 sc in a magic ring

Round 2 :

(3 times)1 sc into sc next inc(9 sc)

Round 3 :

(3 times)2 sc into sc next inc(12 sc)

Round 4 :

(2 times)5 sc into sc next inc(14 sc)

Round 5 :

(2 times)6 sc into sc next inc(16 sc)

Round 6 :

(2 times)7 sc into sc next inc(18 sc)

Round 7 :

(2 times)8 sc into sc next inc(20 sc)

Round 8-17 :

(10 ring)sc into sc(20 sc)

Round 18 :

(4 times)4 sc into sc next dec(16 sc)

Round 19 :

Sc into sc(16 sc)fo.

Info :

Leave a long thread end for sewing.

β€” Arms :

Item Name (ARMS) :

ARMS (Make 2) Main Color

Round 1 :

5 ch.ch into sc(10 sc)

Round 2-5 :

(4 ring)sc into sc(10 sc)

Round 6 :

5 sc into sc 2 ch. 2 ch into sc 5 sc into sc

Round 7 :

2 ch out next 10 sc into sc

Round 8 :

(4 times)2 sc into sc next dec (6 sc)

Round 9 :

(4times)2 sc into sc next inc(10 sc)

Round 10 :

(4 times)3 sc into sc next inc(14 sc)

Infos :

A COLOR

Round 11 :

Only in flo sc into sc(14 sc)

Round 12-22 :

(11 ring)sc into sc(14 sc)fo.

Info :

Straighten. Dip the crochet in both layers. (7 sc) fo.

Info :

Leave a long thread end for sewing.

β€” Head :

Item Name (HEAD) :

Main Color

Round 1 :

6 sc in a magic ring

Round 2 :

6 sc inc(12 sc)

Round 3 :

1 sc into sc next inc(18 sc)

Round 4 :

2 sc into sc next inc(24 sc)

Round 5 :

3 sc into sc next inc(30 sc)

Round 6 :

4 sc into sc next inc(36 sc)

Round 7 :

5 sc into sc next inc(42 sc)

Round 8 :

6 sc into sc next inc(48 sc)

Round 9-14 :

(6 ring)sc into sc(48 sc)

Round 15 :

11 sc into sc(3 sc inc)20 sc into sc(3 sc inc)11 sc into sc(54 sc)

Round 16 :

Sc into sc(54 sc)

Round 17 :

13 sc into sc(3 sc inc)22 sc into sc(3 sc inc)13 sc into sc(60 sc)

Round 18-21 :

(4 ring)sc into sc(60 sc)

Round 22 :

8 sc into sc next dec(54 sc)

Round 23 :

7 sc into sc next dec(48 sc)

Round 24 :

6 sc into sc next dec(42 sc)

Round 25 :

5 sc into sc next dec (36 sc)

Round 26 :

4 sc into sc next dec(30 sc)

Info :

Fill the head tightly.

Round 27 :

3 sc into sc next dec(24 sc)

Round 28 :

2 sc into sc next dec(18 sc)

Round 29 :

Sc into sc (18 sc)fo.

Info :

Leave a long thread end for sewing.

β€” Rabbit's Dress :

Infos :

B COLOR

Round 1 :

40 ch.

Round 2 :

40 ch into sc(40 sc)

Round 3-4 :

(2 ring)sc into sc (40 sc)

Round 5 :

Sc into 2 ch(80 cr)

Round 6-8 :

(3 ring)cr into cr (80 cr)

Round 9-10 :

(2 ring)cr into sc(80 sc)

Round 11 :

Only in blo sc into sc(80 sc)fo.

Item Name (CLOTHES HANGERS) :

CLOTHES HANGERS (Make 2) 30 ch.ch into sc (30 sc) fo.

Info :

Leave a long thread end for sewing.

β€” Basket & Carrots :

Item Name (BASKET) :

Round 1- 8 sc in a magic ring

Round 2 :

8 sc inc(16 sc)

Round 3 :

1 sc into sc next inc(24 sc)

Round 4 :

2 sc into sc next inc(32 sc)

Round 5 :

Only in flo sc into sc(32 sc)

Round 6-11 :

(6 ring)sc into sc(32 sc)

Round 12 :

Basket hanger - 20 ch.

Round 13 :

20 ch into 20 sc fo.

β€” Carrot (D Color) :

Round 1 :

8 sc in a magic ring

Round 2-8 :

(7 ring)sc into sc(8 sc)

Round 9 :

1 sc dec(7 sc)

Round 10 :

1 sc dec(6 sc)

Round 11 :

1 sc dec(5 sc)

Round 12 :

1 sc dec (4 sc)

Round 13 :

1 sc dec(3 sc)fo.

β€” Flowers :

Item Name (DRESS FLOWER) :

DRESS FLOWER (MAKE 3) 8 sc in a magic ring fo. Leave a long thread end for sewing.

Item Name (CORONET) :

CORONET(MAKE 3) 10 ch. 1 ch into 3 cr 1 ch into 1 sc(15 cr 5 sc) Fo. Leave a long thread end for sewing.

β€” Making of the Parts :

Info :

Leave a long thread ends for sewing each part. Use photos as a guide to position ears, arms and dress. Sew flowers and small decorations onto the dress. Embroider facial details before final sewing if preferred.

Assembly Instructions

  • Sew the ears to the top of the head, positioning them evenly on each side of the center top and securing with the long thread ends left from the ears; use hidden whipstitch and reinforce with several passes.
  • Attach the head to the torso by placing the neck opening of the head onto the top of the torso opening, then sew around the neck using the long tail and a whipstitch for a secure join.
  • Position and sew the arms to the sides of the body between the torso rounds where the arm openings sit, angling slightly forward for a natural pose and firmly securing with back-and-forth stitches.
  • Sew the legs together at the joined rounds (after Round 22 where legs were joined) and secure them to the bottom of the torso so the doll can stand; stuff firmly as you attach the legs for stability.
  • Sew the dress onto the torso at the waistline ensuring even placement of straps and add the small flower decorations by sewing through the center with a long tail and knotting on the underside.
  • Attach the basket to one hand by sewing through the basket edge and the arm hand piece, and arrange and secure the carrots inside the basket using the hanging thread tails or a few stitches.

Important Notes

  • πŸ’‘Use stitch markers to keep track of your rounds and changes in color or texture, especially when instructions specify only in flo or only in blo.
  • πŸ’‘Leave long thread ends (tails) for sewing when you fasten off each piece to make assembly easier and stronger.
  • πŸ’‘Stuff firmly but gradually to keep smooth shapes and avoid lumps; fill legs and head as you progress to get the correct silhouette.
  • πŸ’‘Follow the 'only in flo' and 'only in blo' notes exactly to achieve the intended edge textures and fitting of garments.
  • πŸ’‘Pin parts in place before sewing to check positioning and symmetry, and make adjustments before final stitching.

This Lady Bunny amigurumi pattern will bring a smile to anyone who loves handmade toys. It combines classic amigurumi shaping with charming outfit details for a delightful finished piece. Make it as a gift, nursery decor or a cherished keepsake for someone special. 🧢🌸✨

You ask,

we answer.

FAQs

What size will the finished piece be?

The finished amigurumi measures around 20 cm in circumference and about 10 cm in length as indicated in the pattern.

Can I use different yarn weights for this pattern?

Yes, you can use different yarn weights, but this will affect the final size; use an appropriate hook size and be aware the measurements will change.

Do I need prior crochet experience for this pattern?

This pattern is rated intermediate, so basic knowledge of magic ring, single crochet, increases and decreases is recommended for best results.

How long does this project typically take to complete?

Most crocheters complete this project in 5-7 hours, though time may vary based on experience level and working pace.

How should I assemble the parts for best results?

Leave long thread tails for sewing, pin parts in place for symmetry, stuff parts firmly as you go, then sew pieces securely using a tapestry needle and hidden whipstitches.