About This Koala Amigurumi Pattern
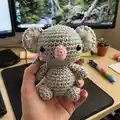
This pattern creates a small, cuddly koala amigurumi approximately 7 cm tall using cotton yarn and simple stitches. It features a shaped head, body, limbs, and fluffy ears made with white acrylic yarn. The instructions include stitch-by-stitch rounds, material lists, and photo-assisted assembly tips. Ideal for making a charming handmade gift or a collectible handmade toy.

Follow the clear round-by-round instructions to crochet each part and sew them together. The pattern also shows how to make shaggy ear fur and attach all pieces for a polished finish.
Why You'll Love This Koala Amigurumi Pattern
I absolutely love this pattern because it turns simple stitches into an irresistibly cute koala with personality. I enjoy the small size that makes it quick to finish and perfect for gifts. The shaggy ear technique with white acrylic yarn adds a fun textured detail that really brings the character to life. Sewing and assembly are satisfying and meditative, and the finished result always makes me smile.
Switch Things Up
I love how easy it is to customize this koala with different yarn colors; try warm taupes, pale beige, or even pastel blues to create different moods.
If you want a larger version, use a bulkier yarn and a bigger hook and your koala will grow into a cuddle-sized friend.
I sometimes swap the 5 mm safety eyes for embroidered eyes for a fully washable doll or to make a softer expression for babies.
Try using a thinner crochet hook and fingering yarn to make an extra tiny keychain version perfect for gifts and party favors.
For more personality, add tiny accessories like a crocheted scarf, a felt bow, or a miniature flower pinned to the ear.
I like experimenting with nose shapes: cut different felt shapes (oval, rounded triangle) to see which fits the face best.
To make the koala poseable, add a short wire inside the limbs before stuffing carefully; take care when using wire around children.
You can change the ear fur color to gray or cream for a subtler look, or try variegated acrylic yarn for a playful texture.
For a vintage look, use slightly textured cotton or light worsted yarn and age the felt nose with light shading techniques.
If gifting, personalize with a small embroidered name tag or hang a tiny bell for charm; I always enjoy tailoring details to the recipient.
Common Mistakes & How to Fix Them
✗ Forgetting to insert safety eyes at the correct rounds; insert the 5 mm safety eyes between rounds 8 and 9 before closing the head.
✗ Not stuffing gradually while shaping the head and body can cause lumps; stuff little by little and shape as you go to keep a smooth silhouette.
✗ Skipping stitch counts during increases and decreases leads to incorrect shaping; count stitches after every round, especially after increase/decrease rounds.
✗ Overstuffing the body and limbs will distort the shape; use moderate stuffing and adjust firmness to match the small scale of the doll.
✗ Sewing parts without pinning first can cause misaligned limbs or ears; pin each part carefully and check positions in photos before stitching.