🧢 Beautiful ✨ Detailed πŸ’ Adorable

Jack Skellington Amigurumi Pattern

Jack Skellington Amigurumi Pattern
4.2β˜… Rating
5-7 Hours Time Needed
3.4K Made This
βœ‚οΈ

Intermediate Level

Ideal for those with basic crochet experience, featuring slightly more advanced stitches and techniques to expand your skills.

⏱️

Weekend Treat

Takes 5-7 hours, making it an enjoyable project to finish over a couple of days.

🧸

Cute Companion

An adorable friend to cherish, handcrafted with love to bring comfort and joy for years to come.

About This Jack Skellington Amigurumi Pattern

This pattern creates a cute Jack Skellington amigurumi complete with head, body, legs, arms and a little bow-tie. Each round is written out with exact stitch counts and helpful photo references to guide you. Techniques include working in the round, joining pieces, and simple embroidery for facial details.

Jack Skellington Amigurumi Pattern crochet pattern - detailed view of completed project

The pattern also includes a second bonus pattern (Sally) in the same PDF for more variety and practice. All materials, abbreviations and assembly notes are listed so you can follow along easily and finish a polished toy.

Why You'll Love This Jack Skellington Amigurumi Pattern

I absolutely love this pattern because it balances simple amigurumi construction with characterful details that really shine when finished. I designed the head and body shaping so they are predictable and easy to count, which helps you get a smooth, rounded finish. The embroidered mouth and sewn eye patches give so much personality with minimal effort β€” it always makes me smile to see them come alive. I also love that the pattern includes photo steps and notes for assembly, which makes it accessible even when tackling small parts like the bow-tie.

Jack Skellington Amigurumi Pattern step 1 - construction progress Jack Skellington Amigurumi Pattern step 2 - assembly progress Jack Skellington Amigurumi Pattern step 3 - details and accessories Jack Skellington Amigurumi Pattern step 4 - final assembly and finishing

Switch Things Up

I love how easy it is to customize this pattern with different yarn colors or facial expressions β€” try a soft pastel palette for a gentler look or bright, bold colors for a playful version.

You can change the final size by using a larger or smaller hook and yarn; a thicker yarn with a larger hook will create a chunkier, cuddle-ready toy, while thinner yarn creates a tiny keychain-sized friend.

I often swap the embroidered mouth for a small felt mouth or add tiny crocheted accessories like hats and scarves to give each toy a unique style.

If you want a poseable version, add a short piece of wire in the arms and bend them carefully for display β€” just be sure to secure ends well inside so they wont poke out.

Try different eye styles: safety eyes for shiny pupils, embroidered eyes for a softer look, or tiny buttons for a vintage vibe.

I sometimes change the bow-tie to a tiny scarf or a crocheted collar to match seasonal themes like Christmas or Halloween.

For Sally, experiment with more or fewer hair loops and varying lengths to achieve curly or flowing hair; hand-placement of the pieces creates very different final looks.

Dont be afraid to add painted details or fabric patches on the dress for mixed-media projects β€” a little paint can mimic shading or stitches beautifully.

When making multiples I like to slightly vary the stuffing level and facial placement to give each character its own personality β€” one might be cheerful, another mischievous.

I encourage you to try adding a small pocket or prop (like a mini pumpkin) to the finished toy to tell a tiny story with your crochet creation.

Common Mistakes & How to Fix Them

βœ— Skipping stitch markers during rounds causes you to lose track of the beginning of the round; use a marker to mark round starts and every 10-20 stitches for large rounds. βœ— Not stuffing evenly results in flattened or lumpy shapes that dont hold the intended silhouette; stuff gradually and shape as you add fiberfill for an even surface. βœ— Forgetting to place eyes or marks before adding stuffing will shift placement later; mark or attach eyes between the rounds recommended in the pattern to ensure symmetry. βœ— Pulling yarn too tight at color joins or when embroidering details will pucker the fabric; maintain consistent, moderate tension and weave ends neatly to avoid distortion.

Jack Skellington Amigurumi Pattern

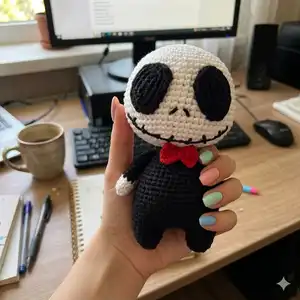
Make your own Jack Skellington amigurumi with clear, photo-backed instructions that guide you from the head to the tiny bow-tie. This pattern walks you through each round and assembly step so you can create a charming handmade Jack to keep or gift. Youll love the simple shaping, embroidered details, and small finishing techniques that bring the character to life.

Intermediate 5-7 Hours

Materials Needed for Jack Skellington Amigurumi Pattern

β€” Main Fabric

  • 01
    Alize Cotton Gold 55 (white) for Jack - small amount
  • 02
    Alize Cotton Gold 56 (black) for Jack - small amount
  • 03
    Alize Cotton Gold 60 (red) for bow-tie - small amount
  • 04
    Alize Cotton Gold 728 (blue) for Sally head/body - small amount
  • 05
    Alize Cotton Gold 60 (yellow/other accents) for Sally - small amounts
  • 06
    Alize Cotton Gold 16 (pink) for Sally accents - small amounts
  • 07
    Alize Cotton Gold 56 (black) for Sally detailing - small amounts
  • 08
    Alize Cotton Gold 264 (blue/other) for Sally accents - small amounts
  • 09
    Alize Cotton Gold 110 (red) for Sally hair - small amounts
  • 10
    Use cotton or sport weight yarn suitable for a 2.00 mm hook; adjust if using different yarn weights

β€” Tools Required

  • 01
    Crochet hook size 2.00 mm (or a hook that fits your yarn)
  • 02
    8 mm safety eyes (for Sally)
  • 03
    Polyester Fiberfill stuffing
  • 04
    Scissors
  • 05
    Yarn needle for sewing and embroidery
  • 06
    Stitch markers
  • 07
    Pins for assembly (optional)

Progress Tracker

0% Complete

β€” Head :

Round 1 :

6 sc in magic ring (6)

Round 2 :

(inc) x6 (12)

Round 3 :

(sc, inc) (18)

Round 4 :

(inc, 2 sc) x6 (24)

Round 5 :

(3 sc, inc) x6 (30)

Round 6 :

2 sc, inc, (4 sc, inc) x5, 2 sc (36)

Round 7 :

(5 sc, inc) (42)

Round 8 :

3 sc, inc, (6 sc, inc) x5, 3 sc (48)

Round 9 :

(7 sc, inc) x6 (54)

Round 10 :

4 sc, inc, (8 sc, inc) x5, 4 sc (60)

Round 11-23 :

sc around (60) (13 rnds)

Round 24 :

(3 sc, dec) x12 (48)

Round 25 :

(2 sc, dec) x12 (36)

Round 26 :

2 sc, dec, (4 sc, dec) x5, 2 sc (30)

Round 27 :

(3 sc, dec) x6 (24)

β€” Eyes :

Info :

*Sc will be made on both sides of the chain.

Round 1 :

ch6 ; start in second chain from the hook, inc in this stitch, 3 sc, 3 sc in last st. Continue on the other side of the foundation chain, 3 sc, inc (13)

Round 2 :

sc,inc, 3 sc, (sc, inc) x2, 3 sc, inc (17)

Round 3 :

2 sc, inc, 3 sc, (2 sc, inc) x2, 4 sc, inc (21)

β€” Leg :

Round 1 :

7 sc in magic ring (7)

Round 2 :

(inc) x7 (14)

Round 3-5 :

sc around (14) *make 2 pieces.

Info :

*After making the first leg, cut the thread. When making the second leg, do not cut the thread and continue to the body.

β€” Body :

Round 6 :

ch4, join the first leg with the sc. Crochet on the first leg: 2 sc, (inc, 5 sc) x2, working on the chain: inc, 2 sc, inc, crochet on the second leg: (5 sc, inc) x2, 2 sc, working on the chain: 4 sc (42)

Round 7 :

(13 sc, inc) x3 (45)

Round 8-12 :

sc around (45) (5 rnds)

Round 13 :

(13 sc, dec) x3 (42)

Round 14-16 :

sc around (42) (3 rnds)

Round 17 :

(5 sc, dec) x6 (36)

Round 18-20 :

sc around (36) (3 rnds)

Round 21 :

(4 sc, dec) x6 (30)

Round 22-24 :

sc around (30)

Round 25 :

(3 sc, dec) x6, slst (24)

Info :

*Fasten off and leaving a long tail for sewing. Stuff the body. Sew the Head with the Body.

β€” Arm :

Info :

Use the white yarn

Round 1 :

6 sc in magic ring (6)

Round 2 :

(sc, inc) x3 (9)

Round 3-4 :

sc around (9) (2 rnds)

Info :

*switch the black.

Round 5-11 :

sc around (9) (7 rnds)

Info :

*I don't fill arms.

β€” Bow-Tie :

Round 1 :

ch8; hdc in 3rd ch from hook, hdc in each space (6)

Round 2-3 :

ch2, turn, hdc in each stitch

β€” (Jack Assembly Notes) :

Info :

Sew eyes or embroider patches and embroider mouth lines as shown in photos to complete the Jack face.

β€” Sally Head :

Round 1 :

6 sc in magic ring (6)

Round 2 :

(inc) x6 (12)

Round 3 :

(sc, inc) x6 (18)

Round 4 :

(inc, 2 sc) x6 (24)

Round 5 :

(3 sc, inc) x6 (30)

Round 6 :

2 sc, inc, (4 sc, inc) x5, 2 sc (36)

Round 7 :

(5 sc, inc) x6 (42)

Round 8 :

3 sc, inc, (6 sc, inc) x5, 3 sc (48)

Round 9 :

(7 sc, inc) x6 (54)

Round 10 :

4 sc, inc, (8 sc, inc) x5, 4 sc (60)

Round 11-23 :

sc around (60) (13 rnds)

Round 24 :

(3 sc, dec) x12 (48)

Round 25 :

(2 sc, dec) x12 (36)

Round 26 :

2 sc, dec, (4 sc, dec) x5, 2 sc (30)

Round 27 :

(3 sc, dec) x6 (24)

Round 28 :

sc around (24)

Info :

*Place the 8mm safety eyes between rounds 18 and 19 leaving 10 sts between them.

β€” Sally Leg :

Round 1 :

7 sc in magic ring (7)

Round 2 :

(inc) x7 (14)

Round 3-5 :

sc around (14) *make 2 pieces.

Info :

*After making the first leg, cut the thread. When making the second leg, do not cut the thread and continue to the body.

β€” Sally Body :

Round 6 :

ch4, join the first leg with the sc. Crochet on the first leg: 2 sc, (inc, 5 sc) x2, working on the chain: inc, 2 sc, inc, crochet on the second leg: (5 sc, inc) x2, 2 sc, working on the chain: 4 sc (42)

Round 7 :

(13 sc, inc) x3 (45)

Round 8-12 :

sc around (45) (5 rnds)

Round 13 :

(13 sc, dec) x3 (42)

Round 14-16 :

sc around (42) (3 rnds)

Round 17 :

(5 sc, dec) x6 (36)

Round 18-20 :

sc around (36) (3 rnds)

Round 21 :

(4 sc, dec) x6 (30)

Round 22-24 :

sc around (30)

Round 25 :

(3 sc, dec) x6, slst (24)

Info :

*Fasten off and leaving a long tail for sewing. Stuff the body. Sew the Head with the Body.

β€” Sally Arm :

Round 1 :

6 sc in magic ring (6)

Round 2 :

(sc, inc) x3 (9)

Round 3-11 :

sc around (9) (9 rnds)

Info :

*I don't fill arms.

β€” Dress :

Info :

Start with the color pink; Ch14, add yellow color; ch15. Starting from the second

Round 1 :

yellow; (sc, inc) x7, pink; (sc, inc) x7 (42), turn

Round 2 :

ch1, pink; 21 sc, yellow; 21 sc (42), turn

Round 3 :

ch1, yellow; 7 sc, ch6, skip 6sc, 8 sc, pink; 8 sc, ch6, skip 6 sc, 7 sc, turn

Round 4 :

ch7, pink; 21 sc, yellow; 21 sc (42), turn

Round 5 :

ch1, yellow; 13 sc, blue; 8 sc, pink; 4 sc, black; 17 sc (42), turn

Round 6 :

ch1, black; 9 sc, (inc) x2, 10 sc, blue; 10 sc, (inc) x2, 9 sc (46) turn

Round 7 :

ch1, blue; 23 sc, black; 23 sc (46), turn

Round 8 :

ch1, black; 10 sc, (inc) x2, 11 sc, blue; 11 sc, (inc) x2, 10 sc (50), turn

Round 9 :

ch1, blue; 25 sc, black; 25 sc (50), turn

Round 10 :

ch1, black; 11 sc, (inc) x2, 12 sc, blue; 12 sc, (inc) x2, 11 sc (54), turn

Round 11 :

ch1, blue; 26 sc, black; 22 sc, yellow; 6 sc (54), turn

Round 12 :

ch1, yellow; 8 sc, black; 5 sc, (inc) x2, 15 sc, blue; 10 sc, (inc) x2, 12 sc (58), turn

Round 13 :

ch1, blue; 24 sc, black; 23 sc, yellow; 11 sc (58), turn

Round 14 :

ch7, yellow; 13 sc, black; 15 sc, (inc) x3, 5 sc, pink; 22 sc (61)

Round 15 :

ch1, pink; 20 sc, black; 23 sc, yellow; 18 sc (61), turn

Round 16 :

ch1, yellow; 21 sc, black; 16 sc, pink; 24 sc (61), turn

Round 17 :

ch1, pink; 27 sc, black; 9 sc, yellow; 25 sc (61), turn

Round 18 :

ch1, yellow; 30 sc, pink; 31 sc (61), turn

Round 19 :

ch1, pink; 31 sc, yellow; 30 sc (61)

Info :

Cut the yarn and hide.

β€” Hair :

Round 1 :

6 sc in magic ring (6)

Round 2 :

(inc) x6 (12)

Round 3 :

BLO (sc, inc) x6 (18)

Round 4 :

BLO (2 sc, inc) x6 (24)

Round 5 :

ch 34, Starting from the third; 32 Hdc, 1sc skip, slst. Repeat this process 28 times. Hair in all loops with BLO in this way. If you want to do less, you can. If you want to make more, do it without skipping stitches. Then sew as in the photo.

Info :

*Fasten off and leaving a long tail for sewing.

Assembly Instructions

  • After making the second leg without cutting the yarn, join both legs with a ch4 and continue to work the body rounds as written to form a single body piece.
  • Fasten off leaving a long tail for sewing; stuff the body firmly and sew the head to the body using the long tail and a yarn needle.
  • Place the 8mm safety eyes between rounds 18 and 19 on Sally, leaving 10 stitches between them; for Jack attach eye patches and embroider facial details as shown in photos.
  • Sew arms to the sides of the body at the height shown in the photos; tuck in ends and secure with hidden stitches so pieces sit flat and symmetrical.

Important Notes

  • πŸ’‘Use stitch markers to keep track of the beginning of each round and especially during increases and decreases for even shaping.
  • πŸ’‘Stuff the body and head gradually and evenly to avoid lumps; overstuffing may distort the shape of the toy.
  • πŸ’‘Pin all parts (head, arms, legs) in place before sewing to check positioning and symmetry.
  • πŸ’‘Work with consistent tension throughout and weave in ends neatly as you go to produce a clean finish.

This Jack Skellington amigurumi pattern helps you crochet a small, characterful companion step-by-step with photos and full round lists. Whether you gift him or keep him for your spooky collection, this little friend is handmade with love and attention to detail. Happy crocheting and dont forget to tag your finished toy when you share! πŸ§ΆπŸŽƒ

You ask,

we answer.

FAQs

What size will the finished piece be?

The finished Jack measures approximately 12-16 cm tall depending on your yarn and tension; using the recommended yarn and a 2.00 mm hook gives a compact amigurumi size.

Can I use different yarn weights for this pattern?

Yes, you can use a different yarn weight but the finished size will change; choose a suitable hook for your yarn and adjust safety eye size or embroidery placement accordingly.

Do I need prior crochet experience for this pattern?

This pattern is rated intermediate; basic crochet stitches and working-in-the-round experience are recommended for best results.

How long does this project typically take to complete?

Most crocheters complete the Jack in about 5-7 hours; Sally may take a similar amount depending on dress and hair complexity.