🧢 Beautiful ✨ Detailed πŸ’ Adorable

Hulk Amigurumi Pattern

Hulk Amigurumi Pattern
4.2β˜… Rating
2-4 Hours Time Needed
3.6K Made This
βœ‚οΈ

Beginner Friendly Level

Perfect for those just starting their crochet journey, with clear instructions and simple techniques

⏱️

Bite-Sized Project

Finishes in 2-4 hoursβ€”perfect for an afternoon of creative relaxation.

🧸

Cute Companion

An adorable friend to cherish, handcrafted with love to bring comfort and joy for years to come.

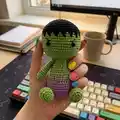
About This Hulk Amigurumi Pattern

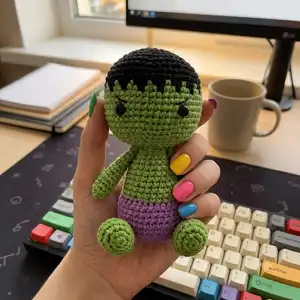
This pattern creates a small, 13 cm tall Hulk-inspired amigurumi with a cute round head, simple body, arms and legs. The design uses basic single crochet shaping, color changes and minimal embroidery for facial details. The instructions are written in continuous rounds and are ideal for crocheters with basic skills.

Hulk Amigurumi Pattern crochet pattern - detailed view of completed project

You will learn to change colors in the round and shape the body with increases and decreases. Clear assembly notes guide you through sewing parts together and finishing touches.

Why You'll Love This Hulk Amigurumi Pattern

I absolutely love this pattern because it turns simple stitches into a charming character with personality. I enjoy how quickly it comes together while still giving room for small customizations like facial embroidery and color choices. I created it to be accessible so beginners can feel proud of a finished toy in a single afternoon. I also love the compact size β€” it makes the perfect little gift or shelf companion.

Hulk Amigurumi Pattern step 1 - construction progress Hulk Amigurumi Pattern step 2 - assembly progress Hulk Amigurumi Pattern step 3 - details and accessories Hulk Amigurumi Pattern step 4 - final assembly and finishing

Switch Things Up

I love customizing this pattern by changing the colors β€” try soft pastels for a friendlier look or bold shades for a comic-inspired vibe.

I sometimes swap YarnArt Jeans for a bulkier yarn and a larger hook to make a chunkier, cuddlier version.

I often replace safety eyes with embroidered eyes for a fully handmade, child-safe toy option.

I add small accessories like a crocheted scarf or tiny felt shorts to personalize each character.

I experiment with positioning of the eyes and eyebrow stitches to create different facial expressions and personalities.

I suggest trying different stuffing densities β€” a slightly firmer stuffing will make the toy more poseable while softer stuffing makes it squishier.

I sometimes embroider tiny details or add surface crochet decorations to the body for texture.

I like to create a whole set using different colorways to make a themed collection of characters as gifts.

I recommend blocking small pieces lightly if your yarn allows it to get smoother joins before assembly.

I also enjoy combining techniques like using wire armatures for posable limbs if you want a display-friendly figure.

Common Mistakes & How to Fix Them

βœ— Skipping the stitch marker will make you lose track of the beginning of rounds; place a marker and move it each round to keep accurate counts. βœ— Not stuffing gradually can lead to lumps and misshapen parts; stuff little by little while crocheting to keep an even shape. βœ— Changing colors without securing tails can cause loose spots or unraveling later; weave in color change ends neatly and secure knots inside the work. βœ— Forgetting to align stitches when closing openings will create uneven seams; press openings together aligning three stitches before sewing and secure with a long tail for neat assembly.

Hulk Amigurumi Pattern

Make your own mini Hulk amigurumi with this easy, cute crochet pattern. You'll enjoy clear step-by-step rounds for head, body, arms, and legs, plus assembly notes to finish neatly. Perfect for gift-making or a quick handmade project that fits in the palm of your hand. Use the materials list and tips to customize size and color to suit your style.

Beginner Friendly 2-4 Hours

Materials Needed for Hulk Amigurumi Pattern

β€” Main Fabric

  • 01
    YarnArt Jeans or similar yarn (used in pattern) - Green color for body/head and limbs - small amount (approx 20-50g)
  • 02
    YarnArt Jeans or similar yarn - Purple color for lower body/shorts - small amount (approx 10-30g)
  • 03
    YarnArt Jeans or similar yarn - Black color for hair and trim - small amount (approx 10-20g)
  • 04
    Small amounts of contrasting yarn for embroidered eyebrows

β€” Tools Required

  • 01
    Crochet hook Clover Soft Touch 2.00 mm (or hook suitable for your yarn)
  • 02
    8 mm black safety eyes (2 pieces)
  • 03
    Toys filler (polyester stuffing)
  • 04
    Black thin thread for embroidered eyebrows
  • 05
    Scissors
  • 06
    Tapestry needle for sewing and weaving ends
  • 07
    Pins for assembly
  • 08
    Stitch marker

Progress Tracker

0% Complete

β€” Materials :

Info :

-The hook suitable under your yarn. I have Clover Soft Touch 2.00 mm. -Yarn: green, purple and black colors. I used Β«YarnArtJeansΒ» yarn. -8 mm black safety eyes. -Toys filler. -Black thin thread (eyebrows). -Toys filler. -Scissors. -Tapestry needle. -Pins. -Stitch marker.

β€” Terms used and Notes :

Infos :

MR -magic ring. sc-single crochet. ch-chain stitch. slst-slip stitch. blo-through back loops only. inc-increase (stitch 2 times into the next stitch). dec -invisible decrease (crochet 2 sc together using invisible method). hdc -half double crochet. (...)xn -repeat instructions in brackets n times. R -round. Change colors in crochet. Loop your new yarn color over your hook. Crochet your new yarn color back through the two loops on your hook. Notes: -Crochet continuously in a spiral, unless otherwise specified. -In order to not lose track of the number of worked stitches in each round, use a stitch marker to mark the beginning of each round -a thin thread of contrasting color. -Crochet tightly enough so the filler is not visible through the holes between loops. -Tightly and gradually fill all the details of the toy in the process of crocheting. -Size of the finished toy can vary depending on the materials used, the density of crocheting and filling, etc.

β€” General Stuffing Instruction :

Info :

Stuff body and head firmly, stuffing as you go.

β€” Body + head :

Round 1 :

6 scMR (6)

Round 2 :

6 inc(12)

Round 3 :

(1 sc, inc)x6 (18)

Round 4 :

(2 sc, inc)x6 (24)

Round 5 :

(3 sc, inc)x6 (30)

Round 6 :

(4 sc, inc)x6 (36)

Round 7 :

(5 sc, inc)x6 (42)

Round 8-10 :

42 sc (3 rounds) (42)

Round 11 :

(5 sc, dec)x6 (36)

Round 12 :

36 sc (36)

Round 13 :

36 hdc (36)

Info :

Continue on with green.

Round 14 :

(4 sc, dec)x6 (30)

Round 15 :

30 sc (30)

Round 16 :

(13 sc, dec)x2 (28)

Round 17 :

28 sc (28)

Round 18 :

(12 sc, dec)x2 (26)

Round 19 :

26 sc (26)

Round 20 :

(11 sc, dec)x2 (24)

Round 21 :

24 sc (24)

Round 22 :

(2 sc, dec)x6 (18)

Round 23 :

18 sc (18) Cut the yarn.

Info :

Stuff the body firmly.

β€” Arm x2 :

Round 1 :

6 sc MR(6)

Round 2 :

(2 sc, inc)x2 (8)

Round 3-8 :

8 sc (8)

Info :

Stuff only half of the arms.

Round 9-13 :

8 sc (8)

Info :

Do not stuff of the arms. This way the arm doesn't stick out too much after sewing it to the body. Press the opening with your fingers, aligning 3 stitches side by side. Break the yarn and leave a long tail to sew arms to body.

β€” Head :

Round 1 :

6 sc MR(6)

Round 2 :

6 inc(12)

Round 3 :

(1 sc, inc)x6 (18)

Round 4 :

(2 sc, inc)x6 (24)

Round 5 :

(3 sc, inc)x6 (30)

Round 6 :

(4 sc, inc)x6 (36)

Round 7 :

(5 sc, inc)x6 (42)

Round 8 :

(6 sc, inc)x6 (48)

Round 9 :

(7 sc, inc)x6 (54)

Round 10-11 :

54 sc (2 rounds)(54)

Info :

In the next 12 and 13 rounds we will alternate green and black colors.

Round 12 :

(green 1 sc, black 2 sc)x18 (54)

Round 13 :

(green 2 sc, black 1 sc)x18 (54)

Info :

Continue on with green.

Round 14-19 :

54 sc (6 rounds)(54)

Round 20 :

(7 sc, dec)x6 (48)

Round 21 :

(6 sc, dec)x6 (42)

Info :

Place safety eyes between rounds 16 and 17, 11 st apart.

Round 22 :

(5 sc, dec)x6 (36)

Round 23 :

(4 sc, dec)x6 (30)

Round 24 :

(3 sc, dec)x6 (24)

Info :

Start to stuff the head.

Round 25 :

(2 sc, dec)x6 (18)

Round 26 :

Only through back loops, (1 sc, dec)x6 (12)

Round 27 :

6 dec. Leave the thread for sewing.

β€” Leg x2 :

Round 1 :

6 sc MR(6)

Round 2 :

6 inc(12)

Round 3 :

inc, 3 sc, 3 inc, 3 sc, 2 inc(18)

Round 4 :

7 sc, 3 inc, 8 sc (21)

Round 5 :

Only through back loops, 21 sc (21)

Round 6 :

7 sc, 3 dec, 8 sc (18)

Round 7 :

4 sc, 4 dec, 6 sc (14)

Round 8 :

2 sc, 4 dec, 4 sc (10)

Round 9 :

(3 sc, dec)x2 (8)

Info :

Stuff only half of the legs.

Round 10-15 :

8 sc(6 rounds) (8)

Round 16 :

Only 5 sc. Do not stuff of the legs. Press the opening with your fingers, aligning 3 stitches side by side. Break the yarn and leave a long tail.

β€” Finishing :

Info :

Sew the head to the body. Sew the legs to the body. Sew the arms to the body symmetrically. Embroider eyebrows.

Assembly Instructions

  • Attach the head to the body by sewing through the final round opening using the long tail left from the head, securing evenly around the neck.
  • Sew the legs to the bottom of the body, spacing them evenly and securing firmly so the amigurumi sits upright.
  • Position arms on either side of the body and sew symmetrically, pressing the arm openings together aligning 3 stitches before stitching.
  • Place safety eyes between rounds 16 and 17 of the head, spaced 11 stitches apart, then secure the washers on the inside before stuffing further.

Important Notes

  • πŸ’‘Use a stitch marker to mark the beginning of each round to avoid losing track during increases and decreases.
  • πŸ’‘Stuff gradually and firmly as you go, but avoid overstuffing which can distort the shape and show through the stitches.
  • πŸ’‘Crochet tightly enough to prevent stuffing from showing through holes, especially when using lighter yarns.

This cute mini Hulk amigurumi is perfect for quick handmade gifts and playful decor. The pattern uses simple shaping and color changes to create a lovable character full of personality. Whether you keep it on your shelf or give it to a friend, it will bring smiles and handmade charm. 🧢🧑

You ask,

we answer.

FAQs

What size will the finished piece be?

The finished amigurumi measures approximately 13 cm (about 5.1 inches) tall when using the recommended yarn and a 2.00 mm hook.

Can I use different yarn weights for this pattern?

Yes, you can use different yarn weights, but this will affect the final size; adjust your hook accordingly and expect the toy to be larger or smaller.

Do I need prior crochet experience for this pattern?

This pattern is rated beginner friendly, so basic knowledge of single crochet, increases, decreases, and working in the round is helpful.

How long does this project typically take to complete?

Most crocheters complete this project in 2-4 hours, though time may vary based on experience level and how much time you spend on finishing details.