🧢 Beautiful ✨ Detailed πŸ’ Adorable

Handsome Dog Amigurumi Pattern

Handsome Dog Amigurumi Pattern
4.5β˜… Rating
5-7 Hours Time Needed
3.4K Made This
βœ‚οΈ

Intermediate Level

Ideal for those with basic crochet experience, featuring slightly more advanced stitches and techniques to expand your skills.

⏱️

Weekend Treat

Takes 5-7 hours, making it an enjoyable project to finish over a couple of days.

πŸ₯

Charming Critter

Delightful animal designs with sweet details that capture the essence of your favorite woodland and farmyard friends.

About This Handsome Dog Amigurumi Pattern

This pattern creates an adorable handsomely dressed dog amigurumi with a sculpted muzzle, floppy ears and tiny overalls. You will crochet separate parts then assemble them for a polished, professional look. The pattern uses color changes and shaping to define the face and clothing.

Handsome Dog Amigurumi Pattern crochet pattern - detailed view of completed project

Detailed round-by-round instructions are provided for every part: head, legs, arms, ears, nose and tail. Clear abbreviations and material lists make it easy to gather supplies and follow along.

Why You'll Love This Handsome Dog Amigurumi Pattern

I absolutely love this pattern because it turns simple stitches into a character full of personality and charm. The color changes on the face and the sculpted nose bring so much expression to the finished doll. I enjoy the assembly process too β€” sewing the ears and nose in place gives each toy a unique look. Watching the toy take shape from small pieces into a cohesive amigurumi is incredibly rewarding. This pattern is a lovely way to practice shaping and finishing skills.

Handsome Dog Amigurumi Pattern step 1 - construction progress Handsome Dog Amigurumi Pattern step 2 - assembly progress Handsome Dog Amigurumi Pattern step 3 - details and accessories Handsome Dog Amigurumi Pattern step 4 - final assembly and finishing

Switch Things Up

I love to change colors to give each dog its own personality; try soft pastels for a baby-safe version or warm autumn tones for a cozy look.

To make the toy larger or smaller, I change the yarn weight and hook size β€” bulky yarn with a larger hook makes a cuddly plush while thin yarn makes a tiny keychain version.

I sometimes add embroidery on the overalls, like initials or tiny hearts, to personalize gifts for friends and family.

Swap the overall style for a dress or a sweater by adjusting the number of rounds and creating a simple skirt attached at the waist.

Try different eye types: safety eyes for a classic look, embroidered eyes for a baby-safe toy, or felt appliques for a vintage style.

I add wire to the limbs when I want posable arms and legs for display, being careful to anchor the wire ends safely inside the stuffing.

Use a contrasting yarn for the muzzle edge to make the face pop more, or blend the colors for a softer transition between head and muzzle.

Mix yarn textures β€” a fuzzy yarn for the ears or tail can add a tactile element that children love to explore.

For seasonal flair, crochet tiny accessories like a scarf, hat or a pocket flower and attach them with removable stitches so you can change outfits later.

Experiment with facial placement: moving the eyes slightly closer or further apart will change the expression dramatically, so test placements with pins before sewing.

Common Mistakes & How to Fix Them

βœ— Skipping stitch markers during rounds can cause you to lose track of the beginning of round; place a marker at the first stitch and move it each round to avoid counting errors. βœ— Stuffing too late or too little will cause the head and limbs to collapse when sewing; stuff gradually and firmly as you crochet to keep a smooth shape and good support. βœ— Not checking color joins during face shaping may create visible gaps; weave in color change tails carefully and check the first few stitches after a change for neat tension. βœ— Forgetting to flatten and sew layered pieces (ears, sleeves) well will make seams bulky; flatten the needle layers and sew with small whipstitches for an even finish.

Handsome Dog Amigurumi Pattern

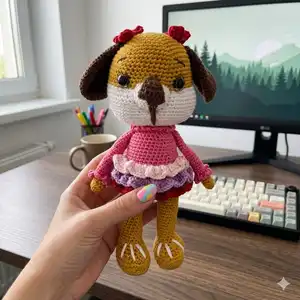
Make a sweet handmade dog with this detailed amigurumi pattern that guides you round-by-round from head to tail. You will enjoy shaping the expressive face, sewing on the ears and nose, and finishing the overalls for a charming finished toy. Perfect for gifting or keeping as a lovely handmade companion.

Intermediate 5-7 Hours

Materials Needed for Handsome Dog Amigurumi Pattern

β€” Main Fabric

  • 01
    Yarn - main colors listed in pattern (Mustard - A, White - B, Light Green - C, Dark Green - C, Brown - D)
  • 02
    Mustard (Main Color A) - quantity as needed for head and legs accents
  • 03
    White (Color B) - quantity as needed for muzzle and feet
  • 04
    Light Green (Color C) - quantity as needed for shirt
  • 05
    Dark Green (Color C) - quantity as needed for overalls
  • 06
    Brown (Color D) - quantity for ears, nose and tail

β€” Tools Required

  • 01
    Crochet hook size 2.5 mm (or size that fits your yarn)
  • 02
    Scissors
  • 03
    Polyester stuffing
  • 04
    Tapestry needle for sewing and weaving ends
  • 05
    Stitch marker
  • 06
    Pins for assembly
  • 07
    Safety eyes (recommended size to match photos)
  • 08
    Optional: small buttons for overall straps

Progress Tracker

0% Complete

β€” Abbreviations :

Infos :

blo - back loop. ch - chain. cr - crochet. dc - double crochet. dc3tog - double crochet three together. dec - decrease. flo - front loop. hdc - half double crochet. FO - Fasten Off. inc - increase. rnd(s) - round(s). sc - single crochet. sc3tog - single crochet three together. slst - slip stitch. st - stitch. tr - treble stitch. (...) - number in parentheses indicates the number of stitches at the end of the round. [...] - repeat instructions x times or to the end of the round. (...) - work the stitches all into the same stitch.

β€” Materials :

Infos :

Yarn. 2.5 mm hook size or a size that fits your yarn. Scissors, stuffing, tapestry needle, stitch marker and pins. Main Color: Mustard A: White B: Light Green C: Dark Green D: Brown. FINISHED SIZE Around 20 cm in circumference, about 10 cm in length.

β€” Head :

Rnd 1 :

6 sc in a magic ring

Rnd 2 :

6 sc inc(12 sc)

Rnd 3 :

(6 times)1 sc into sc next inc(18 sc)

Rnd 4 :

(6 times)2 sc into sc next inc(24 sc)

Rnd 5 :

(6 times)3 sc into sc next inc(30 sc)

Rnd 6 :

(6 times)4 sc into sc next inc(36 sc)

Rnd 7 :

(6 times)5 sc into sc next inc(42 sc)

Rnd 8 :

(6 times)6 sc into sc next inc(48 sc)

Rnd 9-17 :

(9 ring)sc into sc(48 sc) Install the safety eyes between rnd 15-16. There will be 9 sc in between.

Rnd 18 :

12 sc into sc (9 sc inc)6 sc into sc (9 sc inc)12 sc into sc(66 sc)

Rnd 19-26 :

(8 ring)sc into sc(66 sc)

Info :

Stuff the head tightly. Keep filling as you go.

Rnd 27 :

(6 times)9 sc into sc next dec(60 sc)

Rnd 28 :

(6 times)8 sc into sc next dec(54 sc)

Rnd 29 :

(6 times)7 sc into sc next dec(48 sc)

Rnd 30 :

(6 times)6 sc into sc next dec(42 sc)

Rnd 31 :

(6 times)5 sc into sc next dec(36 sc)

Rnd 32 :

(6 times)4 sc into sc next dec(30 sc)

Rnd 33 :

(6 times)3 sc into sc next dec(24 sc)

Rnd 34 :

Sc into sc (24 sc)fo. Leave a long thread for sewing.

β€” Legs :

Rnd 1 :

6 sc in a magic ring

Rnd 2 :

6 sc inc(12 sc)

Rnd 3 :

(6 times)1 sc into sc next inc(18 sc)

Rnd 4 :

only in flo sc into sc(18 sc)

Rnd 5-8 :

(4 ring)sc into sc (18 sc)

Info :

Main Color

Rnd 9-20 :

(12 ring)sc into sc(18 sc)

Rnd 21 :

Bring the legs together. make 4 ch in between.

Rnd 22 :

18 sc into sc 4 ch into sc 18 sc into sc ch next ring 4 sc(44 sc)

Rnd 23-29 :

(7 ring)sc into sc(44 sc)

Rnd 30 :

(6 times)6 sc into sc next dec(38 sc)

Info :

B Color

Rnd 31-37 :

(7 ring)sc into sc(38 sc)

Rnd 38 :

(6 times)4 sc into sc next dec(32 sc)

Rnd 39 :

2 times)14 sc into sc next dec(30 sc)

Rnd 40-43 :

(4 ring)sc into sc(30 sc)fo.

β€” Arms :

Rnd 1 :

6 sc in a magic ring

Rnd 2 :

6 sc inc(12 sc)

Rnd 3-6 :

(4 ring)sc into sc (12 sc)

Rnd 7 :

Only in flo sc into sc(12 sc)

Info :

B Color

Rnd 8-22 :

(15 ring)sc into sc(12 sc)

Rnd 23 :

Flatten the needle in both layers.

Info :

6 sc fo. Do not fill the sleeves.

Arms Detail :

Only in blo sc into 3 ch fo.

β€” Overalls :

Info :

C Color - Make 2

Rnd 1 :

20 ch

Rnd 2 :

20 ch into sc(20 sc)

Rnd 3-11 :

(9 ring)sc into sc(20 sc)fo.

Rnd 12 :

Bacakları birleştirin. sc into sc(40 sc)

Rnd 13-22 :

(10 ring)sc into sc (40 sc)

Rnd 23 :

24 sc into sc turn

Rnd 24 :

8 sc into sc turn

Rnd 25 :

8 sc into sc fo.

Info :

Hangers - Make 2. 18 ch 18 ch into 18 sc fo. Leave a long thread for sewing.

β€” Pockets :

Info :

C Color - Make 2

Rnd 1 :

5 ch .5 ch into 5 sc turn

Rnd 2 :

sc into sc(5 sc)turn

Rnd 3 :

sc into sc (5 sc)fo.

Info :

Leave a long thread for sewing

β€” NOSE and NOSE TIP :

NOSE TIP - D Color :

Rnd 1- 2 ch into 2 sc turn

Rnd 1 :

2 ch into 2 sc turn

Rnd 2 :

1 sc inc 2 sc into sc (3 sc)turn

Rnd 3 :

1 sc inc 3 sc into sc(4 sc)turn

Rnd 4 :

1 sc inc 4 sc into sc(5 sc)turn

Rnd 5 :

1 sc inc 5 sc into sc(6 sc)fo.

Info :

Leave a long thread for sewing.

NOSE - A color :

Rnd 1- 5 ch ch into sc(10 sc)

Rnd 1 :

5 ch ch into sc(10 sc)

Rnd 2 :

1 sc inc 4 sc into sc 1 sc inc(12 sc)

Rnd 3 :

1 sc inc 5 sc into sc 1 sc inc (14 sc)

Rnd 4 :

1 sc inc 6 sc into sc 1 sc inc(16 sc)

Rnd 5 :

1 sc inc 7 sc into sc 1 sc inc(18 sc)fo.

Info :

Fill the nose, leave a long thread for sewing. Sew the nose between the 2 eyes between Rnd 16-20. fo.

β€” Ears :

Info :

D COLOR - MAKE 2

Rnd 1 :

6 sc in a magic ring

Rnd 2 :

6 sc inc(12 sc)

Rnd 3 :

(6 times)1 sc into sc next inc(18 sc)

Rnd 4 :

(6 times)2 sc into sc next inc(24 sc)

Rnd 5 :

(6 times)3 sc into sc next inc(30 sc)

Rnd 6-10 :

(5 ring)sc into sc(30 sc)

Rnd 11 :

(6 times)3 sc into sc next dec(24 sc)

Rnd 12-15 :

(4 ring)sc into sc (24 sc)

Rnd 16 :

(6 times)2 sc into sc next dec(18 sc)

Rnd 17-21 :

(5 ring)sc into sc(18 sc)

Rnd 22 :

Flatten the needle in both layers. 9 sc fo.

Info :

Leave a long thread for sewing.

β€” Queue :

Info :

D Color

Rnd 1 :

6 sc in a magic ring

Rnd 2 :

6 sc inc(12 sc)

Rnd 3 :

(3 times)3 sc into sc next inc(15 sc)

Rnd 4-6 :

(3 ring)sc into sc(15 sc)

Rnd 7 :

(3 times)3 sc into sc next dec(12 sc)

Rnd 8-12 :

(5 ring)sc into sc(12 sc)

Rnd 13 :

(4 times)1 sc into sc next dec(8 sc)

Rnd 14-15 :

(2 ring)sc into sc(8 sc)

Rnd 16 :

Flatten the needle in both layers. 4 sc fo. Leave a long thread for sewing.

Assembly Instructions

  • Install the safety eyes between rounds 15-16 of the head, leaving 9 single crochet stitches between the eyes before securing the washers.
  • Sew the small nose tip (D color) and the nose (A color) between the eyes; place the nose between the two eyes between rounds 16-20 and secure with the long tail.
  • Attach the ears to the top sides of the head using the long thread left after finishing Rnd 22 of each ear; flatten the needle layers and sew through both layers for a neat edge.
  • Bring the legs together at Rnd 21 and join with 4 chains between them, then continue with Rnd 22 to form the body base before stuffing and shaping.
  • Position arms and sleeves on each side of the body and flatten the needle in both layers at Rnd 23 of the arms before finishing; do not overstuff sleeves.

Important Notes

  • πŸ’‘Use stitch markers to keep track of the beginning of each round, especially when working increases and decreases.
  • πŸ’‘Stuff parts gradually and firmly as you go for even shaping; overstuffing can distort the shaping while understuffing will make pieces floppy.
  • πŸ’‘Leave long tails when you fasten off for sewing pieces together, and check placement before final stitching for symmetry.

This Handsome Dog amigurumi makes a heartwarming handmade gift or a special addition to your toy collection. Crochet this sweet dog with expressive features, floppy ears and tiny overalls for a charming finish. Happy crocheting and enjoy every stitch! 🧢🐢✨

You ask,

we answer.

FAQs

What size will the finished piece be?

The finished amigurumi measures approximately 20 cm in circumference and about 10 cm in length using the recommended hook and yarn.

Can I use different yarn weights for this pattern?

Yes, you can use different yarn weights but this will change the final size; adjust your hook to suit the yarn and check gauge by comparing a small swatch.

Do I need prior crochet experience for this pattern?

This pattern is rated intermediate, so basic knowledge of single crochet, increases, decreases and simple assembly is recommended.

How long does this project typically take to complete?

Most crocheters finish this project in 5-7 hours, though the time can vary with experience, customization and finishing details.