🧢 Beautiful ✨ Detailed πŸ’ Adorable

Granny Clusters Crochet Skirt Pattern

Granny Clusters Crochet Skirt Pattern
4.5β˜… Rating
5-7 Hours Time Needed
2.5K Made This
βœ‚οΈ

Beginner Friendly Level

Perfect for those just starting their crochet journey, with clear instructions and simple techniques

⏱️

Weekend Treat

Takes 5-7 hours, making it an enjoyable project to finish over a couple of days.

✨

Stylish Touch

An elegant detail to elevate any look, combining traditional techniques with contemporary design sensibilities.

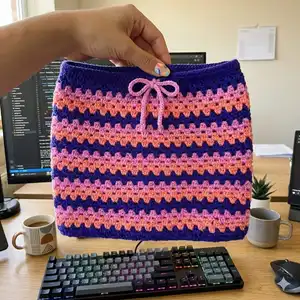
About This Granny Clusters Crochet Skirt Pattern

This pattern creates a flattering granny-cluster striped skirt worked in the round with a comfortable elastic-style waistband and a drawstring. It uses Caron Simply Soft yarn in three contrasting colors for bold horizontal stripes. The pattern includes stitch diagrams, a stitch key and all finishing steps to sew and thread the drawstring casing.

Granny Clusters Crochet Skirt Pattern crochet pattern - detailed view of completed project

Written for multiple sizes from XS/S through 4/5XL, the instructions show changes for larger sizes in color-coded numbers. Diagrams for the granny cluster and waistband are included to help you visualize each section.

Why You'll Love This Granny Clusters Crochet Skirt Pattern

I absolutely love this pattern because it combines the timeless granny cluster motif with a practical wearable shape. I enjoy how the stripe pattern lets you play with color combinations to create a unique skirt each time. The waistband construction is clever and comfortable, and the drawstring makes fit adjustments simple. I take pride in how beginner-friendly the instructions are while still producing a polished, stylish finished garment.

Granny Clusters Crochet Skirt Pattern step 1 - construction progress Granny Clusters Crochet Skirt Pattern step 2 - assembly progress Granny Clusters Crochet Skirt Pattern step 3 - details and accessories Granny Clusters Crochet Skirt Pattern step 4 - final assembly and finishing

Switch Things Up

I love how easy it is to customize the colors in this skirt; try pastel shades for a soft summer look or high-contrast brights for a bold statement.

To make the skirt larger or smaller, adjust the starting chain count proportionally and always check gauge to keep shaping accurate.

Swap the yarn weight and use a larger hook for a chunky, cozy skirt or a finer yarn for a delicate, lightweight version suitable for warmer weather.

I often add a decorative trim at the hem β€” a round of sc or picot stitches gives a pretty finish and helps stabilize the edge.

You can lengthen the skirt by repeating more stripe pattern repeats; each 6-rnd Stripe Pat equals one repeat of the color sequence.

For a different texture, try substituting the granny clusters with V-stitches or shell stitches while maintaining the same stitch multiples.

If you prefer a smoother waistband, make a separate ribbed waistband piece and sew it onto the top of the skirt for extra elasticity.

Consider adding a small lining if you want more opacity or a smoother feel next to the skin; sew it in before attaching the waistband casing.

I like to experiment with metallic or sparkly accent yarn for the drawstring to add a little shine without changing the main fabric.

To convert to a mini or midi, simply stop repeating the Stripe Pat when the skirt reaches your desired length and proceed to the waistband instructions.

Embroider a small motif or initials near the hem for personalization or make matching accessories like a headband or scrunchie using leftover yarn.

Common Mistakes & How to Fix Them

βœ— Skipping the note to carry unused colors loosely up the wrong side can cause bulky seams; carry yarn loosely along WS to avoid tightness and bumps. βœ— Not checking gauge before starting results in an incorrect finished size; work a 4" [10 cm] gauge swatch of 13 sc and 14 rows and adjust hook if necessary. βœ— Twisting the foundation chain when joining to form a ring makes the skirt warp; lay the chain flat and double-check before joining with a slip stitch. βœ— Forgetting that Ch 2 at the beginning of a round does not count as a stitch can throw off your stitch counts; always follow the pattern counts and treat Ch 2 as a turning chain only.

Granny Clusters Crochet Skirt Pattern

Make a stylish, striped granny cluster crochet skirt using Caron Simply Soft yarn. This easy, weekend-friendly pattern guides you through the granny cluster stitch, waistband facing and a handy drawstring for a comfortable fit. You will enjoy creating bold color stripes and a flattering silhouette with clear step-by-step instructions and diagrams.

Beginner Friendly 5-7 Hours

Materials Needed for Granny Clusters Crochet Skirt Pattern

β€” Main Fabric

  • 01
    Caron Simply Soft (6 oz/170 g; 315 yds/288 m) main yarn
  • 02
    Contrast A: Iris (39747) - 1 ball (approx 277/253/305/335/368/423/508 yds per size as shown in pattern table) - refer to size table for exact yardage
  • 03
    Contrast B: Strawberry (COL0015) - 1 ball (approx 182/166/200/220/242/278/334 yds per size) - refer to size table for exact yardage
  • 04
    Contrast C: Blackberry (39792) - 1 ball (approx 153/139/168/185/203/234/281 yds per size) - refer to size table for exact yardage

β€” Tools Required

  • 01
    Crochet hook size U.S. G/6 [4 mm] Susan Bates Silvalume or size needed to obtain gauge
  • 02
    Susan Bates yarn needle
  • 03
    Scissors
  • 04
    Stitch markers (optional)
  • 05
    Tape measure
  • 06
    Polyester stuffing (not required for this project)
  • 07
    Pins for assembly (optional)

Progress Tracker

0% Complete

β€” Abbreviations :

Infos :

Approx = Approximately. Beg = Beginning. Ch = Chain(s). Cont = Continue(ity). Dc = Double crochet. Hdc = Half double crochet. Pat = Pattern. Rem = Remain(ing). Rep = Repeat. Rnd(s) = Round(s). Sc = Single crochet. Sl st = Slip stitch. Sp(s) = Space(s). St(s) = Stitches. WS = Wrong side. Yoh = Yarn over hook.

β€” Gauge :

Info :

13 sc and 14 rows = 4" [10 cm].

β€” Instructions :

Info :

The instructions are written for smallest size. If changes are necessary for larger sizes the instructions will be written thus XS/S (M-L-XL-2/3XL-4/5XL). Numbers for each size are shown in the same color throughout the pattern. When only one number is given in black, it applies to all sizes.

Info :

Notes: Carry color not in use loosely up WS of work. Ch 2 at beg of rnd does not count as st.

Info :

Stripe Pat: With A, work 2 rnds. With B, work 2 rnds. With C, work 2 rnds. These 6 rnds form Stripe Pat. See diagram on page 3.

Info :

With A, ch 120 (132-144-165-183-204). Join with sl st to first ch to form a ring, being careful not to twist chain.

Round 1 :

Setup rnd: Ch 1. 1 sc in each ch around. Join with sl st to first sc.

Round 2 :

Beg working in Granny Cluster Pat as follows: With A, ch 2. 3 dc in same sp as sl st. Skip next 2 sc. *3 dc in next sc. Skip next 2 sc. Rep from * to end of rnd. Join with sc to top of first st.

Round 3 :

With A, ch 2. 3 dc around joining sc. *Skip next 3 dc. 3 dc between 3 dc just skipped and next 3 dc. Rep from * to end of rnd. Join with sc to top of first st.

Info :

First 2 rnds of Stripe Pat are now in place.

Info :

Keeping cont of Stripe Pat, rep 1st and 2nd rnds until work from beg measures 16 (16-17-18-20-21)" [40.5 (40.5-43-45.5-51-53.5) cm]. Break B and C.

β€” Waistband and Facing :

Round 1 :

With A, ch 1. Skip joining sc. 1 sc in each st around. Join with sl st to first sc. 120 (132-144-165-183-204) sc.

Round 2 :

Ch 2. Working in front loops only, 1 hdc in each sc around. Join with sl st to first hdc.

Round 3 :

Ch 2. 1 hdc in each of next 58 (64-70-80-89-100). Ch 1. Skip next hdc. 1 hdc in each of next 2 (2-2-3-3-2) hdc. Ch 1. Skip next sc. 1 hdc in each st to end of row. Join with sl st to first hdc.

Round 4 :

Ch 2. Working in back loops only, 1 hdc in each st and ch-1 sp around. Join with sl st to first hdc.

Round 5 :

Ch 2. 1 hdc in each hdc around. Join with sl st to first hdc. Fasten off.

β€” Drawstring :

Drawstring (P1) :

First st: With C, ch 2. Draw up a loop in 2nd ch from hook. Yoh and draw through 1 loop on hook - ch made. Yoh and draw through 2 loops on hook - sc made. Rem sts: *Draw up a loop in "ch" of previous st. Yoh and draw through 1 loop on hook (ch). Yoh and draw through 2 loops on hook. Rep from * until Drawstring measures length to fit waist measurement and approx 12" [30.5 cm] extra length to tie. Fasten off.

β€” Finishing :

Info :

Fold Waistband between 3rd and 4th rnds, ensuring sts are aligned. With WS facing, join A with sl st to any unworked loop from sts worked in 1st rnd.

Info :

Ch 1. Working up through unworked loops from 2nd rnd, and through both loops of sts worked in 5th rnd, work in sl st to create waistband casing around top of Skirt. Join with sl st to first sl st. Fasten off.

Info :

Using ch-1 sps worked in 3rd rnd of Waistband as eyelets, thread drawstring through Waistband casing.

β€” Diagrams & Stitch Key :

Info :

See diagrams on page 3 for Waistband Pattern and Granny Cluster Pattern. Stitch Key: oval = chain (ch). dot = slip stitch (sl st). + = single crochet (sc). T = half double crochet (hdc). T with extra vertical = double crochet (dc). Curved symbols indicate worked in back loop only or front loop only as shown in diagram.

Assembly Instructions

  • Fold the Waistband between the 3rd and 4th rounds so the stitches align, then join A with a slip stitch to any unworked loop from the stitches worked in the first round.
  • Create the waistband casing by working slip stitches through the unworked loops from round 2 and through both loops of stitches worked in round 5; join with a slip stitch to finish the casing.
  • Thread the drawstring through the ch-1 spaces worked in round 3 of the waistband to form a functional tie that can be adjusted for fit.
  • Break off Contrasts B and C when the skirt measures the required length from the beginning and secure ends before starting the waistband facing.
  • Ensure stripes line up and color carries are kept on the wrong side when changing colors to maintain a neat appearance.
  • Weave in all ends securely on the wrong side and trim excess, ensuring the drawstring ends are left long enough to tie.

Important Notes

  • πŸ’‘Carry color not in use loosely up the wrong side of work to avoid pulling and uneven tension.
  • πŸ’‘Ch 2 at the beginning of rounds does not count as a stitch; follow stitch counts accordingly.
  • πŸ’‘Check your gauge of 13 sc and 14 rows = 4" [10 cm] before starting to ensure correct sizing.
  • πŸ’‘When joining the foundation chain, make sure it is not twisted to keep the skirt shape even.
  • πŸ’‘Break contrast colors B and C when instructed and fasten off cleanly to create neat stripe transitions.

This granny clusters skirt brings classic crochet texture into a wearable, modern silhouette with bold stripes and a comfortable waistband. Choose three contrasting colors to express your personal style and enjoy the satisfying rhythm of granny clusters as the skirt grows. Perfect for gifting or adding a handmade staple to your wardrobe 🧢✨

You ask,

we answer.

FAQs

What size will the finished piece be?

The finished skirt measures approximately the finished hip sizes listed: XS/S 37" [94 cm], M 40Β½" [103 cm], L 44Β½" [113 cm], XL 51" [129.5 cm], 2/3XL 56Β½" [143.5 cm], 4/5XL 63" [160 cm].

Can I use different yarn weights for this pattern?

Yes, you can use a different yarn weight, but this will change the finished size and drape; be sure to make a gauge swatch and adjust hook size accordingly.

Do I need prior crochet experience for this pattern?

This pattern is rated Beginner Friendly and uses simple stitches like dc, hdc and sc with a repeating granny cluster motif; basic knowledge of these stitches is helpful.

How long does this project typically take to complete?

Most crocheters complete this skirt in 5-7 hours depending on experience, size made and the number of stripes you choose.